Outboard Motor repair with Pocketknife
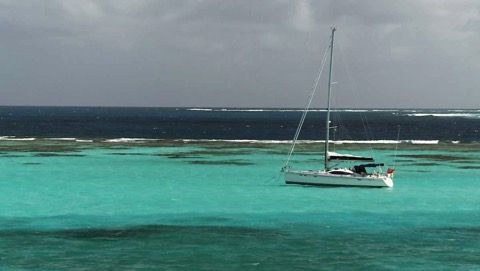
Oops, managed to shear off the fuel cut-off lever on our little Honda outboard. Here we are in paradise and now we can’t get around to explore these gorgeous islands!! Where is the nearest agent for Honda?
Nearest agent will not be available over Christmas and will not have the part in stock so I will try to fix it myself.
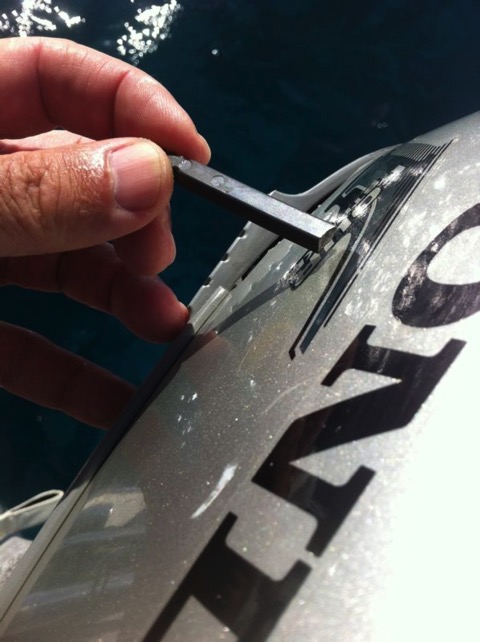
Removing the cover we see the actual valve appears intact but is back in under the air filter. So it appears to still work but can’t be reached with the cover in place.

Checking the casing I find it is made of a soft plastic and my pocketknife (Gerber multitool) easily whittles an expansion to the slot where the lever used to protrude.
I test this a couple of times to get the hole just big enough for my finger to reach in.
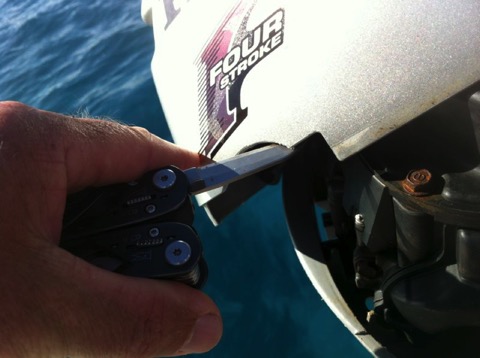
Finger or thumb can now reach inside to pull the stub of valve-lever over from open-close-open.
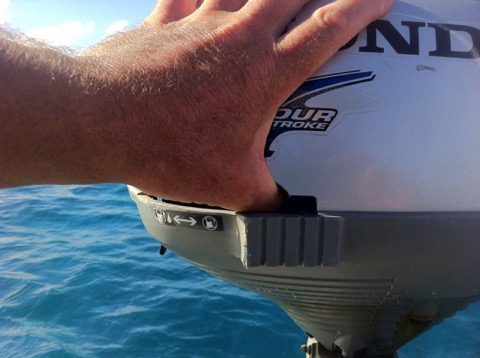
Practice this new operation a few times!
Back in Business!! So we do have a working outboard to explore paradise!
What does Christmas Cost?
We went out to the local ACE hardware in Grenada to get some lights and find out!
We got two strings of outdoor lights - important if you plan on hanging them outside!! Strangely in Grenada which is a 220V country - they only seem to sell 110V Christmas lights. This means that anyone like us with a 220V boat will also need a transformer to step down the 220 to 110....
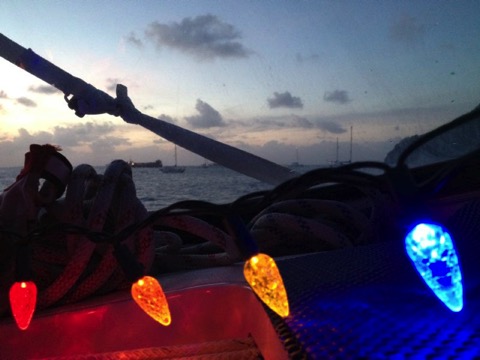
Purchased - 2 X strings of 50 LED bulbs (each 12 feet long) = 24 feet long by with 100 bulbs. + 1 small transformer
The lights cost $26 and the transformer was $19 (US$)
Testing - sadly our first test didn’t work - the bulbs lit for just a couple of seconds and went out. A test with my voltmeter showed the transformer was defective and output 220V when its supposed to output 110 - it blew the bulbs...
Back to ACE hardware in Grenada where the very friendly staff replaced the transformer as well as the lights and tested the new transformer to see worked properly.
Back on board again for a test.
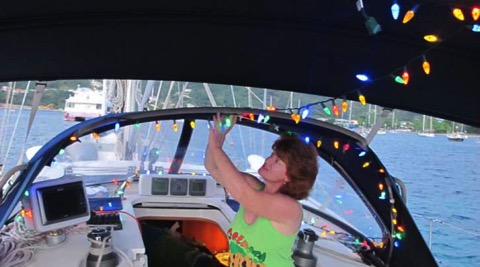
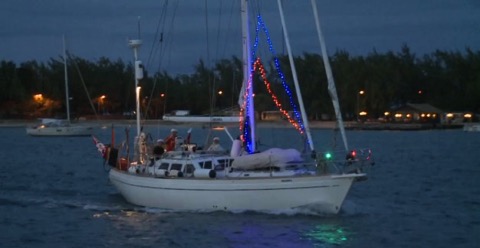
We string the lights and plug in. Perfect.
But what does it COST us in power to run this.
Checking the ship’s main power monitor - the MasterVolt Shunt display indicates the whole setup is using just about 6 watts - thats half an amp at 12V. Whoa!! That is great!
Comparing it another way - our old anchor light used a 10W bulb and we ran it every night at anchor - but all these 100 christmas lights together are just 6watts and that even includes the transformer. One of our old reading lights on Two-Step used more power than this!
So what does it cost to decorate the cruising boat with Christmas lights? Not as much as you might think!
Merry Christmas Everyone!
Crew Harmony - Keeping the cruising spouse happy!
I am sure many sailors would like to introduce their spouse (or potential spouse), friends and family to the rewarding sport of sailing and cruising. But for some reason this doesn't always go the way we hope and new crew are often not keen to continue sailing. But have no fear! It is possible by carefully planning cruises and managing the sailing experience, to encourage that commitment to the sport in the novice or even the unwilling crew.
As much as I would like to take credit for these ideas, I am afraid they are almost all credited to other cruisers we have met over the years who I am certain are still happily cruising!
So here are some time-tested hints for the skipper who wants to keep a happy crew.
- Plan departure times and stick rigidly to these plans. Discipline is important on board and small items like strong headwinds, stormy weather, and imposed deadlines build character as well as crew morale.
- Don't involve the crew or your spouse in destination and passage plans. It will be a fun surprise when you announce you are now ready to achieve your lifelong goal of crossing an ocean to your tentative crew. They will appreciate your confidence in them and will overcome their worries and love it!
- Plan as many tough ocean passages as possible. Nothing like "Offshore, Ocean, Overnight" sailing to get the beginner sailor up to speed quickly!
- Install a loudspeaker on deck and use it to urge your crew on while you are coming in to dock "Susan, hurry up and get that dock line on" and "You could use a bit of practice tossing that line Honey" are a couple of suggested comments. This allows other boats in the marina to appreciate your crew's level of teamwork!
- Assign the crew some jobs on deck as their skills build. For instance, in the event you slightly misjudge a docking approach, a crew member can help push the boat away from the dock. At sea commands such as "Ease off the port spinnaker pole topping lift" can be happily given without worrying they might be misunderstood by new crew. Better they get right in and learn these things.
- Polishing stainless is another good job for building confidence, but be careful about letting the crew think they are getting ahead of themselves. After all, you know who the captain is!!
- Don't help with galley chores. The galley is small compared to the spouse's larger home kitchen so there isn't much room anyway. As skipper you can stay up on deck in the fresh air, doing the hard work steering and tweaking the sails. Heeling the boat over while the chef is working increases their sense of accomplishment. When they come up for air you can call them the "galley slave" to show how much you appreciate the job they have done.
- Landlubbers are not that familiar with water use on a sailboat. Simple exercises like offering the crew 1 litre of water to shower in can build this skill. Soon the sailing spouse will happily be showering in a teacup of water!
- Laundry facilities in various islands are somewhat limited and can be expensive. Why spend money needlessly that could be better spent on extra boat-parts! Learning to do laundry in a bucket will give the spouse a new life skill. No need for the skipper to help out here as we don't want to impinge on that special feeling of nautical accomplishment.
- Carefully squash any plans for extraneous activities such as sightseeing, historical visits, or shopping in exotic foreign markets. This time can be better employed (especially after a tough passage) by servicing the head pumps or changing the oil in the engine. Spouses appreciate the opportunity to learn these jobs! And the lighter crew can also overcome their fear of heights by being winched up the mast to do work aloft.
I am sure you will come up with many more ways to improve crew morale and keep the cruising spouse happy! ;-)
And if these methods seem unlikely to work with your particular spouse or potential crew - watching a nice episode of Distant Shores might be a better idea... Sheryl and I have cruised together happily for 24 years by keeping it fun, respecting each other’s fears, and taking things gradually. Romance and charm works wonders. And I insist Sheryl does everything I tell her to... :-)
Comments Welcome!
Battery Bank Design, Care and Monitoring
The Story
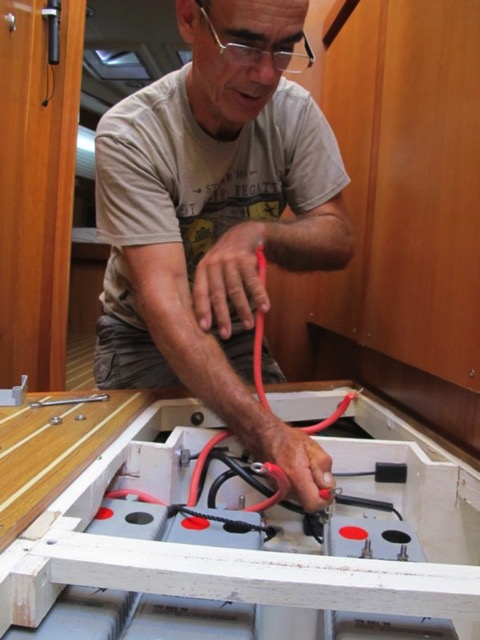
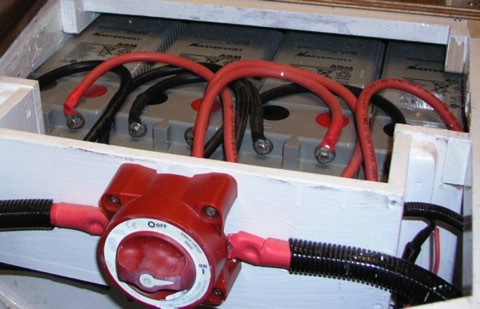
We left Distant Shores II in the water here in Port Louis Marina in Grenada. It is a lovely marina and we had just planned a short trip home, but ended up staying home for 8 weeks. Normally we will haul the boat out and lay it up for a 2 month period, then the batteries are shut down. In this case we left the boat plugged in and basic systems switched on - bilge pumps, alarm etc. When we came back and opened the boat last Wednesday, the batteries were overheating and the whole compartment was too hot to handle! I estimate it was 100°C. Yikes!
I disconnected the charger, we aired the boat and slept. Clearly the batteries were ruined and we very nearly had a fire on board!
First thing in the morning we called Mike Hulbert our contact at our excellent yacht insurance company - Pantaenius Yacht Insurance in the UK - who passed our info on to claims. Simon Firth was next to be in touch from Pantaenius and had a surveyor over to the boat in just a few hours! Shout out to both Pantaenius and surveyor, Bob Goodchild, for such quick service. Bob did an inspection and measured the temperature of the batteries with a laser heat sensor.
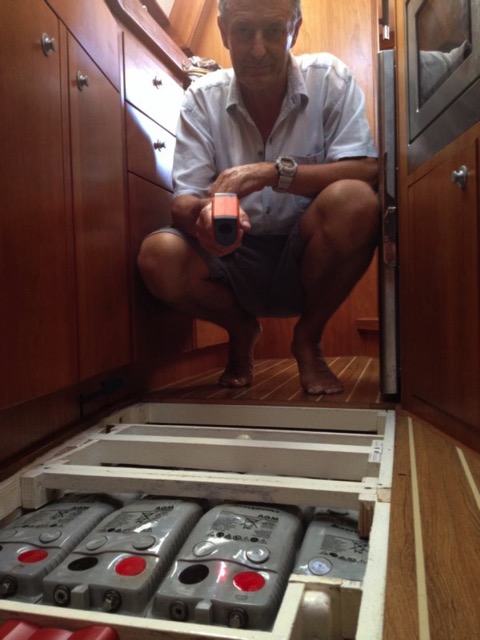
I must say here that I believe the Mastervolt Batteries we have installed on Distant Shores II (and were also on Distant Shores) are the best batteries we have ever had, and are the highest quality AGM batteries available. Electrician, Alan Reynolds, from X-Marine who later came to do an inspection and wire up the batteries as required by the insurance company, also agreed that they were top quality batteries. We have been cruising nearly full time for 4 years, and their capacity appeared to be still as good as they were when we took delivery of Distant Shores II in England in 2010.
The batteries are sealed AGM and obviously hot gases had caused them to expand - but they didn’t crack or burst. Mastervolt make incredibly tough and well engineered products. They have an excellent and well justified reputation in the marine industry.
We must determine what transpired to cause this and are naturally keen to make certain this never happens again. We have looked at the clues and tried to reconstruct a series of events that could explain the problem.
Scenarios
- Perhaps one of the automatic bilge pumps cycled on drawing current consistently...
- If the shore-power breaker somehow tripped off then the battery would be drained over a period of days - flattening the battery. If this continued to draw the battery right down to 0V then one of the cells might be damaged?
- When the power came back on the charger pumped power in but couldn’t charge the batteries due to the bad cell.
- The battery bank might heat up. AGM batteries are somewhat more susceptible to thermal runaway but the excellent Mastervolt Charger is designed to detect the high heat and shut the charger down. It has a sensor to detect battery heat and turn off the charger.
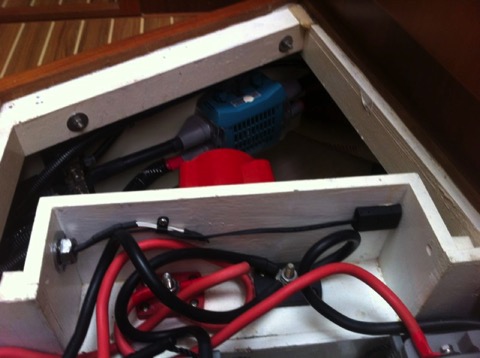
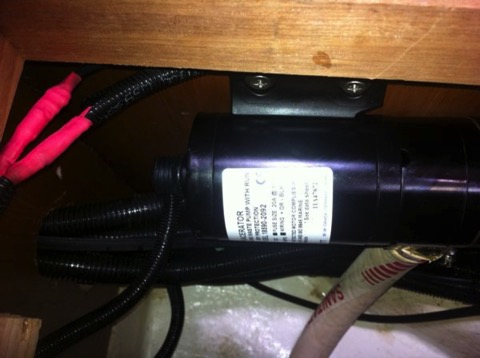
We may never know exactly what occurred to cause this. But one major factor appears to be the battery charger did not shut down the charge even when the whole compartment overheated - reaching nearly 100°C. The charger is supposed to cut current off if the temperature reaches 50°C. Here is the black matchbox size temp sensor installed in the battery box. I emailed Mastervolt technical support with photos. They wrote back directly.
2 Problems
- Mastervolt advise this sensor be directly stuck on the battery - I will move it
- The sensor is wired up to the Shunt Battery monitor instead of connected directly to the Charger. So the charger doesn’t get the info on battery temp.
Solutions
I will buy another sensor and connect it to the charger directly. This will prevent a recurrence of the thermal meltdown we found when we returned. However this does highlight a deeper problem which I think is common to many marine power installations. Our boats have become technically complicated, and if one component fails the resulting cascade of problems can be severe. If we are on board these will likely be caught by the observant boat owner, but if unattended the problems can multiply. My hope is to add a system to monitor the vital stats of the boat when we are away.
New Batteries
The Mastervolt Slimline batteries are an unusual shape - tall and thin, and I was worried we wouldn’t be able to replace them easily. What a surprise to find Island Water World here in Grenada actually had 3 of them in stock - on sale no less!! We bought all three. I will get the fourth at the next St Lucia in a couple of weeks. Although I normally do all the electrical work myself, Pantaenius wanted us to have an electrician check over the whole system. Alan came by (on a Sunday!) to check out the system , connect up the batteries and wrote a comprehensive report.
Recommendations
I am investigating monitoring options to see if there is a way to have a device that would call us if error conditions exist. For instance, if the bilge pump comes on, voltage of the battery goes below 12.5 volts, or above 13.8.
Mastervolt have a GPRS interface for their network that appears it might do what I need. It sends a text message with the info that is available on the power system (volts, amps, temperature etc) but I don’t think it can trigger an alarm if the bilge pump is on.
If anyone has experience with such a device, or experienced a similar problem, please chime in with comments below!
Top 10 Canal Journeys
If you dream of exploring foreign countries by water, then the inland waterways and canals are a great way to see the inside of the country. I have just finished editing the last episode of Season 9 Distant Shores (here on Vimeo) - all about travelling on canals and waterways - and thought I could try to summarize and compare these voyages. Over 24 years we have made journeys on a dozen different canal systems. Here are our favourites. Honestly I did try to put them in order but it was too difficult. They were all fun!
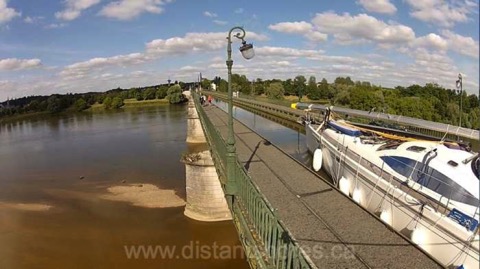
Right across France by boat!! There are numerous routes but all require the mast down as the small canals have clearances of just 3.5 meters. It is a modern route up the Seine to Paris though, so if you just want to visit Paris clearances are higher - 5.5 meters to enter into the excellent Arsenal Basin marina.
We did the whole trip across France in 10 weeks but this included 10 days in Paris, and many other stops. If you plan to take your own boat it should probably be less than 1.7 meters to enjoy the trip. You can also rent boats at different areas along the way. Here are links to blogs on preparing for the Canals, taking the mast down, fendering, and general recommendations.
USA - ICW
The US Intra-Coastal Waterway (or ICW) will always have a warm spot in our hearts as it was part of our first big cruise - leaving Canada and heading south to the Bahamas back in 1989. The whole 900-odd miles we travelled from Norfolk to Ft Lauderdale took us roughly 5 weeks with many great stops along the way including charming towns, nice anchorages, friendly folks and some challenging navigation. Nowadays it has shoaled up somewhat in certain areas but I think is still a fun trip. You have a height clearance of 64 feet so it's a "mast-up" route for most boats.
Scottish Canals
The Crinan & Caledonian Canals are also "mast-up" routes for most boats (27 meters clearance to transit the Caledonian), deep and well maintained. The Crinan is short and could be done in 6 hours but we divided it in half staying the night along the way, and at the end. The Caledonian is much longer allowing you to cross Scotland and go through Loch Ness en route to Inverness. Pubs and a few cute villages en route plus spectacular scenery!
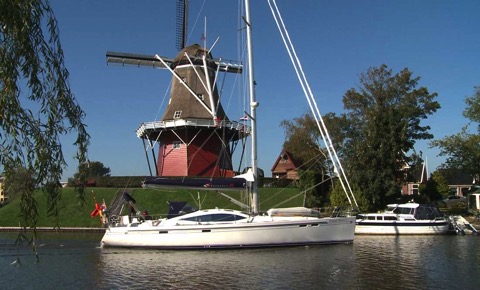
We were surprised by how lovely this trip was! It had been difficult to get good info on the Dutch Canals so perhaps we hadn’t understood just how charming the dutch towns were along the way. We started at the north in the Lauwersmeer, and visited Dokkum, Leeuwarden and Lemmer before crossing the IJsselmeer to Enkhuisen, Hoorn and Amsterdam. All these stops were AMAZING... historic, friendly and neat as a pin. (here’s our blog on the Dutch Canals)
UK Narrowboat Canals
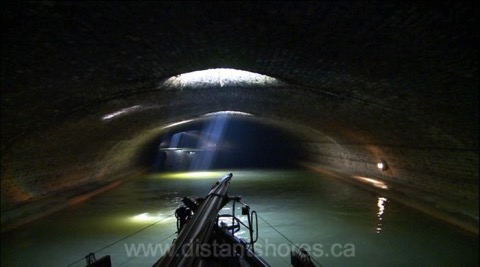
Quirky and charming, the narrow canal system in the UK is one of the oldest systems we travelled. The canals are so small you can only do it in the special narrowboats (unless you travel by canoe!) The beam is just 7 feet (including fenders) so no normal cruising boats can do this system. But narrowboats are readily available for hire and it’s a fun way to see the countryside. Chugging along a waterway that’s hardly bigger than a ditch... there are pub lunches and evenings tied to the shore in the middle of the country. It sometimes seems like you have gone back one or two hundred years. We only did 3 days on this system but could see returning to do another trip. Here’s the link to our program on Vimeo.
New York’s Erie Canal
This is a very useful short-cut from the Great Lakes to the route south. The Erie Canal is also quite fun, travelling through some lovely scenery and nice small US towns. They are actively encouraging boat traffic and some towns offer free/cheap dockage wifi etc. We recommend you add a day or two to the plan here to take advantage of this lovely route. It's not just a shortcut but a destination! At the end is the dramatically beautiful Hudson River and New York City.
44 locks and 210 miles of rivers, lakes and waterway connect Lake Ontario to Georgian Bay. The Trent-Severn Waterway crosses a very pretty area on Ontario, Canada with vacation cottage lakes and tiny old Canadian towns. Water depths are 6 feet but over 5 feet will have some issues. Height is restricted to 22 feet so its "mast-down" for sailboats. We spent 7 days coming through to Lake Simcoe. If you don’t want to bring your own boat this is another nice opportunity to rent a houseboat. Highlights are the remarkable lift locks (which we filmed) and the nice cottage lakes. Best time is June-September.
Sweden’s Gota Canal
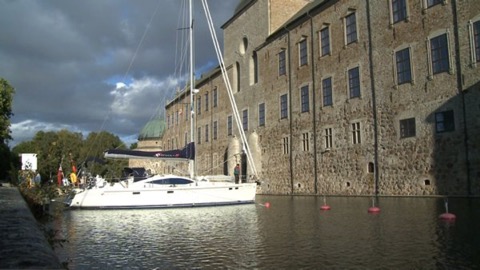
We spent more than a week crossing Sweden via the Gota Canal. We did it in September but would recommend it during the summer season. The middle section crosses lovely northern lakes with nice swimming in summer. There are some cute small towns and there was even an opportunity to moor up in the moat of a Castle!

For More info check out all my blogs related to Canals
On DVD our shows on Canals were
Season 5 - Trent Severn
Season 6 - Erie Canal & ICW
Season 7 - Narrowboats, Kiel Canal, Gota Canal, Dutch Standing Mast
Season 8 - Scottish Crinan and Caledonian Canals
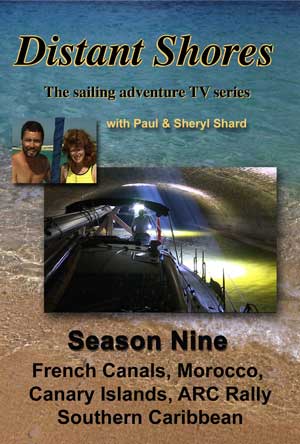
Season 9 - French Canals (5 episodes) and Great Canals Journeys
Plan your passages around the world with us aboard Distant Shores
Order the Super Pack on DVD and get Season 1-10 Downloadable.
Order the Super Pack on Vimeo and we will send you the code for Season 10 as a bonus.
Mooring Stern-To with Lazy Lines
Step 1 – Planning. Your approach will depend if you will be bow-in or stern-in. This is likely determined by your boat’s boarding options. Most boats are easiest to board over the stern and many are designed for this as it is common in Europe and the Med. However if you have lots of clutter at the stern such as a big wind-vane then it might be better to come bow-to. The marina will likely assign you a dock and you can see how the wind is blowing for your approach, whether stern or bow-to. With strong winds, or if you are worried about it many marinas can come out with a RIB tender to help nudge you in if you want help.
Step 2 – Prepare lines and fenders. You will need 2 lines to tie to the dock. Assuming we come stern-to these will be made ready astern. We put our fenders out as well planning for our neighbour boats. Generally fenders will go higher up since you aren’t coming beside a pontoon. If the neighbours have not left fenders out then you can hang all yours out. If they have a bunch of fenders out then we usually just have a couple of large ones over near the stern and the others tied on but not thrown out until we get in position.
Step 3 – Back up towards the quay and in between your neighbours. This is often tight but once you have the boat partially in place its easier since your fenders hopefully line up and you are now resting against the beam of one or both of your neighbours. Keep up the momentum and move back in lifting the fenders past neighbouring fenders so they don’t get tangled. We have one reserved as a “roving” fender in case we jostle our new neighbours. Once you get in between the other boats you have done the hard part. Now toss a stern-line ashore if there is someone waiting and pull in on the stern.
Here is an example of stern-to docking with no neighbours to help out. Its a castle in Sweden where you can dock in the moat!!
Step 4 – Pick up the "Lazy Line". These are usually left tied to the dock in the middle of your slip. Its often a light messenger line that extends down to the heavier stern line down on the sea bed. Hopefully a dockhand or fellow boater will grab the stern line and pull it up a bit so you can grab it with a boathook. Note you should be careful not to get the lazy line in the prop... Best to put the engine in neutral at this point. Lazy-lines are often VERY encrusted with an amazing variety of sea-life including slime, corals and more. Gloves are a good idea. You can "hand over hand" the line and walk forward to tie it on the bow cleat.
Step 5 – Tidy up. Tie on the other stern line, and adjust your two stern lines so you can get ashore. If there is another "insurance" lazy-line you can make that one fast too. Then make sure the lazy lines are tight enough to hold the boat off the dock in a blow. Adjust fenders etc...
Congratulations - you have moored up Mediterranean style!!
Here is a link to our video on mooring Med-Style with an anchor...
Sail Away! Excerpt - Electrical System Problems
Sail Away! A Guide to Outfitting and Provisioning for Cruising
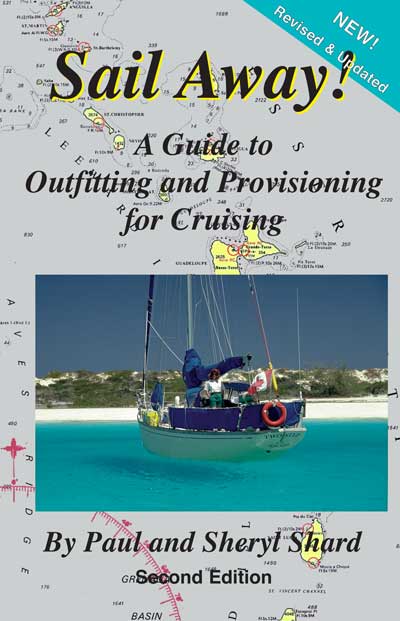
This book went on to sell nearly 11,000 copies and we are happy that so many people have told us the book helped them fulfill their cruising dreams!
I checked this morning on Amazon They have 4 "new condition" copies on sale from $153-$363 - Yikes!!!
The book has been out of print for some years now but we are starting a project to update it! Here is an excerpt from the Outfitting section...
Corrosion
The most common electrical problem, especially in saltwater, is corrosion causing a bad connection. This problem is not confined to wet bilges and areas where saltwater leaks onto and actually touches the connections. Even the salt air holds sufficient moisture and salt to start corrosion on terminals.
Different metals react to this corrosive environment in different ways. Plain copper wire, for instance, is susceptible to corrosion -- it turns the characteristic green of copper roofs. The best wire for use on a boat headed for saltwater is “tinned, stranded copper wire”. Stranded copper wire refers to the fact that a large number of fine strands of wire are run together inside the insulating core. This means the wire is much more flexible and less likely to fatigue and break if bent repeatedly. (Single strand wire commonly used in houses should not be used!) Tinned copper wire has a fine coating of tin on the outside of each strand and this is far more resistant to corrosion than plain copper. Any projects where gear is added to a boat should be done using tinned copper wire if possible.
A surprising amount of marine electrical gear comes with regular copper wire. I usually solder these bare connections before doing anything else. Even if I am not installing a new pump right away I lightly twist up the exposed strands and melt a drop of solder onto the wire. It protects it while waiting in the locker to be installed.
Connections
Many boats are wired up with crimp connections and I believe this is the best solution to the question of how to connect two wires. Experience on Two-Step and Distant Shores has shown that these connections last well BUT only when the wire being crimped is tinned first. If you don’t have tinned copper wire then it is best to protect the ends of the wires first by soldering them before crimping, when adding equipment. Then crimp a connection onto the wire and get a much better connection between the wire and the crimp fitting. Use closed end crimp connectors since they are more reliable in the event of a connection becoming loose.
Caution: Do not use acid core flux solder on any electrical connections. It will cause failure when least expected! Use rosin core solder only.
If the boat’s original wiring involves regular untinned wire with crimp connections, check any connections in damp areas and make sure they are watertight. You might be able to slip an insulating piece of heat shrink tubing over the terminal or wrap with self-amalgamating tape to protect them.
Incidentally, a copper wire that has gone green will not accept solder until it has been cleaned first -- I sometimes pull the strands between a piece of fine sandpaper a couple of times to clean them.
Hot-Hot-Hot
Generally a breeze makes it so much more comfortable, but the last few days we’ve had much lighter winds. Add in a few moquitos in the evening and I haven’t been able to get any sleep the past few nights...
I do have a couple of fans that blow air around in the fwd cabin, but these calm night there isn’t the outside breeze blowing in the hatch. Its just the same old air getting stale and warm throughout the night! Yuck!
The problem is that the cool night air is staying outside - we need that air in the cabin. So yesterday I hung up this Caframo Fan designed for just this purpose.
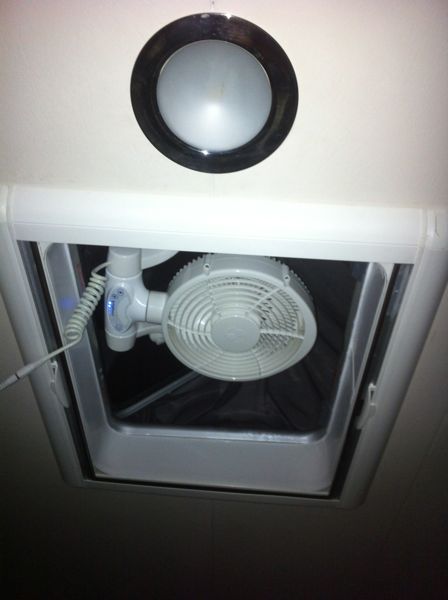
It attaches to the hatch with suction cups and plugs into a 12Volt socket.

Talk about a world of difference. With this fan on the cabin becomes cool breezy and comfortable!! The grill on the bottom there appears to be designed to spread the air around and it works great. Best nights sleep I have had in the marina!
Installing the fan was as simple as sticking on the suction cups, but I should still have read the manual first. As I was sweltering and the fan looked like a simple device I just jumped right in and started pressing buttons... suddenly the fan spun up like an Airbus 320 on takeoff - and produced a gale in the cabin of similar proportions. If I had been reading the manual it would have been blown out of my hands :-)
In the calm light of next morning I read the manual to find that this is feature! Press the small fan button and it accellerates to "Air Blast Exchange Mode" for 5 minutes before reverting to the previous set mode. RTFM - read the frickin manual Paul!!
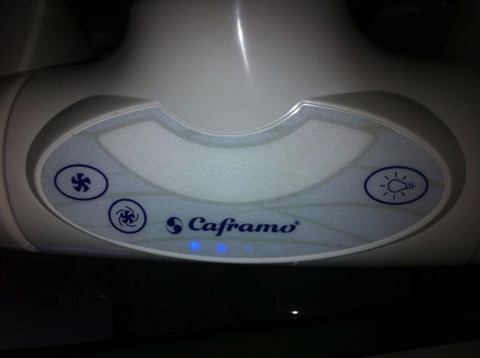
Note the large fan button adjusts the speed - the smaller button activates TURBO mode. There is even a Cabin light built in.
Current use is minimal - less than 1 amp which is difficult to measure on my monitor so I will quote from the manual again.
Speed 1 - 0.2 amps
Speed 2 - 0.5 amps
Speed 3 - 0.95 amps
AirBlast - 4.3 amps (but just for 5 minutes)
The fan also turns to act as an exhaust if desired.
Hot nights!! Bring them on!!
When the cats away... plumbing!
When the Cats Away... the mice will do plumbing projects!
I am missing Sheryl as she has flown home for a couple of weeks...
However this also means I can get to a couple of the more disruptive boat jobs. And one of the most disruptive jobs is servicing the heads (that’s toilets and plumbing in land-speak). Not only does plumbing mean I have to open up floorboards and various lockers, find the spare parts and generally make a mess, it also means a certain amount of cursing and blue language as I run into unforeseen problems.
What plumbing job doesn’t involve unforeseen problems? Well we do try our best to foresee difficulties and plan the needed parts.
Todays job involved overhauling the macerator pump...
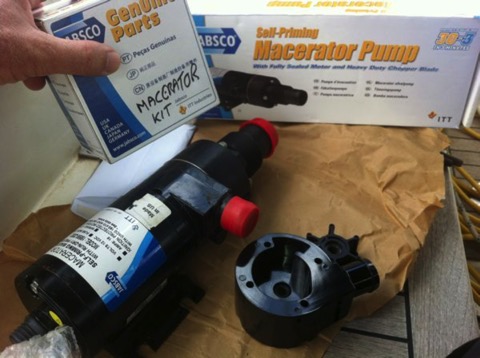
- spare parts kit for the macerator
- spare macerator
- wiring connectors to wire the new pump in (shown below installed with red shrink tube)
Why have a spare macerator if I also have a spares kit? Well my plan was to be able to quickly disconnect the pipes to the macerator, then just swap in the brand new pump. I have rebuilt these pumps before and I know it will take an hour or so. The plan was to be able to do that rebuild later at my leisure, and put the rebuilt pump back in my spares locker.
It was just as well. The swap went quickly, I added the wiring quick-connectors on the new pump, took out the old pump, fitted the hoses in place and the swap was done in just a few minutes with minimum cursing.
Then I surfaced for air and took the old pump out on deck to rebuild it....
Oops, opening up the old pump I see it has 2 broken bolts in it (out of 4). There are two shorter bolts and 2 longer bolts that hold the motor to the pump assembly. One of those 2 longer bolts is broken, and the spare kit just gives you the 2 shorter bolts. I should have know this since I have used this same pump on Two-Step for years, and those bolts are the main weakness of this pump. Anyway, no excuses, today I pop around to Island Water World to see if they have the bolt studs. Then I can finish the pump rebuild and put it back in my spares kit.
Thank goodness I had the whole spare pump otherwise it would have left an unpleasant mess until the parts could be sorted out.
When the cats away the mice will play (with plumbing parts!)
August, look out we must!
May no way
June too soon
July stand by
August look out we must
September remember
October all over
Well here comes August and we are still keeping a sharp eye out. Hurricanes can't just pop into existence out of nothing, generally ones that hit the Caribbean form from a depression that is coming across the Atlantic from Africa - a tropical wave. So you get a few days warning at least. Then the choice is to run away or choose the best place to batten down and somehow weather the storm.
Running away
Its generally acknowledged that hurricanes will not go much south of Grenada as the spinning effect of the earth's rotation - the Coriolis Effect - is reducing the closer we come to the equator. Here is an image showing the tracks of hurricanes over the last 150 years. Looks like we can run south to Grenada or Trinidad and be out of the path of all but the very occasional storm. If one did seem to be heading to the southern side of the range we are then ready to run even further south?

Where to Hide
Where would be a safe place to hide is a trickier question. Many cruisers we have met this summer have picked out a nice summer spot and are planning to hide nearby if a storm threatens. There are still many boats in Marin Martinique and are planning to stay if a hurricane comes. Our experience in the mangrove for a direct hit of Tropical Storm Chantal (in Marin) made it clear we could be safe there with winds up to 50-60 knots. But increasing to a proper hurricane at say 80 knots means forces are doubled. I am not at all confident we would have been safe where we were, and I think there would have been serious problems out in the main harbour. Nearby Rodney Bay St Lucia looks like a safer alternative, and Marigot St Lucia also looks safer. But when winds get higher and anchorages get crowded with last minute hastily-anchored charter boats, I think a truly safe hurricane hole will still be a very risky place to weather a storm.
Distant Shores II - Hurricane Plan
Perhaps my choice is reflected in our name... in the event a "proper" hurricane is coming our choice will be to head for "Distant Shores". We will run south. The destructive path of the hurricane isn’t very wide and if we can get out of the worst winds and south of the main-event, we will have a blustery day as it heads past to the north. That’s our plan anyway!
Each hurricane season and each tropical storm/ hurricane is very different and we will judge as they come, but a well-found cruising boat should be able to make the distance needed to get out of the path of the storm given the proper notice. This strategy is more difficult if you are further north, but from here in the Southern Grenadines the decision is simple. Go south. And nowadays we can have the proper notice with such good weather forecasts and internet access to the information from just about anywhere. Even at anchor in the lovely and remote Tobago Cays last week we had reasonable internet access for just $1//day and could start the day with a coffee and a look over the National Hurricane Center forecast.
Is there a storm over the horizon?? Look out we must!
Have you been in a hurricane or tropical storm? What would you do if you were cruising and a storm was coming?
Hurricane Blog Entries
Part 1 Hurricanes - Watching the Weather
Part 2 Tropical Storm Likely
Part 3 Tropical Storm Chantal is Coming
Part 4 Securing in a Mangrove
Part 5 Tropical Storm Chantal Arrives
Part 6 Tropical Storm Moves Off
We filmed all this for an episode in Season 9 - Martinique Tropical Storm here on Vimeo
Check out the whole Tropical Storm Adventure plus lots more sailing on Season 9 Distant Shores on Vimeo in Hi-Def Download
Tropical Storm Moves Off
We haven't budged and have had no visible problems. I will go into the mangroves later and check how our "mangrove lines" did but all appears to be well.
Meanwhile everyone is poking their heads out, examining their boats and sniffing the air to make sure Tropical Storm Chantal is really gone!!
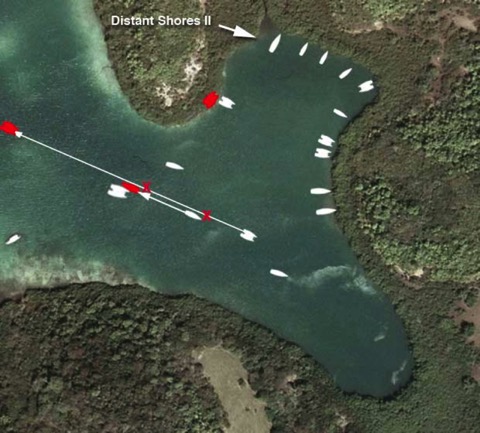
Here is the updated graphic showing what happened to the boats in our little mangrove community (see original here).
The forward-most catamaran (lower-centre) dragged in the strongest gusts from the SE. They dragged back and turned sideways, and managed to hit directly side on to the bows of the monohull behind them. They stayed that way for some time (15-20 minutes?) and I was amazed that the monohull's anchor didn't drag sooner. But with a large cat side-on to the wind the strain must have been enormous. So eventually the pair of them dragged back further and crashed into the larger catamaran.
The two boats hung for a few minutes then the first catamaran continued to drag right out of the anchorage - I didn't see them again. The monohull is about 40 feet and they managed to raft up to the large catamaran (a gorgeous 50 footer) and the two stayed rafted throughout the rest of the storm.
Here is the bow of the big cat - crunched in but I couldn't see any more damage.
Note the many fenders hung down. Since there were crews aboard all the boats throughout the storm they were able to prevent much more damage by putting the fenders down as the boats came together. Also there was no more than a small chop since our mangrove was so small and enclosed with no chance for the seas to build up and cause the boats to bounce.
On the radio there has been much talk of boats dragging out in the main harbour. But no one was hurt and no boats sunk I think! Really only a few boats dragged their anchor or broke loose their mooring. The problem, as in our mangrove, is that one boat dragging often turns into a disaster for 2,3 or more other boats.
Storm Over!! Incredibly it is a calm afternoon - was it just this morning we took the genoa down?? The storm came and went in less than 3 hours. I run in to the grocery to buy a steak for dinner. We deserve it!!
Hurricane Blog Entries
Part 1 Hurricanes - Watching the Weather
Part 2 Tropical Storm Likely
Part 3 Tropical Storm Chantal is Coming
Part 4 Securing in a Mangrove
Part 5 Tropical Storm Chantal Arrives
Part 6 Tropical Storm Moves Off
We filmed all this for an episode in Season 9 - Martinique Tropical Storm here on Vimeo
Tropical Storm Chantal Arrives
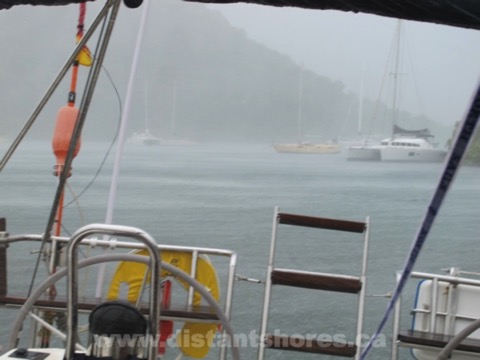
Whoa... big winds from the NE-E this morning (July 9) with Tropical Storm Chantal approaching but we are snuggled behind our mangrove!
First thing this morning we took down the big genoa and folded it up but then the wind got up and we didn’t have a chance to take down the smaller jib. Not a worry I think since the forecast is for 50 knots gusting 60 knots. Not full hurricane strength. But I have tied off the furling drum. Normally the furling system relies on the furling line to keep the sail furled but I think it's a good idea to tie the drum directly so it definitely can’t come undone. (We saw the danger of this when we went through Hurricane Bertha in New Bern, North Carolina, a few years back which we documented in the Cruising with the Shards DVD.)
Otherwise all is secured.
0930 - Wind starts gusting from the NE and that’s over the hill for us so we see almost no wind on deck. The small boat next to us is completely in the wind shadow. Our mangroves seem to be holding well.
1000-1030 - Wind is from the ESE and the fortress FX37 is holding the stern up into the wind. These gusts are 50 knots. Some higher I think. In the strongest gusts our neighbours disappear in the driven spray.
The wind seems stronger at the far end of the bay where the 5 sailboats are anchored.
Here is a closeup view. In these gusts the catamaran here later drags anchor and hits the monohull to the right of the picture.
1100 - The cat has hit the monohull and the closer cat has dragged into the mangroves.
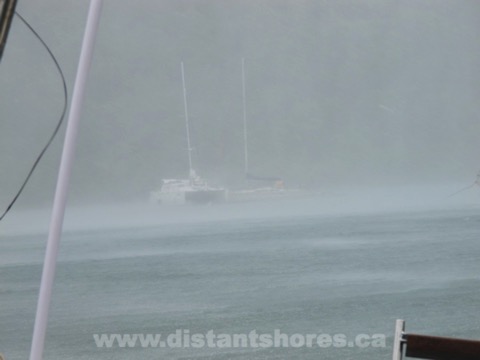
Another close-up shot through the driving rain. The far cat has dragged on top of the mono and after I took this shot they both drag on top of a larger catamaran...
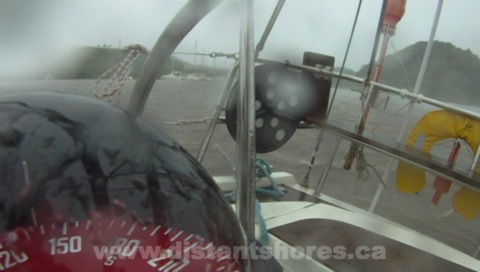
Finally the wind comes from the South and seems about as strong as before. Now almost all the strain is on our anchors, with the Fortress to the SE taking the brunt of it. As far as I can tell we do not drag at all. To set the Fortress before the storm we motored forward at 2000 RPM with the bow coming to a meter away from the mangrove. Now with the full wind blowing up over 50 knots we do not budge and the bow stays clear of the mangrove.
Around 1130 the winds suddenly drop to 10-12 kts and it is over. Then clean-up begins...
Hurricane Blog Entries
Part 1 Hurricanes - Watching the Weather
Part 2 Tropical Storm Likely
Part 3 Tropical Storm Chantal is Coming
Part 4 Securing in a Mangrove
Part 5 Tropical Storm Chantal Arrives
Part 6 Tropical Storm Moves Off
Check out the whole Tropical Storm Adventure plus lots more sailing on Season 9 Distant Shores on Vimeo in Hi-Def Download
Securing in a Mangrove
"Secure your boat in a mangrove!" Most Caribbean experts agree the mangrove is the safest place for a boat to be in a tropical storm. But actual details on the process are scarce. So, with Tropical Storm Chantal approaching, here is the first time we have tied up in a mangrove and how we did it.
Our goal was to have the boat bow-in to the mangrove so rudders and prop would be protected if anything slipped and we were pushed further in. Also it gets quite shallow close to the mangrove so most boats couldn’t get very close if they went stern-to.
We wanted to use our main 33KG Rocna anchor so we chose a spot where we could lay out 40-50 meters of chain. Then we dropped it and backed up toward the mangrove, setting the anchor with 2000RPM in reverse. Then we spun the boat around, dropping out enough chain so it would stay slack and hang under the boat as we turned. My plan was to pick up the chain later with our chain-hook snubber so we could secure the anchor to the stern, and leave a slack loop up to the bow. We have 80 meters of chain so this worked fine.
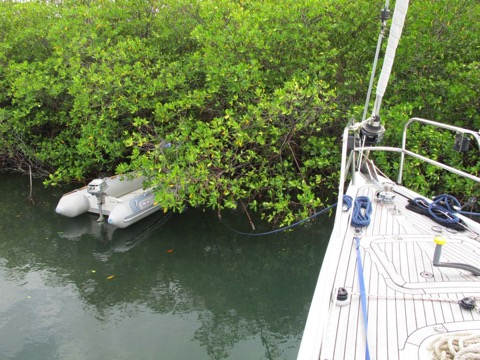
With the bow toward the mangrove we drove the bow right up to it to gently rest at the edge of the mangrove. I ran a line quickly ashore so we wouldn’t drift off again using a convenient root in the mangrove, but we would re-install these more carefully later.
Next I went up to the bow in the dinghy, lifted up a loop of the slack anchor chain, and handed along it until I was back at the stern. Then I connected our anchor snubber and a line to attach it to a stern cleat. The plan was to tighten this up later when everything else was installed.
Then off we went into the mangroves to attach lines to big secure mangrove growth...
Note the small mangrove roots and the bigger central "trunks". I tied a dockline to a big strong mangrove using a couple of loops to spread the load along the trunk and reduce chafe.

But I wanted to spread the load further. So I connected 2 additional lines from the first big one, on to other mangroves so the strain would be spread out to 3 different mangrove trunks. I tried to organize these so they would continue in more-or-less the same direction.
We now have 8 lines attaching to the mangrove, coming back to three heavy docklines and back to the bow. These are planned to take into account the main winds being from the NE-E-SE-S and finally SSW as the storm passes away. Our bow is oriented to the NE so we will hang on the mangroves as the storm approaches, then have it side-on as the wind builds and the strongest winds from the SE-S as the storm passes. This would be from our stern quarter and we would be hanging mainly on our anchors. If we do drag we will go up into the mangrove with the bow.
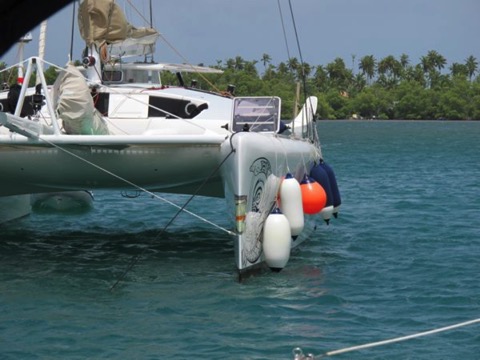
Next we set out the 2 additional stern anchors - both Fortress aluminum anchors.
We carry a Fortress FX23 and a bigger FX37.
I wanted the FX37 to be the main one so we set that toward the SE and brought the line back to the stern cleat. (note the nice anchor line bag - always kept neatly stowed with the line flaked carefully. The line will always run out smoothly with no tangles so I can just back up letting it out as I back up to the boat.
To eliminate chafe I wanted to cleat it off. To get it tight I used a line with rolling hitch to winch it up tight, then take in the anchor line.
Next we set the 3rd anchor, our Fortress FX23, and finally, tightened and adjusted all the lines so we would be ready. All told this took more than 4 hours and it was getting on to dusk... storm Chantal due the next morning with winds building by 0900...
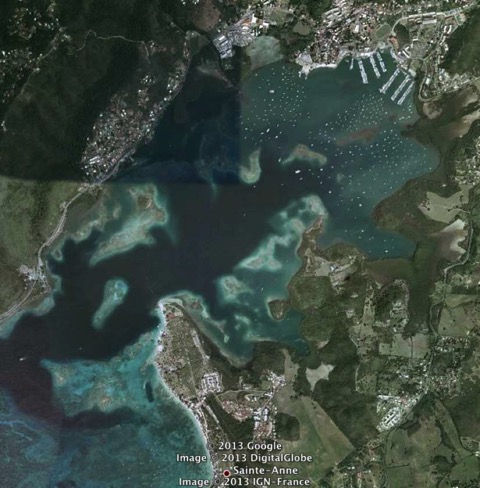
This is a Google Earth snapshot where I have put us in our position in the mangrove. You can see no swell should ever penetrate here.
Note we are not to scale - we are much smaller in reality - see below with the other boats here.
There are also boats all along the right side of the mangrove, one astern of us stern-to the mangrove and 5 have anchored in the lower channel and middle. No room for anyone to anchor where we are and it is all full of everyone’s anchors. Most people have put floats on their anchors. Here is a rough plan of the mangrove.
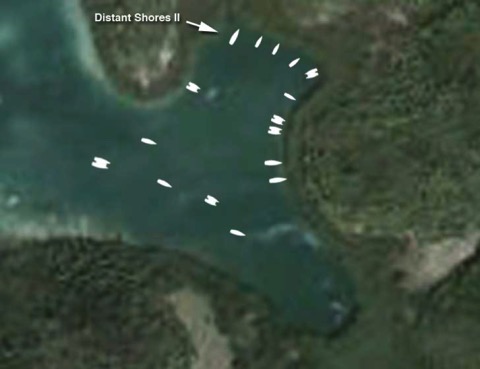
The wind forecast is to build from the NE then E and SE as it arrives. Forecast strength is 50 with gusts of 60 knots. The strongest winds are forecast to come from the SE-South which we will take on the beam-quarter.
Hurricane Blog Entries
Part 1 Hurricanes - Watching the Weather
Part 2 Tropical Storm Likely
Part 3 Tropical Storm Chantal is Coming
Part 4 Securing in a Mangrove
Part 5 Tropical Storm Chantal Arrives
Part 6 Tropical Storm Moves Off
We filmed all this for an episode in Season 9 - Martinique Tropical Storm here on Vimeo
Check out the whole Tropical Storm Adventure plus lots more sailing on Season 9 Distant Shores on Vimeo in Hi-Def Download
Tropical Storm Chantal is coming
Hurricane Blog Entries
Part 1 Hurricanes - Watching the Weather
Part 2 Tropical Storm Likely
Part 3 Tropical Storm Chantal is Coming
Part 4 Securing in a Mangrove
Part 5 Tropical Storm Chantal Arrives
Part 6 Tropical Storm Moves Off
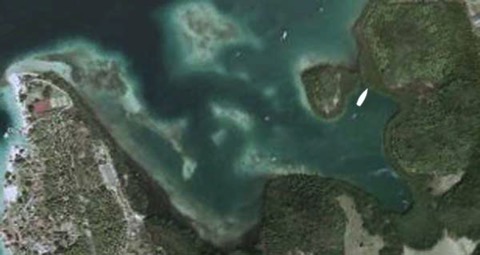
This mornings advisory shows the newly named Tropical Storm Chantal heading directly toward us in Martinique. The storm is due to arrive tomorrow around midday. So this morning we will head in to Marin. This is one of Martinique’s best hurricane holes. Note the large protected harbour, many anchorages and mangroves to the lower right. I think this is one of the best protected harbours in the Eastern Caribbean. However it is a popular harbour and charter base so will have a number of boats in it already. We will see what it looks like as the day goes on. I hope to find a spot in a corner at the bottom of the photo. We looked at this a few days ago.
We also went in to explore Baie des Anglais on the south east. This also looked very good and has no local boat population. It could be a possibility.
Here is Baie des Anglais from our Navionics charts on the iPhone. No we don’t navigate with our phone, but I did happen to grab a screenshot with the excellent Navionics App as we were anchored in the bay (we are the red triangle).
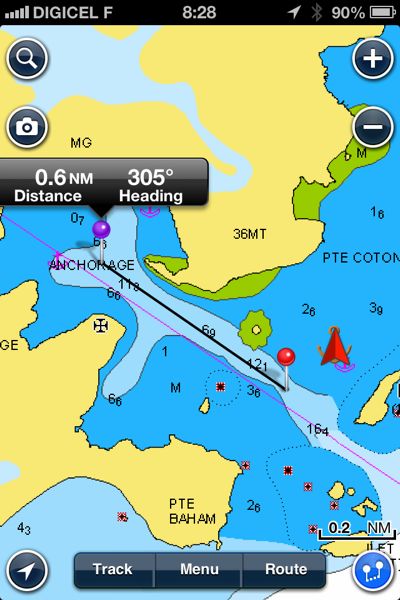
We will report back when we get secured at anchor today.
Hurricane Blog Entries
Part 1 Hurricanes - Watching the Weather
Part 2 Tropical Storm Likely
Part 3 Tropical Storm Chantal is Coming
Part 4 Securing in a Mangrove
Part 5 Tropical Storm Chantal Arrives
Part 6 Tropical Storm Moves Off
We filmed all this for an episode in Season 9 - Martinique Tropical Storm here on Vimeo
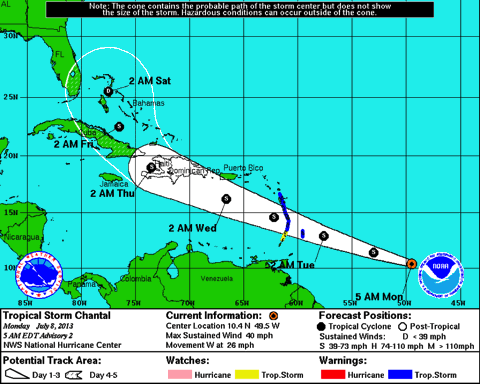
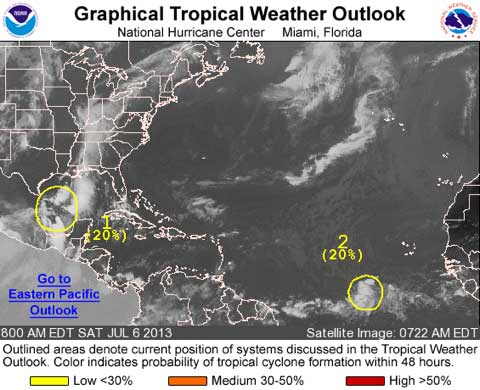
Tropical Storm Likely
We will move into the harbour of Marin tomorrow and see about securing in the mangroves. We have never actually secured in a mangrove before and are quite interested in how it is done. We are taking this very seriously. Even if it doesn’t develop into a tropical storm before passing Martinique it will undoubtedly be a stormy day. And of course it is much better to be prepared and not have a storm, than take a chance that it won’t develop.
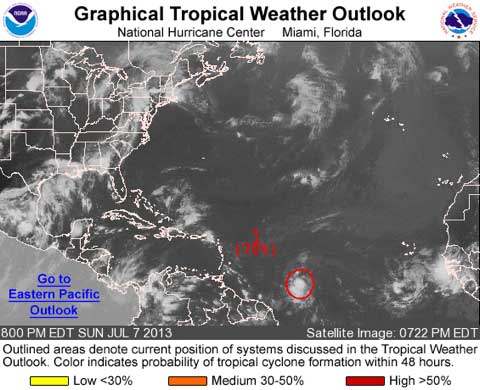
1. A STRONG TROPICAL WAVE LOCATED ABOUT 1050 MILES EAST-SOUTHEAST OFTHE WINDWARD ISLANDS IS MOVING WEST-NORTHWESTWARD AT AROUND 25 MPH. SATELLITE IMAGERY INDICATES THAT SHOWER AND THUNDERSTORM ACTIVITYHAS INCREASED IN ORGANIZATION SINCE THIS AFTERNOON. ENVIRONMENTALCONDITIONS ARE CONDUCIVE FOR ADDITIONAL DEVELOPMENT...AND THISDISTURBANCE COULD BECOME A TROPICAL DEPRESSION OR TROPICAL STORMLATER TONIGHT OR ON MONDAY. THIS SYSTEM HAS A HIGH CHANCE...70PERCENT...OF BECOMING A TROPICAL CYCLONE DURING THE NEXT 48 HOURS.IF DEVELOPMENT OCCURS...TROPICAL STORM WARNINGS WOULD LIKELY BEISSUED FOR PORTIONS OF THE LESSER ANTILLES. REGARDLESS OFDEVELOPMENT...THIS SYSTEM IS EXPECTED TO PRODUCE LOCALLY HEAVYRAINS AND WINDS TO TROPICAL STORM FORCE IN SQUALLS OVER PORTIONS OFTHE LESSER ANTILLES ON MONDAY NIGHT AND TUESDAY. AN AIR FORCERESERVE HURRICANE HUNTER AIRCRAFT IS SCHEDULED TO INVESTIGATE THEDISTURBANCE ON MONDAY AFTERNOON.
Will report more tomorrow as we secure and see how things look in Marin.
Hurricane Blog Entries
Part 1 Hurricanes - Watching the Weather
Part 2 Tropical Storm Likely
Part 3 Tropical Storm Chantal is Coming
Part 4 Securing in a Mangrove
Part 5 Tropical Storm Chantal Arrives
Part 6 Tropical Storm Moves Off
We filmed all this for an episode in Season 9 - Martinique Tropical Storm here on Vimeo
Check out the whole Tropical Storm Adventure plus lots more sailing on Season 9 Distant Shores on Vimeo in Hi-Def Download
Hurricanes - Watching the Weather
Here is their forecast from this morning at 0800 (Click here for their link)
We also check the online weather forecasts from Passageweather here which is showing a 30-35 knots as the wave passes on Tuesday evening. It is currently predicted to pass directly over Martinique where we are...
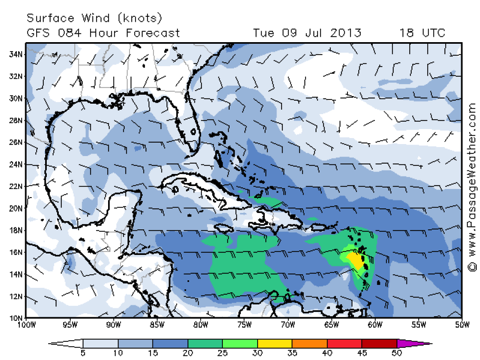
Here is my other favourite with the spot forecast for Martinique at Windguru

Hurricane Hole - We are on the south east corner of Martinique and will be using the excellent harbour of Marin as an anchorage for this wave/storm as it passes on Tuesday. We had been planning a trip to the east side to gunk-hole some of the amazing coastline of Martinique, and since the weather is predicted to be lovely today and tomorrow we will proceed with this plan, and come back tomorrow evening, then in to Marin in the morning on Monday after getting another storm update!
Hurricane Blog Entries
Part 1 Hurricanes - Watching the Weather
Part 2 Tropical Storm Likely
Part 3 Tropical Storm Chantal is Coming
Part 4 Securing in a Mangrove
Part 5 Tropical Storm Chantal Arrives
Part 6 Tropical Storm Moves Off
Going to Windward
Its been said that "Gentlemen don’t go to windward"
Well they do if they are hoping to get to the "Caribbean Windward Islands". I think the idea is that gentlemen can wait a day or two for more favourable winds and hence avoid the need to beat to windward. This strategy actually does work in many temperate climates where winds come from a variety of directions. But here in the tropics the winds are much more predictable and come almost always from the east. Days and days of east winds, generally varying from 12-15 knots to 15-20 knots, and slightly ENE in the winter and E-ESE in the summer. So the gentleman who hopes to sail from Saint Martin to Martinique will be quite close-hauled for most of the journey.
We just finished the upwind journey from Saint Martin to Martinique over the past 3 weeks.
"St Martin to Nevis (63 nm) - great sail close hauled! Average 6.8 knots."
"70 miles Nevis to Deshais, Guadeloupe (70 nm) - we do this 2.5 hours less than a nearby 44 foot sailboat !"
"Sail upwind Deshaies to Portsmouth, Dominica (45 nm) - 6.5-7 knots at 45% apparent in 18-24 apparent wind 1.5-2 meter swell"
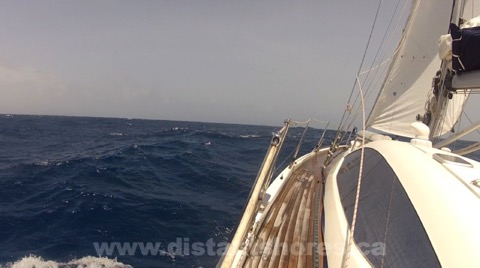
"Upwind Dominica to St Pierre, Martinique (49 nm) - 6.3 knots - seas 2-2.5 meters, apparent winds 24-30 knots"
Wind Strength
If the wind is around 15 knots the seas will likely be less than 2 meters. This makes the whole thing more "Gentlemanly"... Our first three days the winds were 14-15 knots on average and the seas less than 2 meters. We were close hauled at 45% apparent but that is a very good point of sail for the Southerly with her 10-foot draft when the variable-draft keel is down (2’ 10" draft with the keel raised). We can point as high as 30 degrees but of course would slow down somewhat and would have more trouble in the big seas. So for us 45% is a fine angle. We had a romping good sail and passed all the other boats we saw out there. There are a number of factors here, and if you are on the margin on some of them then the day isn’t going to be nearly so enjoyable. Here are some of the factors that effect windward ability...
Sails
Our sails are just 3 years old and in excellent shape. Old baggy sails can’t point efficiently to windward and will slow you down considerably. We were using our mainsail with one reef in it. The fully-battened mainsail in good shape will almost certainly beat a furling mainsail when close hauled. We have a "self-tacking" jib just 100% and quite flat cut. It is an excellent sail and in good shape. It is just Dacron however - nothing exotic. So if you have more modern sails you might go better to windward, if you have older sails or are using a bigger genoa reefed down then you will have more difficulty pointing.
Hull(s)
Not all boats are designed for close-hauled windward ability. Catamarans are commonly said to have more trouble going to windward and a number of our cruising friends on cats confirm this. The difficulty seems to be compounded in large seas as the two hulls hit the waves more often... But many monohulls are not that good going to windward. The depth of the keel helps, as does hull shape. A cruising boat with "shoal-draft" will not point as well as the same boat with a regular keel. In fact I think a modern cruising catamaran can perform as well to windward as most monohulls when not overloaded...
Loading
Regardless of boat design above, all boats will have more trouble performing to windward if they are overloaded. The problem with cruising boats is that it is very easy to overload them. A large stern arch bristling with solar panels, antennas, spare anchors, fishing gear, additional outboard motors etc, is a huge weight to have high and aft on a boat. Surfboards, jerry cans and more strapped to the lifelines are a big factor reducing stability and sailing ability. The designer didn’t plan for this and the performance will not match initial expectations! Catamarans are even more susceptible to this as they have a lot of interior space. It is a temptation to keep filling that space up, and as a cat gets lower in the water the bridge deck comes lower too. Then there are even more problems going to windward. I do not mean to point the finger at "cats". Looking around at the typical anchorage I think the cruising monohull is likely to be more overloaded than the average catamaran. So not to overload your cruising boat if you hope to achieve the performance you remember when you first got your boat - whether she is a catamaran or mono-maran :-)
Waterline
Comparing our previous boats, our old Classic-37 "Two-Step" had a sailing waterline length of less than 30 feet. Distant Shores II has a waterline of almost 48 feet as she sails to windward. This means she pitches much less, absorbs the waves more easily and is drier as well. Not much you can do about this one, but be aware if passage planning that a smaller boat will have a rougher ride, especially to windward. I know that as we sailed these past 2 weeks we were enjoying the sail and sitting in the mostly-dry cockpit. Remembering Two-Step, as I looked at some of the larger waves coming at us I thought how much wetter and less comfortable we would have been on Two-Step.
The extra waterline length also means higher speed. As we averaged nearly 7 knots on the first 3 days we cut a couple hours off boats that were struggling to make 5.5-6 knots upwind. Its 71 miles between Nevis and Guadeloupe and we took 11 hours (average 6.5 knots). For boats that averaged just 1 knot less that would take 2 hours longer. That meant we didn’t have to get going in the dark, still making it in before dusk at the lovely harbour of Deshaies.
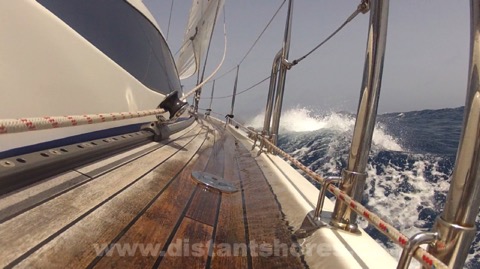
Reefed jib sailing in 20 knots to windward - notice (nearly) dry decks
Limits on Comfort
The last log entry is for the crossing from Dominica to Martinique. Seas were higher at 2-2.5 meters (7-8 feet), the wind was up with a forecast of 20-24. We certainly saw those seas and higher in the turbulent zones near the headlands. Apparent wind was 24-30. In these conditions I decided to just fly our tough 100% jib. We could have flown a double reefed main as well but I was worried about higher gusts near the high headlands. So we took it easier and slowed down a bit. As we passed the gusty headland leaving Dominica we had a few rolls in the jib to reef even further. With just the jib we stood up nicely and still sailed at a reasonable 6-6.5 knots. So knowing the limits for your sail configurations, and how comfortable you can be in bigger seas is a factor too. As we were closer to our "comfort-limit" on that last sail I wanted to take it easy on the boat and her crew. After all we were completing the last leg on our journey to the "windward islands" so hopefully can crack sheets and enjoy some reaching coming up!!
Spare Parts - If you Bring Your Umbrella...
It sometimes seems to be the same with spare parts on a cruising sailboat. Try to bring along the spares you think you might need and it’s actually something else you find broken.
Electric Heads
I know... many people "poo-poo" electric heads (warning.... there may be more head-related humour within) but we have been having a very positive experience with our Tecma electric heads on Distant Shores II. I cannot speak for other electric heads, but I have admired the simple design, solid workmanship and easy operation. And so far they have been reliable... right up until a few days ago when I began to suspect something was up with the aft heads.
Everything looked fine, and sounded fine when the button was pushed... however, something smelled funny...
I quick check of the bilge revealed the worst. A leak from the heads, and it wasn’t pretty.
Rather than start disassembling immediately I dove into the parts locker to find all the parts I had bought for these heads. Since I had not owned a Tecma until we bought this boat, a Southerly 49, (3 years ago) I hadn’t known what might need fixing. So I basically bought one of everything as a spare part.
On the right is the large and heavy-duty macerator pump that sits in the bottom of the toilet. On the top of the picture (in a small bag) is the water injector fitting and a few other gaskets etc. Then there are the two very creatively shaped hoses that move the content/effluent/poo around. Note that all this actually fits inside the body of the toilet. Cunning engineering! In fact the design of this toilet is very beautifully shown here in what must be the sexiest toilet video ever made...
Anyway, here I am admiring the large pile of expensive spare parts, confident that one of these hoses was likely to be the odiferous cause of my woes, and proud that I had the parts.
Besides, playing with nice clean spare parts beats playing in the ....
So, time to roll up the sleeves and get to work. I will gloss over the first part of the project where I had to bail out the bilge, rinse it down and sterilize all... anyway that was done with no more than a smattering of "poo-jokes" some swearing and a nice long shower afterwards. There certainly was an incremental (or excremental?) increase in toilet references during this whole procedure :-)
Now to get to the actual repair. At this point I seem to have lost my enthusiasm for photography and did not record any more pictures.
1) Detach toilet - this entailed cutting the silicone sealing the whole unit in place, and removing the 4 screws holding it down.
2) Carefully lift toilet up - extra long hoses allow it to come up somewhat until you can undo the hose clamps
3) Disconnect hoses - I removed the saltwater intake hose, but the outflow hose had already come off!!
Problem Found. the hose clamp was not tightened down enough and the outflow fitting has slipped right out.
Result - direct discharge into the bilge whenever the toilet was operated! Yikes!!
Solution - re-assemble and tighten to insure the fitting doesn’t come off again!
During the disassembly procedure I carefully inspected all the hoses and the macerator. All appeared to be in top shape. No sign of age or any problems, so I did not actually need any of the spare parts.
Looking for the "silver-lining" in a generally "s__t" day, I can say it felt good to start the project knowing I had all the parts that could possibly be needed. I would not be faced with a long delay trying to get spare parts to get the head back in action.
Just like carrying an umbrella and not worrying that it might rain.
Bilge Alarm!!
Every once in a while you hear a story like this...
A sailor on watch pops down to get a cup of tea and finds the floorboards awash.
Or...
Waking up in his bunk the sailor puts his foot out to find he is ankle deep in water...
Or...
A couple out on deck at night enjoying a romping sail start to feel the boat is a bit sluggish... they find the boat has taken on so much water they can’t trace the leak since everything is awash... the boat sinks and they abandon ship...
All of these stories are true but in most cases I believe they could have been prevented.
One of the most common causes of sinking is simply some sort of leak that went undetected until it was too late. A hose clamp fails, a hose bursts, a pump back-syphons, an anti-syphon valve sticks, a thruhull fitting cracks... you get the idea. Modern boats are somewhat complicated and many things COULD go wrong.
The main point is that many of these potential leaks is small and easy to deal with IF you know you have a problem. Unfortunately most boats do not let you know you have that problem! A beautiful little Rule Automatic bilge pump will deal with a certain amount of water coming in to the bilge. It will continue to try to keep up with the leak but it is so quiet that you will likely not hear it and never know you have a problem.
A bilge alarm can solve this! And for a VERY affordable price it is the cheapest insurance you can buy!!
Bilge Alarm Options
Broadly speaking there are two types of bilge alarm. Water detectors and bilge-pump alarms. One will detect water that is getting to a dangerous level. The second detects when you bilge pump has activated itself.
Water detector
Bilge alarms can be a simple water detector. It sounds an alarm if water is detected in the bilge. Then you have to decide how to install it. You could set this detector above the level of the automatic pump. This means basically to set a water detector so that it will sound when it gets up above the bilge pump. So in effect you wait until the bilge pump is overwhelmed and then sound an alarm. For very wet boats this might be the right solution but it does sound a bit scary...
Alternatively it can be set up to detect ANY water in the bilge by putting it below the level the bilge pump will activate. Then you will hear the alarm whenever water enters the bilge. It depends on the type of boat you have whether you might prefer this. Our first boat "Two-Step" had a very deep bilge and all water would drain to this small space where the bilge pumps were located. Pour 1 litre of water into the bilge anywhere and it would drain down to this bucket-sized bilge where it would set off this alarm.
Bilge Pump Alarm
Another option is to connect a loud alarm to let you know the bilge pump has been activated. This is my preferred solution and I have installed these alarms on all our boats. It is really quite simple and inexpensive - the ones I installed on Distant Shores II cost less than $4 each. What a DEAL for such super insurance!!
Here is how its done...

Basically all you have to do is connect a beeper or buzzer to the manual side of the typical bilge pump control. This means any time the pump has power then the alarm will sound.
Optional - I also added a switch to turn the alarm off again. In the event the bilge pump DOES come on and you are busy trying to find the leak, you might want to turn off the alarm. I installed the switch inline with the alarm. Easy and made the price more than $5 total!!
Cruising Guides - Still relevant?
Background Information
For years we have followed roughly the same method. We initially read about interesting cruising destinations in sailing publications or websites as well as talking to other experienced cruising sailors about the places they love to explore. Boat show seminars are another great resource. Then if a cruising destination holds a serious appeal to us, we buy a cruising guide or two about the area. We flip through them trying to get the flavour and basic information about the places. What season to visit? What are the hotspots? What did the author find most worthwhile to include photos on? What are the anchorages or harbours like? In many cases the author’s introduction is valuable. You are learning from someone who often has many decades of experience in these waters. Compare that to reading a blog... the blogger is reporting back on his first and likely only visit, and how things went for him. He may have got lucky, or unlucky with weather, he may have had boat problems and report mainly on how easy it was to get things repaired? All potentially useful, but not the definitive account. Although we read and reference websites and blogs for insights into the experiences our fellow sailors have had cruising in a place, we would never depend on them entirely as the only reference in addition to good charts.
Harbour Entry Advice
Here is another time when we really like to have a cruising guide on hand. Entering a new harbour, planning a safe anchorage, the cruising guide is your local expert at your side. Looking at a chart is going to be necessary at the next step as you plan the actual route and when you are there navigating, but the cruising guide contains very useful hints and warnings to help you interpret the chart and cross-reference any discrepancies.
For instance, here in the British Virgin Islands where we’re currently cruising there are MANY bareboats and people who do not have local knowledge, or even any experience on the boat they’re sailing. A cruising guide is a GREAT idea and fun way to get into the spirit of the trip weeks before you even arrive. And when cruising here the guide is a great resource as you come in to a port for the first time. The sections on "Approach & Entry" to the harbours warns of off-lying danger and offers a safe conservative route in.
For example coming around to Gorda Sound here in the BVI there are a couple of options to enter the harbour. But the first convenient option south of Mosquito Island is really too shallow for most boats. "Cruising Guide to the Virgin Islands" (Nancy & Simon Scott) states...
"There are 3 entrances into the Sound but only one that is well marked. The western entrance via Anguilla Point is tricky and should only be used by those with local knowledge. Most bareboat companies place it off limits".
Sketch Charts
Cruising Guides also include sketch chart - simplified sketches showing the recommended routes, anchorages etc.. These are not at nearly the detail of the proper charts, but drawn with the author’s local knowledge. Here’s the entry to Gorda Sound from the "Cruising Guide to the Virgin Islands" .
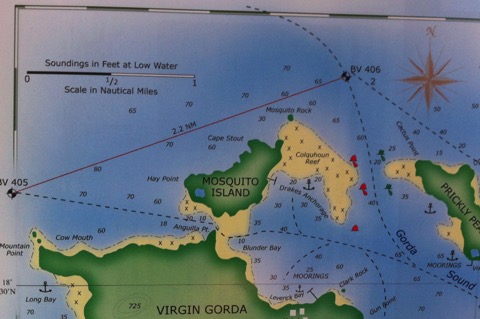
We have gone through this entrance many times and know it quite well. There is less than 5 feet of water on the route so we swing up our keel. Last week we were heading in and a charter catamaran was following us toward it. They probably thought we were deeper than them so they could safely follow us. In fact we draw less than 3 feet and they (a Leopard 47) draws 1.5 feet more than us! Luckily they thought better of it and veered off. Perhaps they were reading through their cruising guide and changed their mind?
The moral of the story? Cruising guides are still a good idea! Up-to-date charts are important! And don’t follow other boats especially if they are lifting keel boats!
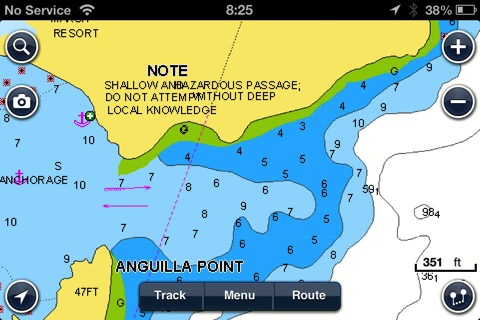
Here is the wide shot on the Navionics chart. Notice there is a "Note - See Lower Zoom" near our passage...

When you Zoom in the note recommends against it... and accurately shows the depths. Too shallow for the deeper cats!
A Plug for all your "devices"
Then I saw this excellent small 12Volt plug that has 2 USB outlets built in. Its for sale at one of the local super-chandleries Budget Marine! Its made by Blue Seas who make many high quality electrical systems for boats.
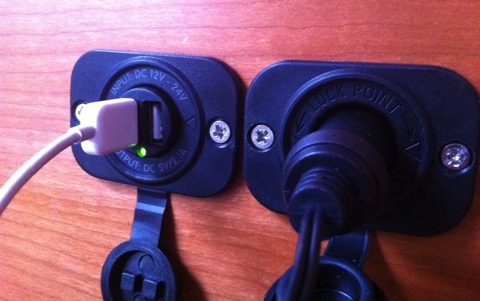
It’s nice that it connects right into 12Volt so you don’t have to run an inverter and double-convert to run the special chargers. And its better than the typical cigarette charger since it has 2 outlets in one. It was just $29, so we bought 2!!
Blue Seas even lists on the specification that it has a small "parasitic" draw of 15ma. Parasitic draw is what it will use when plugged in but not in use. I am impressed that they list this since it is important - and nice and low compared to leaving a normal charger plugged in.
Now I’m going to go around the boat and count the number of devices we have on board that charges with a USB connection...
How many USB charged things do you have onboard??

Boatyards - The Zen of Haul-out
After enlightenment man chops wood and carries water.
Zen Proverb
So it is in the boatyard. Annual maintenance must be done and we have the choice if we will enjoy it and make the most of it... or not. Here in the St Maarten Shipyard we are enjoying being hauled out.
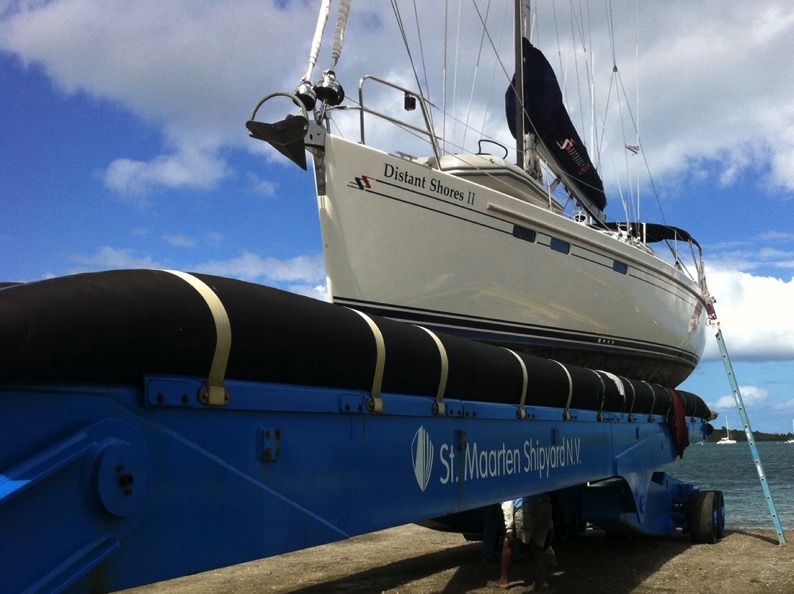
Of course we could also just pay someone to do the work and come back when they are finished, which we have done from time to time... but I like getting up close and personal with the hull, at least every year or so to see what it going on down there. Any fittings that need replacing? Anything we might have scraped coming through the French canals and forgotten about? Any problems with rudders or prop? Any zincs corroding faster than they should? I like the sense of accomplishment of a job well done.
Here are some thoughts on maximizing the productivity and enjoyment of the "Zen of Haul-out"...
Finding a good yard
We always look for a yard wher
Antifouling
The bottom of our Southerly 49, Distant Shores II, was very grown up with coral and worms so we definitely had to update the antifouling despite it just being 8 months old. The Cruiser Uno (one coat one season) which served us well in European waters doesn’t seem to be able to handle the high fouling here in the warm waters of the Caribbean. We are going to give one of the local favourites a try. I am planning 2 coats of "SeaHawk Islands 44 Plus" and another around the waterline. It’s an ablative paint so it will come off when scrubbed, and it can handle being left hauled out for hurricane season. I will report back next year after it has done a cycle here in the tropics.In case you are wondering, all this growth came off with the pressure washing - a benefit of the ablative paints, I think. Then we asked the yard to do a quick sanding to get rid of the last of the barnacle bases - it took just 2 hours to get back to a smooth hull.
Gelcoat touchup
We had a couple of small chips in the gelcoat from a run-in with the dock in Morocco when the catwalk we were attached to on starboard side broke lose in a gale, and another at the bow from the anchor swinging around as we brought it onboard too quickly one time. Working on this kind of thing is possible while in the water but is much easier when hauled out. I always carry a pot of gelcoat that matches our hull so we can do quick repairs. Otherwise the hull is still in factory perfect condition - she is just 3 years old after all and the gelcoat is perfectly glossy/shiny. In the 3 years we’ve owned her we have gone through nearly 300 locks travelling through Holland, Sweden, Scotland and France but didn’t put a scratch on her in that time! Well maybe a couple of "scuffs". Easily repaired and buffed out.Zincs
The modern cruising boat has a number of zincs. We have a big hull zinc, a specialized zinc on the "Autoprop", another I have added on the shaft, a zinc on the bow thruster, and small zincs protecting the fridge and freezer heat exchanger plates. Your boat may have others. Some places are more corrosive than others - we always found zincs disappeared quickly in the southern USA Intracoastal Waterway. In northern climes they seem to last longer.Bottom Checkup
Taking a closer look at the "wet side" of your boat is worth a bit more time during the annual haul-out to maintain a fully seaworthy bottom. Is anything out of the ordinary? How much play is there in the shaft and stern bearing? Will the bearing need replacement soon? Any barnacles stuck up the thruhulls? I also take a few pictures of any details to help me remember how it looks down there when we’re back in the water and to plan for future jobs. I also take pictures during the lift so I can show the next boatyard how to lift her safely.
Other projects
If you have other bigger projects the haul-out can be a good time. Many installations are safer in the boatyard since you don’t lose a part dropped overboard. I can get out the sander or power tools and not worry about annoying the other people in the marina or anchorage. A boat yard is the proper place to get your boat in shape for the sailing season ahead.
Enjoy
It’s fun, this cruising life... and the enlightened cruiser enjoys it all - even time in the boatyard!
ARC Report - Backup Systems
Update 2014
Atlantic Rally for Cruisers (ARC 2014 edition) is getting underway tomorrow Sunday November 23) and I know everyone there will be scurrying around with last minute jobs, enjoying the last parties and getting ready for the start line tomorrow morning. It is a VERY exciting time and Sheryl & I wish all the participants Fair Winds and Smooth Seas. We did the ARC in 2012 and thought it would be worth republishing summary of how systems worked for the boat in our “quite windy” running of the Atlantic Rally for Cruisers.
ARC 2012
Before the start of the ARC in Las Palmas everyone was working on their boats and getting them ready - trying to prepare for all the conditions we would encounter in the 3000 mile crossing. Getting all the boats systems up and in top condition and preparing for all the contingencies. Trying to anticipate what could go wrong and how would we deal with the problems?
Here is a very un-scientific summary of how well systems, and backup systems, worked for boats on the ARC 2012.
Electrical Power systems
On this year’s ARC many boats reported problems with their electrical power. A number of boats had a malfunction with the main generator but were able to recharge the batteries from the engine. However most engine alternators produce less than you hope. The modern yacht does consume a lot of power. Similarly wind generators often do not work well when sailing downwind. And even the biggest solar array produces less than the typical modern boat uses on a passage. People with power problems had to turn off fridges, turn off autopilots (so crews were exhausting themselves hand-steering for thousands of miles !!!) and otherwise conserve power. The worst cases were boats that lost their engines and had no other way to generate power. In this case they finished the passage with no power left, in the dark!
What is your primary method of generating electrical power? Most of the larger ARC boats have a separate diesel generator, and many of the yachts less than 45 feet rely on the engine’s alternator to recharge the batteries. Some also have a reasonable capacity to generate electricity from Solar panels or Wind generators.
A number of people I spoke with did not know how much power they use. Many boats do not have a decent way to calculate how much they are adding/subtracting from their batteries. A quality power monitoring system is a must! Its essential to know how much power your boat uses on a passage. Refrigeration, autopilot, lighting, Nav instruments are all big users on passage and running 24-7 adds up! Some of the boats had left the cold northern European waters and were surprised how much more power the fridge consumed in a hot climate. Others just hadn’t done the math or worked out what they would need.
On Distant Shores II we are using almost 300 amp-hours per day on passage. This mean we need to run the generator 3 hours per day to put it back in. If the generator quit we would need to run the engine 4-5 hours a day for the equivalent power. We could also cut back by shutting down our freezer and/or fridge, turning off our plotter etc and would reduce power use by probably 50%.
If your backup power is solar panels, you may find it will not cover typical power requirements while on passage. But it is a great backup system with the main drawback being much lower production on the cloudy days we had, especially at the beginning of the crossing this year.
Whatever you do - consider your power requirements carefully, and plan a backup strategy to generate power in the event your main system goes down.
Steering systems
Self-steering systems and autopilots were another area where ARC boats had a number of issues. Heavy conditions in the first week broke quite a few wind-vane steering systems. Quite a few boats found themselves hand-steering when they had an electrical problem and had to save power. On Distant Shores II we have a Raymarine autopilot connected to a robust Lewmar drive unit. It steered flawlessly the whole way right up to the finish line! The boat, a Southerly 49, is quite easy to steer with her twin rudders and has a well balanced helm so the motor isn’t straining and doesn’t draw very much power.
Here is a video showing the Raymarine Autopilot steering in some pretty big seas.
Sailing Systems
Sails, masts, downwind poles and other sailing systems were perhaps the area where most ARC boats had done the most thorough preparation and had thought out what to do in the event of problems. Only one boat I know of lost their mast and had to divert to the Cape Verde Islands for repairs. Although we saw many broken boomvangs, torn sails, and other rig problems on the dock in St Lucia, everyone seemed to have had a strategy and was able to continue on without too much difficulty. For more info on rigs and rigging see my previous blog below...
Water
Many ARC boats were relying on water-makers to provide water for the crew. Compared to the average cruising boat with 2-3 crew onboard for an ocean crossing, the ARC boats had 5 or more - and this means providing more water for the crossing. A 37-footer with 7 crew, and a 40-footer with 9 on board will need quite a lot of water.
On board Distant Shores II we carry 545 litres of water, and had just the three of us (me, Sheryl and friend, Matt Heron) on the passage. I have installed manual foot-pumps at the galley and in the aft-heads, which we use at sea, and turned off the pressure water system for the crossing. This helped us easily conserve water, and also meant that if a leak developed in the system we wouldn’t dump all our fresh water! In the event, it was great having the foot-pumps. We did save water without feeling constrained and arrived at the finish with more than a third of a tank remaining. We switched the pressure system on whenever we needed it (when having showers for example) but mainly left it off for the passage.
Propulsion
A number of boats had engine problems - the most major issue being a propellor drop off, to simply being unable to get the motor started. But everyone with this problem was able to sail right up to the finish line and then accept a tow into the marina.
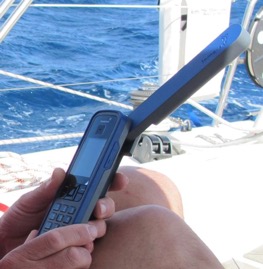
Communications
Many boats had problems with various communications systems - but since everybody had backups of some form, no one was seriously inconvenienced. For example, our SatPhone stopped receiving EMail for 4 days, but we were still in touch with nearby boats over the radio and we could also make phone calls so reports could still be filed, and the Yellowbrick tracker kept on working fine.
Update 2014
Communications upgrades! Probably nothing has changed so much in the last two years since our ARC 2012 as communications. New Satellite phones, the Iridium Go, Inreach and other devices have all come online. If anyone has tested these out please chime in with your thoughts and experiences.