Sailing Recipe - Pumpkin Tomato Soup
By Sheryl Shard, copyright 2015. All rights reserved.
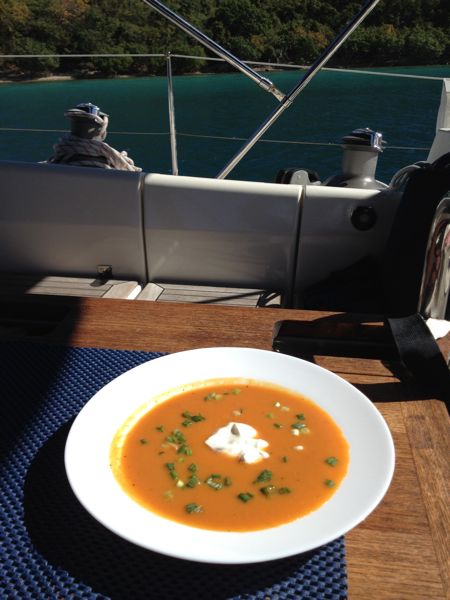
Chilled Pumpkin Tomato Soup
Paul and I love trying new recipes and when we have friends come to visit us on Distant Shores II we ask them to bring one of their favourite recipes so they can teach us how to make it on the boat. Cooking together and then later sharing a meal at anchor in a beautiful place is a nice way to get caught up with friends and loved ones.

Cruising friend, Wanita, in the galley of Distant Shores II
Recently we had our friend, Wanita, from Toronto, Canada, on board. (If you have watched Distant Shores season 7: Channel Islands to Scandinavia and San Blas Islands, episode 83, “Frisian Islands”, where we sail from England to The Netherlands, you will have met Wanita on video.) Wanita shared this recipe for Pumpkin Tomato Soup with us while she was visiting us in the British Virgin Islands and we have made it several times since adapting it slightly.
You can eat this soup hot or cold making it a versatile recipe for cruising. It also freezes well and doesn't lose flavour or texture when reheated. In fact, the flavours blend and improve if made ahead and eaten later.
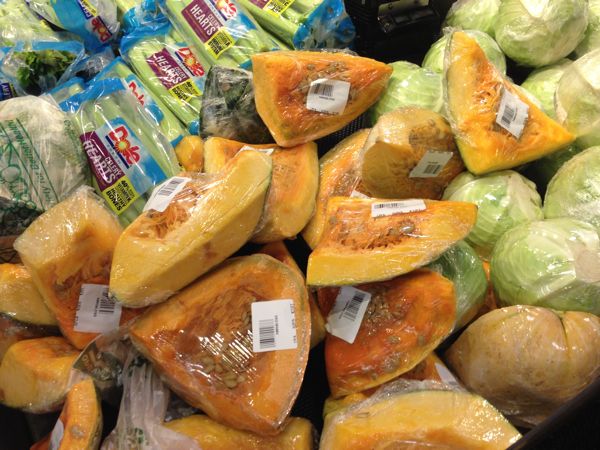
Pumpkin is a popular vegetable in the Caribbean so it is easy to find. Fresh pumpkin is often for sale in convenient pre-cut packages at the grocery store. If not available in your location, you could also substitute butternut squash or other available squash.
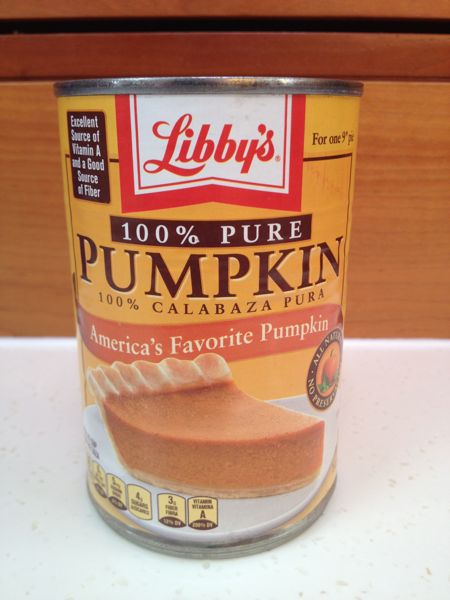
For even more convenience and equally delicious taste, Pumpkin Tomato Soup can be made from canned pumpkin puree (not spiced pumpkin) which is great for the boat.
Pumpkin Tomato Soup
Ingredients
¼ small pumpkin or squash, about 1.3 lbs/500 grams or 1 X 16 oz can of pumpkin puree (pure pumpkin, not spiced pumpkin)
1 tablespoon /15 ml olive oil
1 large onion, chopped
1-2 garlic cloves, minced (optional)
1 chicken bouillon cube + 1 1/3 cups / 300 ml hot water
1 14.5 oz/411g can crushed tomatoes
Juice of ½ lemon / 1-2 tablespoons lemon juice or to taste.
1-2 tablespoons of curry (start with a little bit, taste and add as desired)
Additional water to bring soup to desired consistency
Method
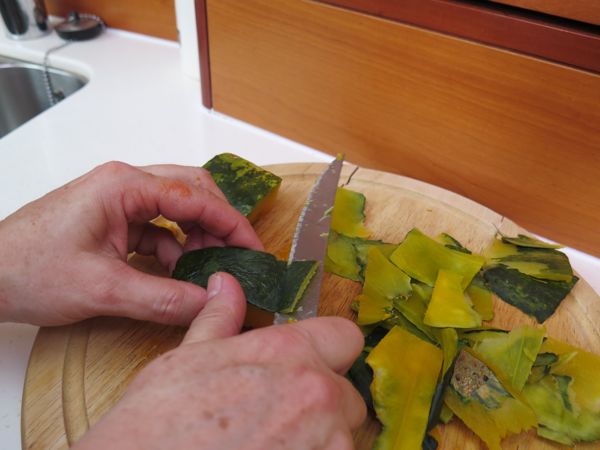
Wash pumpkin piece and scoop out seeds with a spoon. Chop pumpkin into squares. (Wanita leaves the rind on since it's easier to remove rind after cooking.)
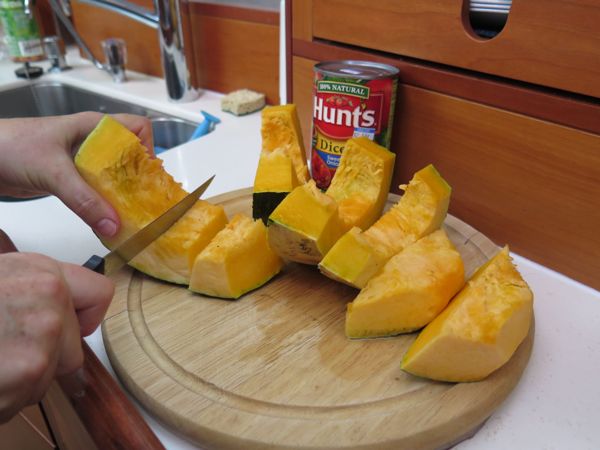
Put pieces into large saucepan and cover with water. Cover pan. Bring water to boiling. Simmer until fork tender, about 10-15 minutes or so. Don't overcook or it will make the soup too watery.
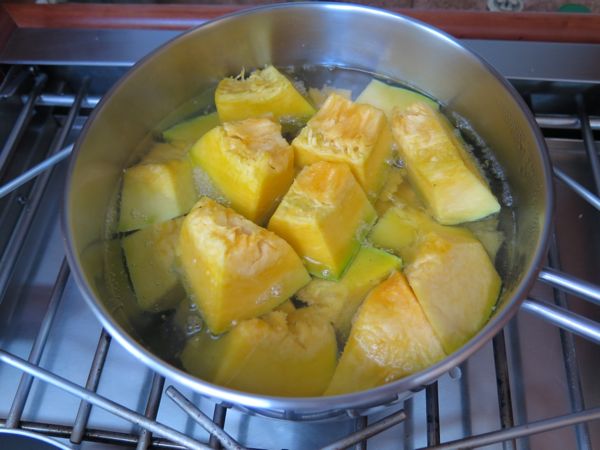
Remove pumpkin from water and allow to cool slightly, enough so that you can handle it to cut off the rind with a paring knife.
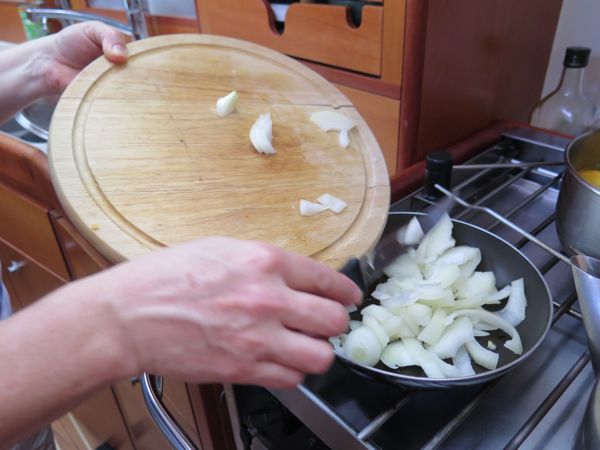
While pumpkin is cooling, saute the chopped onion (and garlic if using) in olive oil for 3-5 minutes in a frying pan, until onion turns clear. Remove from heat.
Open can of tomatoes and add to blender including all liquid in the can. Add softened onion/garlic to the tomato in blender. Puree until smooth.
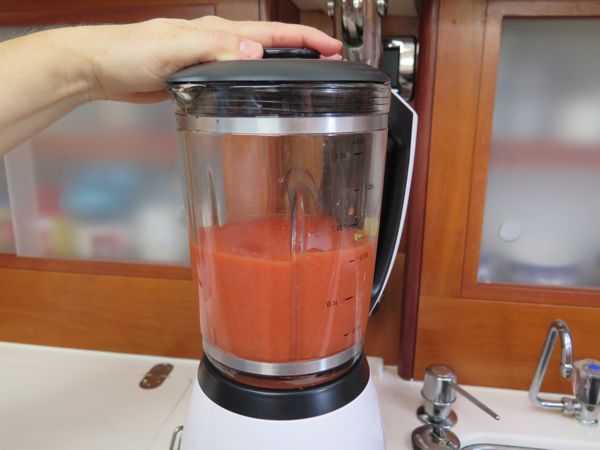
Remove tomato onion puree and put in a large saucepan.
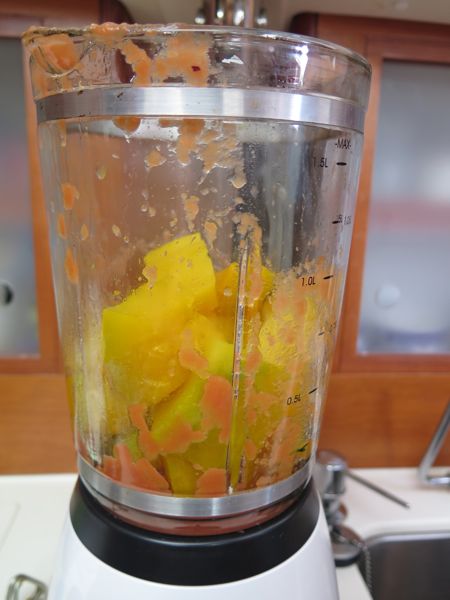
Add pumpkin pieces to blender and puree.
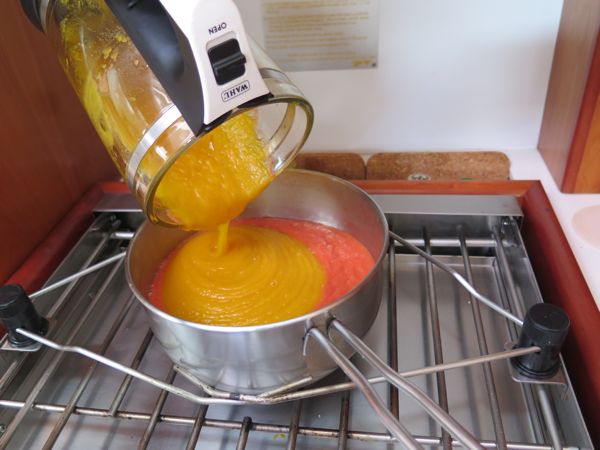
Add the pureed pumpkin (or can of pumpkin puree) to the tomato onion puree in the large saucepan. Stir to blend.
Dissolve 1 bouillon cube in the hot water and add to the pureed liquid in the saucepan. Stir to blend.
Add salt and pepper, curry and lemon juice to taste.
If soup is too thick for your liking, add a little water until it reaches the desired consistency.
Serve hot or cold.
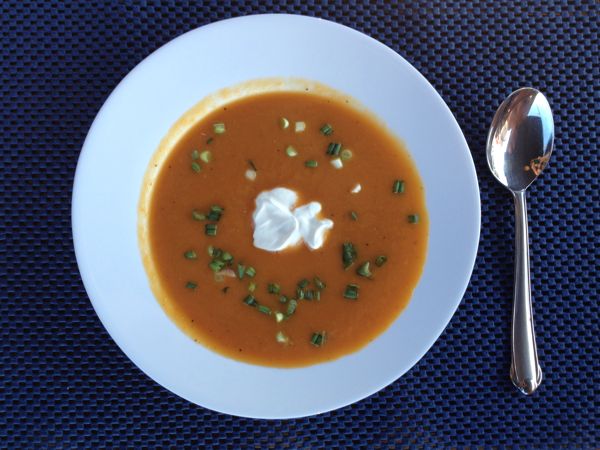
Garnish with garlic croutons, chopped green onion and a dab of sour cream or plain yoghurt.
Makes 4-6 servings.
Check out more Sailing Recipes here.
Plan your passages around the world with us aboard Distant Shores
Order the Super Pack on DVD and get Season 1-10 Downloadable.
Order the Super Pack on Vimeo and we will send you the code for Season 10 as a bonus.
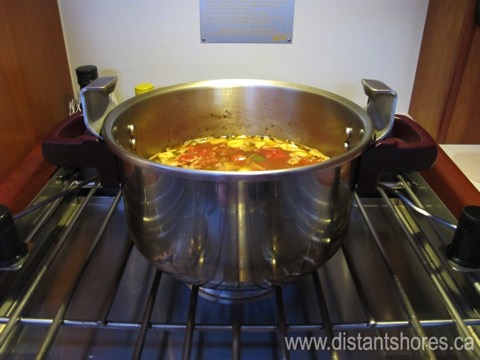
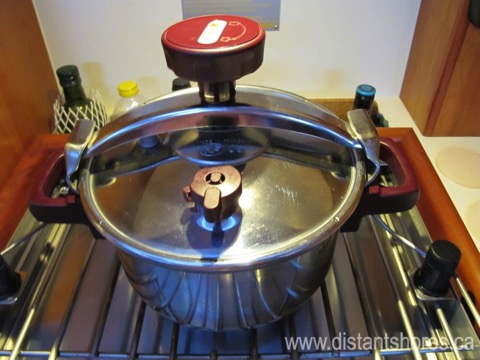
Sailing Recipe - Roast Chicken in a Pressure Cooker
By Sheryl Shard, copyright 2014. All rights reserved

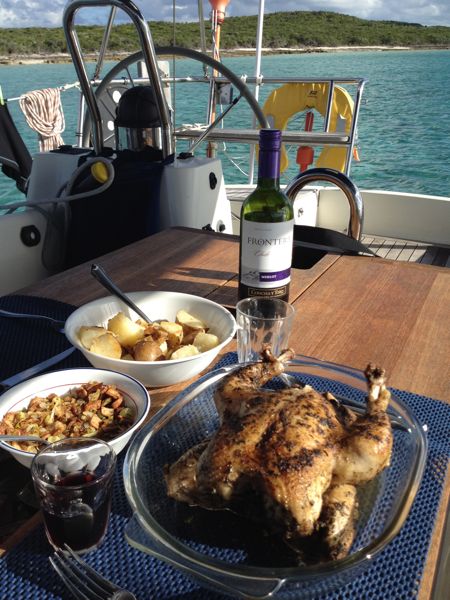
Try making "roast" chicken in a pressure cooker. It's so tender!
In the small settlements of the Out Islands of the Bahamas it is sometimes hard to find good meat but you can always get good quality frozen chicken both in pieces or as a whole chicken so I have been experimenting with lots of chicken recipes recently!
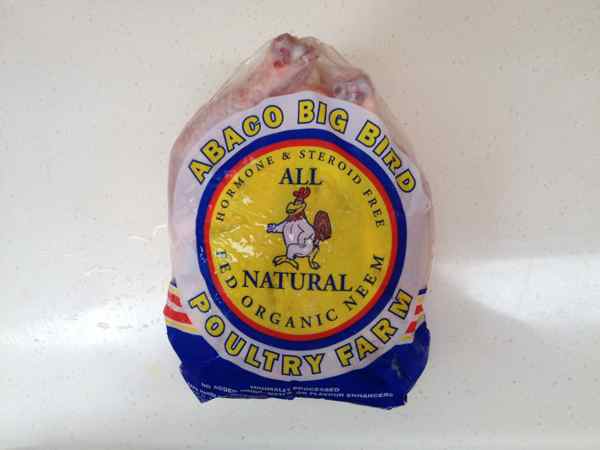
Good quality frozen chicken can even be found in small Bahamian settlements
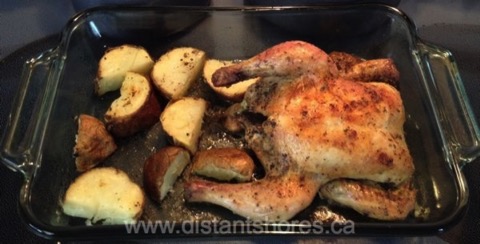
On Sundays Paul and I maintain our family tradition of cooking up a nice roast for a relaxing midday meal and we enjoy a roast chicken with all the trimmings as much as roast beef, pork or lamb. But roasting a whole chicken for up to an hour in the oven in the tropics really heats up the boat. I'd heard that it was possible to roast a whole chicken using a pressure cooker but had never tried it. I thought it would be mushy but I did a little research, spoke to some cruising friends and came up with the following recipe that I think comes pretty close to the flavour and texture of a garlic herb rotisserie chicken which we often enjoyed when we were cruising in the Mediterranean. It's incredibly tender and tasty. Best thing - it cooks in 20 minutes on the stove top!
Whole Roasted Chicken in a Pressure Cooker
Ingredients
1 whole chicken (choose a size that will fit snuggly in your pressure cooker)
3 Tablespoons of Italian Herbs or any mixture of herbs you like
2 Tablespoons of Olive Oil
1 teaspoon of salt
1/2 teaspoon of ground black pepper
3 cloves of garlic, peeled and cut in half
1/4 lemon cut in 2-3 segments, skin on
2 bay leaves
1 cup of water
Method
Thaw chicken. I leave a whole frozen chicken in the fridge to thaw for about 24 hours.
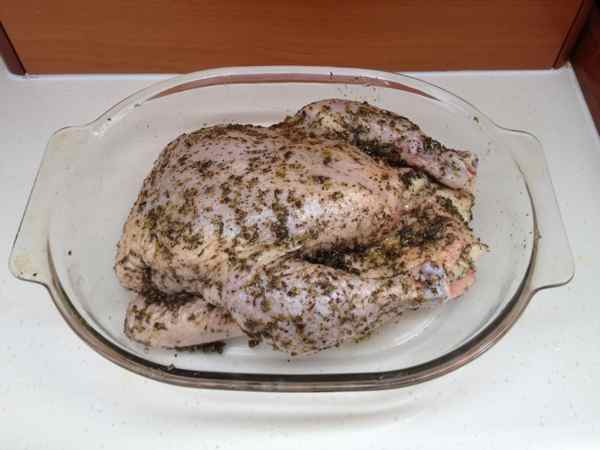
Remove any giblets. Rinse chicken inside and out and pat dry. Tuck the wing tips back behind the neck and place on a large plate or casserole breast up. Take one garlic clove half and rub raw edge all over chicken to flavour skin. Dispose of garlic clove you used on the chicken. Place the remaining garlic in the cavity with one bay leaf. Wash and dry hands.
In a bowl, mix the herbs, salt, pepper and olive oil. Squeeze the lemon slices over the bowl to add juice and then put them in the cavity of the chicken along with the garlic cloves and 1 bay leaf.
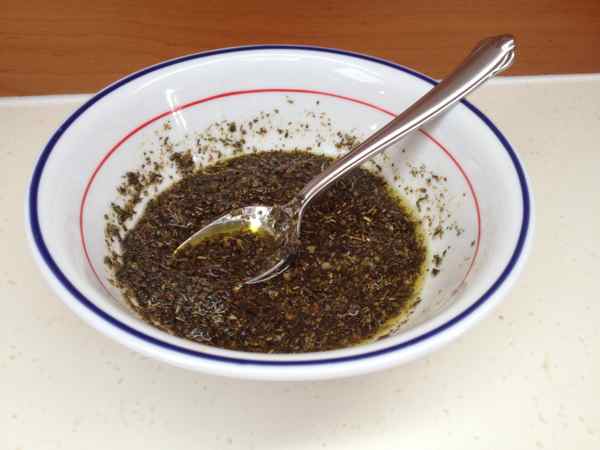
Using bare hands, smear the herb mixture all over the chicken. Wash and dry hands.
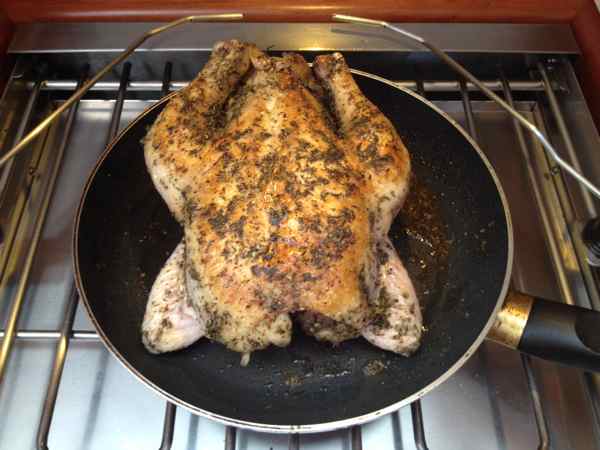
Brown the chicken on all sides for about 10 minutes in a separate pan, or in your pressure cooker if you have a large one. Browning the chicken gives it the roasted taste and texture. Place chicken in pressure cooker.
Add the one cup of water and the second bay leaf to the pressure cooker. Close and lock the lid.

Turn the heat up to high and when the cooker reaches pressure turn heat down to the lowest heat needed to maintain pressure. Cook for 20 minutes.
Turn off heat and let pressure drop naturally rather than by releasing it with the valve.
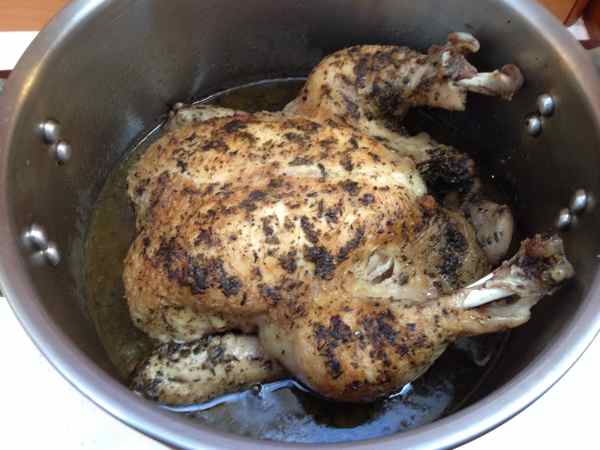
When the pressure has dropped, remove the chicken from the pressure cooker and place on a serving platter.
Tent with foil to keep hot while you make gravy from the juices and liquid left in the pressure cooker. Simmer the contents uncovered until reduced by half, about 5 minutes.
Strain the pan sauce and pour over chicken or place on the table in a gravy boat.
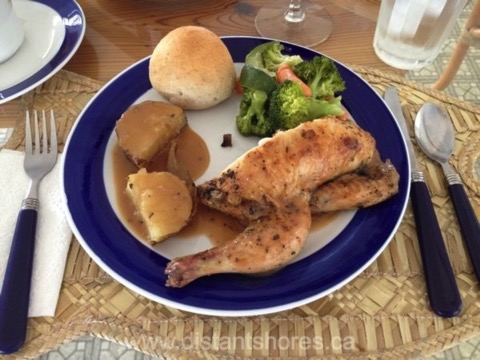
I serve with steamed vegetables and Pan Roasted Potatoes. You can dress this up further for special occasions by serving stuffing too as well as cranberry sauce.
Note: If you just want to cook up a chicken fast and use the meat for chicken salad or other dishes requiring cooked chicken you can skip the browning stage and cook up chicken pieces or a whole chicken with just water. My friend Hermione of S/V Arion (owner of Zigzag Bags who appeared in Distant Shores season 7 episode #79/7-1) does this often and by throwing in chopped onion, lemon and whatever herbs she has on hand also creates a lovely stock which she uses later in risottos or to make soup, etc.
If this recipe appeals to you, email it to yourself or save it to your Facebook timeline. Thanks for sharing it with your friends too!
You might also enjoy these other sailing recipes.
From January 9 to 18, 2015, Paul and I will be conducting seminars at the Toronto International Boat Show in Canada including "Provisioning for Cruising". Hope to meet you there! 
Join our email list and get hints, technical articles and tips plus videos to help you achieve your cruising dreams.
- FREE 1/2 hour video on cruising the Exuma Islands in the Bahamas
- Technical Blog shows you how to deal with issues facing the cruising sailor
- Destination information from some of the world's best cruising areas
- Special discounts and promotions
Bahamas - Catching and Cooking Lobster
By Sheryl Shard, copyright 2014. All rights reserved
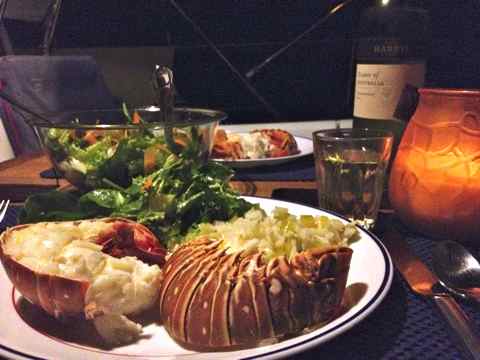
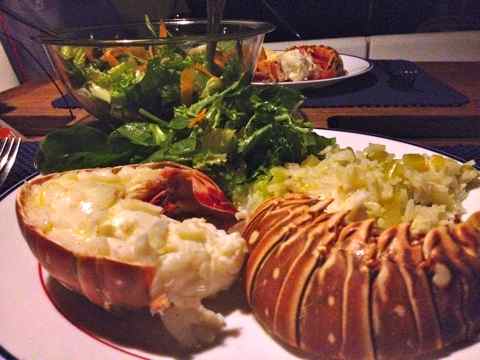
Steamed Lobster Tails served in the cockpit of Distant Shores II
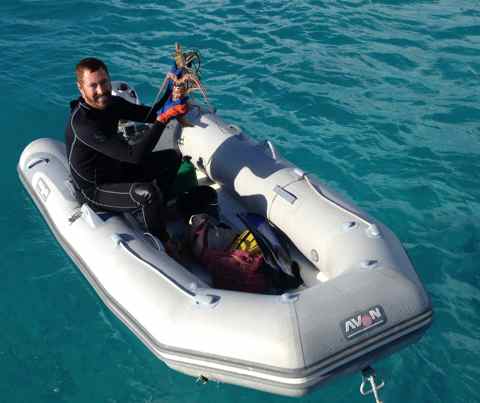
One of the pleasures of cruising in the Bahamas is the abundance of fresh fish and lobster found on the vibrant reefs throughout the islands. We love to snorkel and on our first cruise here in 1989 a friend showed Paul how to use a hand spear and catch lobster. Now it’s something he looks forward to whenever we return to the Bahamas during lobster season which is August 1 to March 31st.
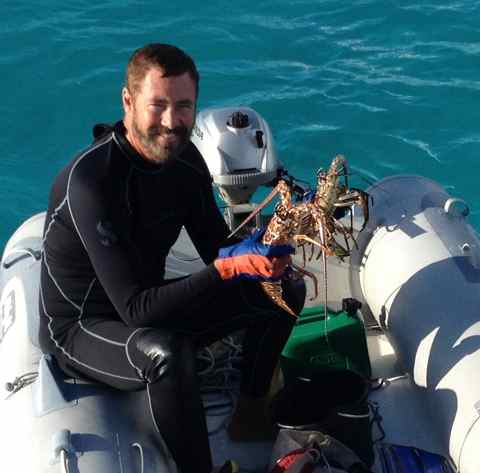
Paul with his Catch of the Day
The lobster in the Bahamas is not like the cold water lobster with claws that you may be familiar with. Here you find Spiny Lobster, also called crawfish by the Bahamians, and in some places called Rock Lobster. These lobsters have very large tails and long barbed whips instead of claws.

Spiny lobster have long whips instead of claws
The best time to hunt for spiny lobster is in the early morning and late evening or on a cloudy day since they hide from the sunshine and wander around at night to forage for food. You'll find them tucked under coral heads or ledges or any safe hole with their whips facing outwards for protection in the daytime.
Regulations for Hunting Lobster in the Bahamas
You need a fishing license to hunt spiny lobster in the Bahamas which is included in your cruising permit when you arrive on your own boat or you can purchase one separately, usually from customs, if you're flying in. In the Bahamas:
- you can only hunt lobster by free diving (breath holding using a snorkel only, no scuba tanks) and you can only use a Hawaiian Sling, a type of hand spear, to catch them, not a spear gun. (In most places we've visited in the Caribbean only the locals are permitted to hunt lobster.)
- Lobsters should measure 3 3/8 inches across the carapace (main part of body) or have a 6 inch tail length. Paul marked these lengths on the end of his spear with a permanent marker so he could measure the lobster before choosing one for dinner.
- Egg bearing females are protected.
- Only 6 lobsters are permitted by one person at any one time.
- The annual season is August 1 to March 31st, closed April 1 to July 31.
Steamed Lobster Tails
Ingredients
1 lobster tail per person (depending on size of lobster)
1 lime or lemon cut into sections
seasoning salt
1to 2 cloves of garlic, crushed
1/4 - 1/2 cup olive oil or melted butter
1 teaspoon of sea salt
Method
Using kitchen shears cut the tails in half longways making sure the vein down the back is cleared out.
Pour about 1 inch of water into the bottom of a large pot and bring to a boil. Add a tablespoon of sea salt and a tablespoon of lime or lemon juice to the water. The juice prevents a strong smell of seafood in the boat. (I have also used clean sea water in place of fresh water plus sea salt. You be the judge.)
You can place a steamer insert inside the pot so that the lobster tails stay above the water level but I usually just place the half tails, shell side down, right into the boiling water.
Cover and steam for 8 minutes or until meat is no longer transparent and shells are reddish in colour.
Meanwhile, crush garlic cloves and add to 1/4 - 1/2 cup of olive oil or melted butter.
When tails are cooked remove with tongs and brush with a little of the garlic oil/ butter and sprinkle with seasoning salt. Save the rest of the garlic oil/butter for dipping into while eating.
Plate and garnish with slices of lemon or lime. Serve with rice and salad or cole slaw.
Steam until the meat is just opaque. Smaller lobsters are more tender.
There are many ways to prepare lobster tails and use the meat. Please tell us how you like it best in the comments below!
If you like this recipe you can save it to your Facebook timeline or email it to yourself. Thanks for sharing it with your friends too!
You might also enjoy these other sailing recipes.
Join our email list and get hints, technical articles and tips plus videos to help you achieve your cruising dreams.
- FREE 1/2 hour video on cruising the Exuma Islands in the Bahamas
- Technical Blog shows you how to deal with issues facing the cruising sailor
- Destination information from some of the world's best cruising areas
- Special discounts and promotions
Sailing Recipe - Crab Nicoise
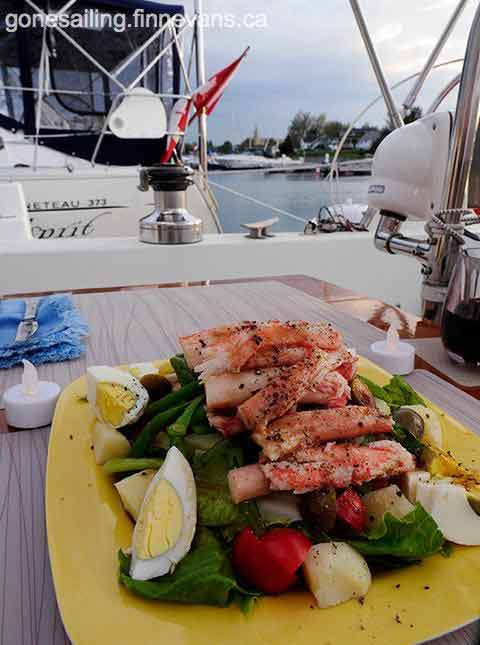
Crab Nicoise by Jayne Finn S/V Phantasia
This week’s recipe is submitted by cruising sailor and artist, Jayne Finn, of S/V Phantasia. Her favourite cruising ground is Eastern Canada. Thanks, Jayne!
I love a salad Nicoise as a main dish in hot weather. It's so elegant with the vegetables carefully arranged and is open to personalization depending on what's available or freshest. Switching it up keeps it fresh to your family too.
This version is from Newfoundland when crab was in season and the traditional tuna is replaced by crab legs purchased already cleaned and cooked.
On a bed of torn lettuce (use what is freshest…romaine, bib, leaf or even iceberg) arrange very lightly steamed whole green beans. I have substituted asparagus or yellow beans at times. Then add sliced tomatoes or halved cherry tom's and olives (again, lots of options but I usually use pitted). Thin-sliced radish and cucumber can be a nice addition. Around the edge of the plate add chunks of firm-cooked potatoes and quartered hard-boiled egg.
The piece-de-resistance…piled high crab legs but this could be shrimp, tuna or salmon, or in a pinch, tinned tuna.
Make a vinaigrette and drizzle over top. If you're an anchovy fan you can add to the vinaigrette for a more traditional, Mediterranean, taste.
FOR THE DRESSING:
3 tbsp. olive oil
2 tbsp. fresh lemon juice or a white wine vinegar
2 tsp. Dijon mustard
1 tsp minced onion
Freshly ground black pepper, to taste
shake vigorously
Garnish with some fresh parsley or parsley flakes and grind some extra fresh black pepper over if you wish.
Enjoy!
Jayne from Phantasia II
gonesailing.finnevans.ca
www.facebook.com/gonesailingCA
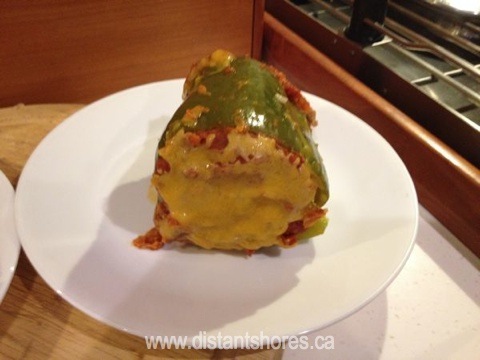
Sailing Recipe - Stuffed Peppers

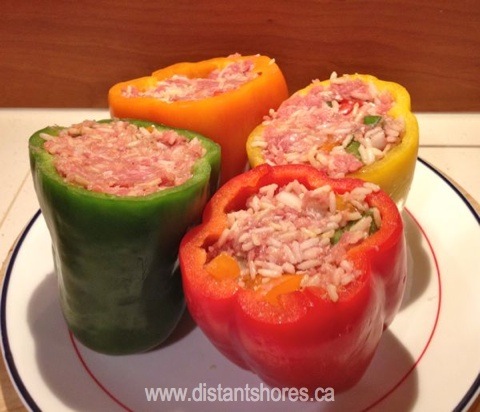
Stuffed Peppers served at the cockpit table of Distant Shores II
Recently sailing friend Maggie came to visit us aboard Distant Shores II along with her husband, Douglas. Maggie is an excellent cook and she and I had a lot of fun cooking together in Distant Shores' galley for the weekend that they sailed with us.
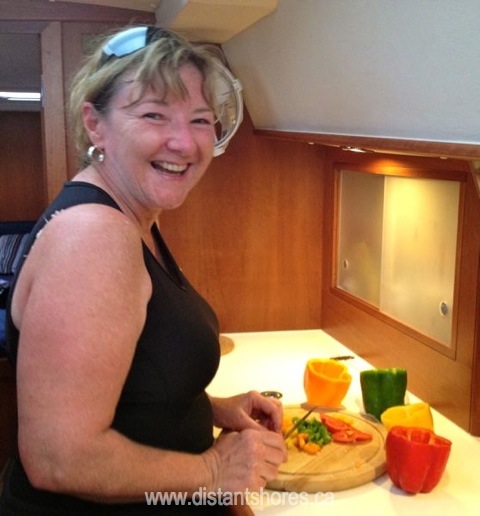
Margaret preparing Stuffed Peppers on board Distant Shores II
Maggie uses her microwave a lot when cooking at home so she shared some microwave tricks and recipes with me (Paul and I just use the small 800 watt microwave we have on board for reheating and thawing) and I shared some pressure cooker recipes with her.

The 800 watt Bosch microwave oven on Distant Shores II
Maggie and Doug are planning to go cruising in a couple of years so Maggie wanted to get familiar with pressure cooking which she doesn't do now at home. She's feels a little nervous of the steam and high pressure just like I did before I came to love my pressure cooker which is so great on the boat!
Why do most cruising cooks love pressure cooking? Things cook very quickly in a pressure cooker compared to a conventional oven so less cooking fuel is used and the boat doesn't get so hot as a result since you're not running the oven or stovetop for long periods. Pressure cooking also keeps steam contained until you release the pressure which disperses rapidly and this prevents build up of humidity and condensation in the boat. The locking lid makes it very safe when underway especially when the seas are rough. But best of all, meals come out moist and tender in a pressure cooker!
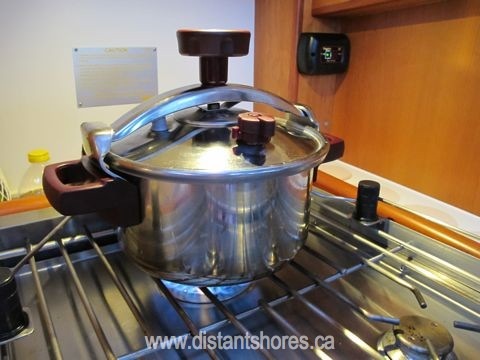
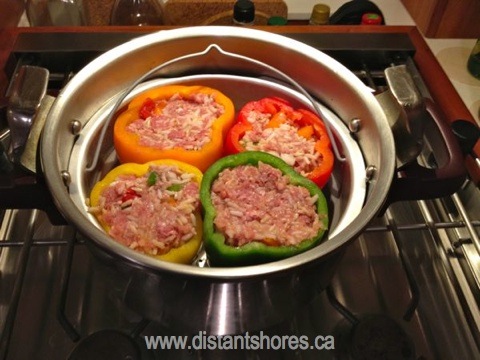
The recipe I'm going to share with you today is Maggie's recipe for Stuffed Peppers. Using a conventional oven her Stuffed Peppers take about an hour to cook. When she does them in her large microwave at home they take about 35 minutes. Using the small microwave on the boat we would have had to run the generator for about 45 minutes, so I adapted her recipe for the pressure cooker which we tested and they cooked in 15 minutes!
Although the recipe and photos demonstrate what we did using the pressure cooker, I have included Maggie's instructions for how to prepare Stuffed Peppers in a regular oven AND a microwave too, so you have three recipes for Stuffed Peppers today.
By the way, you can also stuff eggplants, zucchinis, onions and tomatoes!
Stuffed Peppers
Ingredients
6 medium bell peppers (we used 4 peppers)
1 1/2 lbs. ground beef (we used 1 lb ground beef and had some left over)
1/2 cup onion, chopped
2 cloves of garlic, minced
1 tablespoon of worchestershire sauce
A few dashes of Tabasco sauce (optional)
1 1/2 teaspoons of salt (we used 1 teaspoon)
1/4 teaspoon of pepper
1 cup cooked rice
1 10 3/4 oz can of condensed tomato soup + 1/2 cup water (we substituted about a 1/4 cup of tomato sauce per stuffed pepper).
2 cups grated cheddar cheese (we used about 1 cup of grated cheese for 4 peppers)
1/2 cup of water or broth for pressure cooker method
Pressure Cooker Method
Cut off tops of peppers; remove seeds and membrane. Chop up tops of peppers discarding stem.
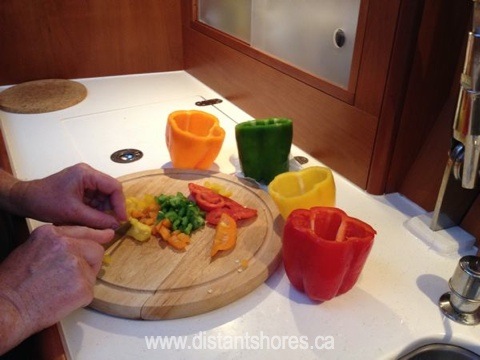
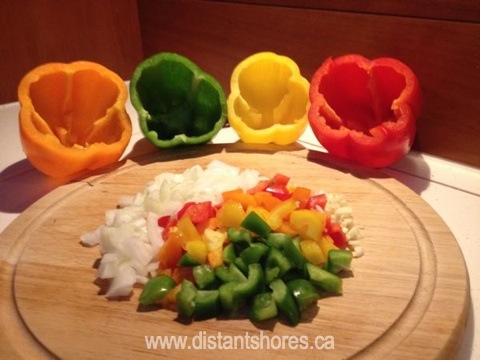
Mix raw beef with chopped pepper tops, onion, garlic, worchestershire sauce, Tabasco sauce (if desired), salt, pepper and cooked rice.
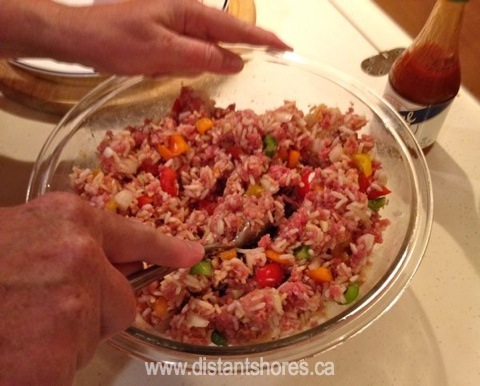
Divide evenly and stuff into peppers.
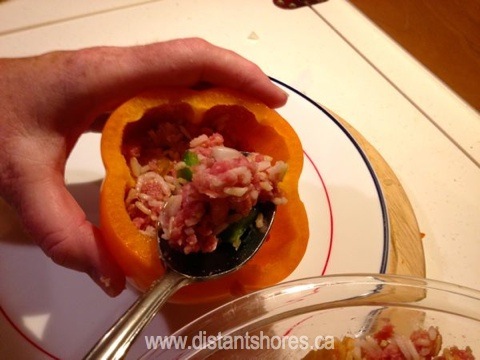
Add 1/2 cup water to the pressure cooker. Arrange peppers upright snugly in the steamer basket of your pressure cooker.
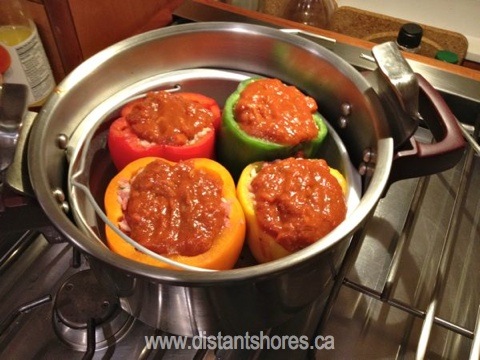
Blend soup and water until smooth (or substitute tomato sauce) and spoon over peppers.
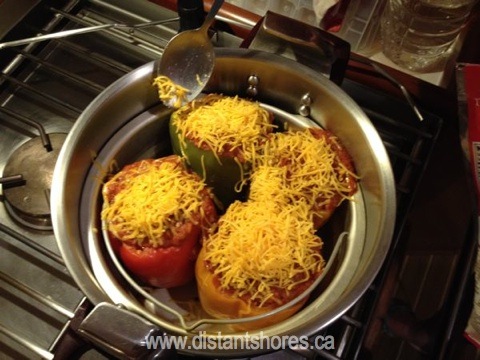
Top with grated cheese.
Close and lock the lid.
Turn the heat up to high and when the pressure cooker reaches pressure, lower the heat enough to keep it at pressure.
Cook at 15 minutes at high pressure.
Release pressure with valve if your cooker has this or, if not, immerse cooker in water to bring pressure down rapidly.
Open the pressure cooker being careful of the steam.
Using tongs, move the peppers to plates and serve.
Microwave Method
Cut off tops of peppers; remove seeds and membrane.
Chop up tops of peppers discarding stem.
Mix raw beef with chopped pepper tops, onion, garlic, worchestershire sauce, Tabasco sauce (if desired), salt, pepper and cooked rice.
Divide evenly into peppers.
Arrange peppers upright snugly in a 3 quart casserole, so one pepper fits into centre of dish.
Blend soup and water until smooth (or substitute tomato sauce) and spoon over peppers.
Cover.
Microwave at High (10) for 28 to 32 minutes. May require more time in small microwave.
Sprinkle with cheese, cover again and let stand 5 to 10 minutes before serving.
Using tongs, move the peppers to plates and serve.
Conventional Oven Method
Cut off tops of peppers; remove seeds and membrane.
Chop up tops of peppers discarding stem and set aside.
Cook peppers in enough boiling water to cover them for 5 minutes. Drain.
Mix worchestershire sauce, chopped onion and chopped pepper tops into the raw beef.
In a medium frying pan, saute meat, onions and chopped pepper tops on the stovetop until onion and peppers are soft and meat is cooked through.
Drain off fat from meat and add cooked rice, garlic, salt and pepper.
Divide evenly and spoon into peppers.
Arrange peppers upright in an 8-inch square dish.
Blend soup and water until smooth (or substitute tomato sauce) and spoon over peppers.
Cover.
Bake at 350° F for 45 minutes to 1 hour.
Uncover. Sprinkle with cheese; recover and let stand for 5 to 10 minutes until cheese melts.
Using tongs, move the peppers to plates and serve.
You might also enjoy these other sailing recipes.
Join our email list and get hints, technical articles and tips plus videos to help you achieve your cruising dreams.
- FREE 1/2 hour video on cruising the Exuma Islands in the Bahamas
- Technical Blog shows you how to deal with issues facing the cruising sailor
- Destination information from some of the world's best cruising areas
- Special discounts and promotions
Recipe - Herb Roasted Cornish Game Hen
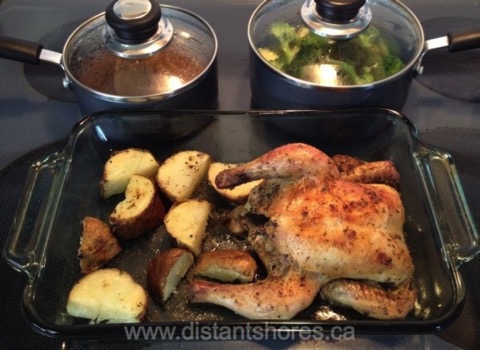
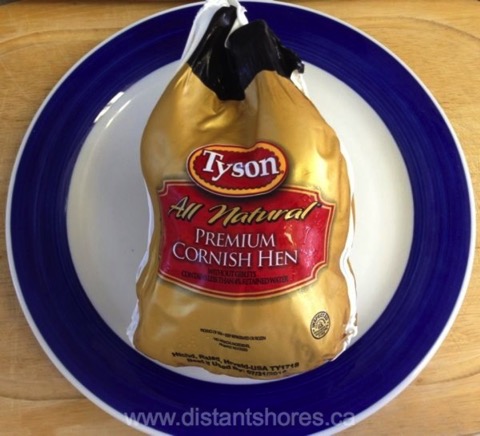
Cruising throughout the Caribbean and Bahamas over the years, we have found that Cornish Game Hens are a popular item in the freezer sections of most grocery stores both large and small in the islands. They are compact, reasonably priced and make a very impressive meal when you want a Sunday Roast, a celebratory dinner or to treat guests on board.
Our New York friends, Nick and Jennifer, first introduced us to the versatility of Cornish Game Hens as excellent items to include in your provisioning list on our very first cruise to the Bahamas in 1989/90. They had a small freezer on board their boat, SV Moonrise, but the hens are small so they stuffed a few into the box to have for special occasions at anchor. They roasted them plain or basted them with orange juice, stuffed them with wild rice or regular stuffing – a variety of ways. We were sold!
We didn't have a freezer on our first boat like they did but we would buy one or two frozen Cornish Game Hens which would keep in the fridge for several days as they thawed out.
Two people can generally share one Cornish Game Hen but it is not unreasonable to serve each person at the table a small hen each.
Cornish Game Hens generally can be found in weights from 16 to 20 oz. and can be prepared, dressed and stuffed just as you would a regular chicken. I can barely tell the difference in taste and they're quicker to cook and prepare than a large chicken. Paul and I always split one, even a 16 oz.
Herb Roasted Cornish Game Hen
Ingredients
1 Cornish Game Hen per 1-2 people depending on appetite level and size of hen.
Butter or olive oil for basting
1 slice of lemon per hen (optional)
1 garlic clove peeled per hen (optional)
1 bay leaf per hen (optional)
Your favourite dried or fresh herb(s), if desired. (e.g. Oregano, rosemary, or poultry seasoning)
Salt and pepper
Method
If frozen, thaw before cooking.
Preheat oven to 350 F (180 C)
Basic: Season with salt and pepper inside and out.
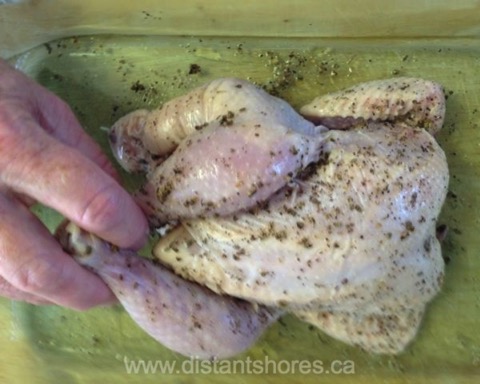
Herb Roasted: Season with salt, pepper and herbs inside and out. In cavity, stuff a slice of lemon (about 1/8 - ¼ lemon), a peeled garlic clove, and a small bay leaf.
Lightly rub outside with olive oil or butter.
Truss (tie up the wings and the legs) as you would a chicken, if you wish.
Place breast side up in a roasting pan or casserole dish.
Roast uncovered, basting frequently with butter, oil and natural juices as the hen roasts. If the hen weighs over 18 oz (1 lb, 2 oz) cook for 1 hour 15 minutes or until juices run clear when thickest part of hen is pierced and temperature on an meat thermometer reads 180 F.
To brown, increase temperature to 400 F during last 10 minutes.
To make gravy I use a gravy mix made with the vegetable water and de-fatted juices from the pan. Quick and easy!
Serve with steamed vegetables and roast potatoes.
Plan your passages around the world with us aboard Distant Shores
Order the Super Pack on DVD and get Season 1-10 Downloadable.
Order the Super Pack on Vimeo and we will send you the code for Season 10 as a bonus.
Recipe - Sour Orange Pie
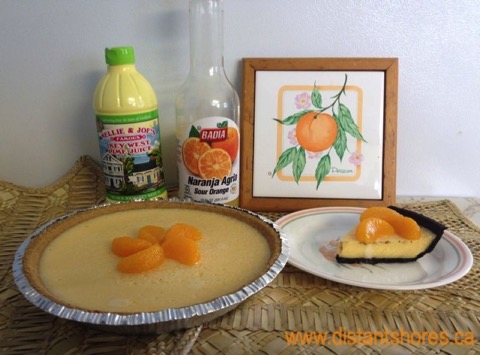
Sour Orange Pie (left) with graham cracker crust and (right) with an Oreo cookie pie crust.
Sour Orange Pie is a refreshing twist on Key Lime Pie and it is just as easy to make.
Sour oranges look like small regular oranges but are bitter. They are used in cooking due to the intense flavour and aroma of the essential oils. They are also used in perfume. You can find them fresh in semi-tropical and tropical regions such as Florida, the Bahamas and Caribbean. The juice is also available bottled in the same way that lemon and lime juice is and this is what I use on the boat when I can't find fresh sour oranges.
A graham pie crust is used just as in Key Lime Pie but a delicious alternative is an Oreo cookie chocolate pie crust, so tasty with the orange flavour! I have found both graham cracker pie shells and Oreo cookie pie shells pre-made in the baking sections of some of the smallest grocery stores in the Bahamas and Caribbean.
Sour Orange Pie
Ingredients
9” graham cracker pie shell or Oreo cookie pie shell
14 oz. (395 g) can sweetened condensed milk
3 egg yolks (Can save whites to make meringue topping if desired. Recipe follows.)
½ cup (125 ml) bottled sour orange juice or juice of 6-8 fresh squeezed sour oranges *
* Alternative 1: If you don't have access to sour oranges or bottled sour orange juice combine 1/3 cup regular orange juice (1-2 oranges) plus 1/3 cups lemon juice (2 lemons) with 1/8 cup of sugar in a sauce pan and bring to a simmer. Cook for 10 minutes reducing liquid to ½ cup. This thickens the juice creating a more intense flavour. Cool.
* Alternative 2: You can also substitute ½ cup lime juice for sour orange juice to make Key Lime Pie.
Method
Combine sweetened condensed milk, egg yolks and sour orange juice blending until smooth.
Pour filling into cool pie shell. Cover with meringue topping if desired. Recipe follows.
Bake at 350 F (180 C) for 12-15 minutes or until mixture sets.
Allow to stand 10 minutes before refrigerating.
Just before serving, top with freshly whipped cream (if not using meringue, see recipe below) and/or garnish with orange slices. (I use canned mandarin orange slices in a pinch as pictured above.)
Meringue Topping
If you prefer a meringue topping, beat 2 large egg whites until frothy. Gradually beat in ¼ cup (50 g) of sugar until stiff.
Spread over pie filling sealing to edge of crust.
Bake as above or until meringue is golden.
Recipe - Paul's Red Lentil Soup
Paul's Red Lentil Soup
Paul was first introduced to lentil soup by our Italian sailing friends, Antonella and Giorgio aboard S/V Narena, while cruising in Turkey. It was around Christmastime and we were in Fethiye on the south coast of Tureky and one sunny day we all decided to go for a sail despite the snow on the surrounding mountaintops. At sea level it was warm in the sun. All other boats were hunkered down for the winter.

Then Paul and Giorgio decided to go diving! Brrr! Giorgio was determined to catch a fish for dinner and to also collect shellfish which he and Antonella eat raw like sushi – a special Christmas treat. So off our men went despite the cold temperature of the water.

Paul and Giorgio were successful in their mission but blue with cold and shivering after their dive so Antonella whipped up a hearty and warming lentil soup in her pressure cooker aboard Narena using red lentils and some vegetables she had on hand.
Paul loved it and over the years has revised the mixture of vegetables and herbs to create his own special recipe. He often makes this soup up before a passage to sit on the stovetop while we're sailing for a quick, nourishing, easily-digestible meal. He recently made up a pot when we weathered Tropical Storm Chantal with the boat tied in the mangroves in Martinique. It was a warming comfort food in the midst of the raging storm. We documented the experience including how we set up the boat in the mangroves in Distant Shores episode 9-12 (#116) which you can download if you’d like to see it.
This is another “kitchen sink” style recipe that you can easily adapt to the vegetables and herbs you find in the places where you're cruising. For example, Paul sometimes adds celery, green pepper or spinach if it's available. If fresh parsley can't be found he will use dried parsley or oregano. A dash or two of tarragon adds a wonderful flavour too!
Paul's Red Lentil Soup
Ingredients
1 large potato, chopped
1 large leek, chopped (or 3 green onions)
1 small yellow onion, chopped
1 large carrot, chopped
2 large cloves of garlic, chopped
1 small bunch of parsley, chopped
1 large bay leaf
pepper to taste
1 ½ cups red lentils (Or 1 cup red lentils plus ½ cup green lentils for added texture)
6 cups of water
Method
Saute chopped vegetables in olive oil in a saucepan over medium heat.
Add pepper.
When vegetables are soft add water and bay leaf, then lentils.
Stir and simmer on medium-low heat until all vegetables are cooked and broth thickens, about 30-40 minutes. If it gets too thick you can add more water. Stir often to prevent scorching on the bottom of the pan. (Note: If you use green and red lentils, the green lentils take longer to cook so you will need to simmer the soup longer, for about an hour total, in a regular saucepan.)
You can also make this soup in the pressure cooker in about 10-13 minutes at 15 lbs. pressure but it nearly always sticks to the pan on the bottom since you can't stir it while under pressure.
Remove the bay leaf before serving.
Puree if desired but we like it chunky, more like a vegetable stew, for a heartier meal.
Serve hot with fresh bread or rolls.
Makes 6-8 servings.
Recipe - Caesar Potato Salad
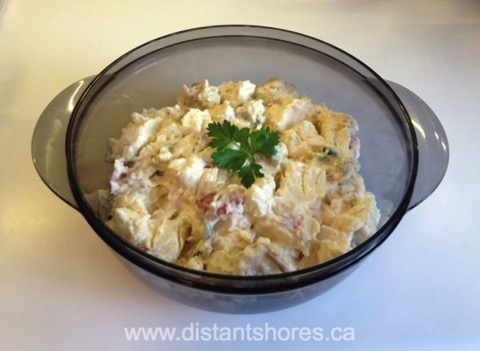
Caesar Potato Salad
This potato salad is a delightful mix of the best flavours of a caesar salad and classic potato salad combined.
I adapted it from a recipe I found in the Taste of Home's Quick Cooking Annual Recipes 2001 Cookbook submitted as “Grandma's Potato Salad” by Susan Plocher of Oklahoma City, Oklahoma.
It's a bit of a “kitchen sink” creation, meaning you can add or subtract from the recipe depending on what you have on hand or how many people you are serving. It is also easy to halve or quarter the recipe if you want to make less.
Caesar Potato Salad is always a winner at Pot Luck Suppers!
Caesar Potato Salad
Ingredients
6-7 medium red potatoes (about 2 pounds)
¾ cups mayonnaise
½ cup sour cream
½ cup plain yoghurt
1/3 cup thinly sliced green onions
2-3 dill pickle spears chopped
4 ½ teaspoons Dijon mustard
1 teaspoon prepared horseradish
1-2 cloves garlic, minced
½ teaspoon celery seed
½ teaspoon salt
¼ teaspoon pepper
Dash onion salt
Dash garlic powder
4 hard-cooked eggs, coarsely chopped
1-2 tablespoons of bacon bits or 1-3 strips of bacon cooked and crumbled.
Preparation
Place scrubbed potatoes, leaving skins on, in a saucepan and cover with water. Bring to a boil.
Cook for 10-20 minutes or until tender, drain and cool slightly.
Slice or cube potatoes into a large bowl.
In a small bowl, combine the mayonnaise, sour cream, yoghurt, onions, pickles, mustard, horesradish, garlic and seasonings.
Pour over potatoes and toss to coat.
Gently stir in eggs and bacon bits.
Cover and refrigerate for 2-3 hours.
Makes 8 servings.
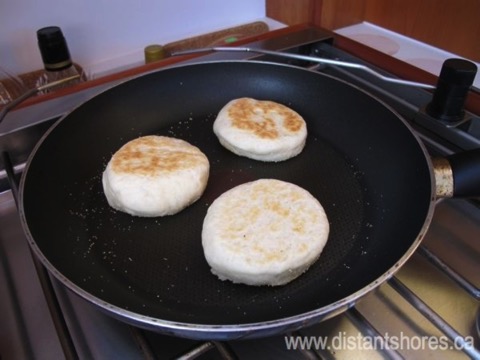
Recipe - English Muffins
English Muffins
English Muffins make a nice change from bread or regular toast in the morning and are easy to make and store on a boat.
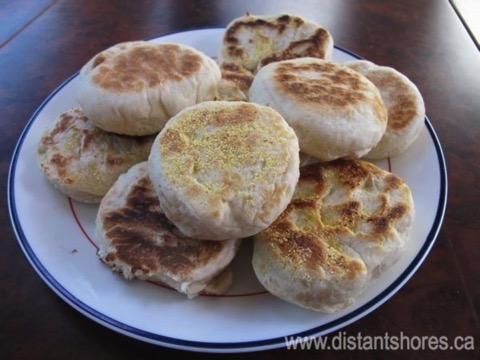
Commonly used in breakfast sandwiches such as Egg McMuffins, English Muffins are a type of skillet bread which means they can be made on the stovetop. Most yeast breads need time in a hot oven which heats up the boat, undesirable in the tropics but welcome when cruising in cooler climates!
Some recipes for English Muffins call for finishing the muffins in the oven but I never do and they're delicious. Instead, after browning both sides, I put the lid on the frying pan and “bake” them for 2-3 minutes that way. Baking them in the oven does make for a lighter fluffier less chewy muffin however.
This recipe, which I got online from All Recipes, makes about 16 English Muffins which I store in a self-sealing plastic bag. They keep well for a few days even without refrigeration.
English Muffins
Ingredients
1-1/2 tsp (7 mL) active dry yeast
1 cup (250 mL) warm milk
1 cup (250 mL) warm water at 110 F (45 C)
1/4 cup (60 mL) butter, melted
2 tbsps (30 mL) granulated sugar
6 cups (800 g) all-purpose flour
1 tsp (4 mL) salt
1/3 cup (75 mL) cornmeal, (approx)
Preparation
Warm the milk in a small saucepan until it bubbles, then remove from heat. Mix in the sugar, stirring until dissolved. Let cool until lukewarm.
In a small bowl, dissolve yeast in warm water. Let stand until creamy, about 10 minutes.
In a large bowl, combine the milk, yeast mixture, butter and 3 cups flour. Beat until smooth. Add salt and rest of flour, or enough to make a soft dough. Knead. Place in greased bowl, cover, and let rise.
Punch down. Roll out to about 1/2 inch thick. Cut rounds with biscuit cutter, drinking glass, or empty tuna can. Sprinkle waxed paper with cornmeal and set the rounds on this to rise. Dust tops of muffins with cornmeal also. Cover and let rise until double, 40 minutes or longer depending on temperature in the galley.
Heat greased griddle or frying pan. Cook muffins on griddle about 10 minutes on each side on medium heat. Allow to cool and place in plastic bags for storage. To use, split and toast. Great with peanut butter or cream cheese and jam.
(Make-ahead: Store in airtight container for up to 2 days or freeze for up to 2 weeks.)
Serving Suggestion:

English Muffin Mini Pizzas
Split English Muffins in half and top with tomato sauce, shredded mozzarella cheese and pizza toppings of your choice. Place under a broiler to melt the cheese. When golden and bubbling, remove from heat and serve. Makes a quick lunch.
Researching Destinations for your Dream Cruise?
Check out the entire Distant Shores Super Pack which now includes the newest episodes in the Caribbean, Turks & Caicos and Bahamas from Season 10.
Recipe - Bahamian Macaroni and Cheese Casserole
Potluck suppers and dock dinners are popular social occasions for sailors whether they are out cruising or at home moored at the local yacht club. A collection of good recipes for dishes to contribute to a potluck gathering seems essential to the cruising lifestyle :-)
So this week's recipe, Bahamian Macaroni and Cheese Casserole, is a potluck favourite of mine. It is simple and a hit with sailors of any age.
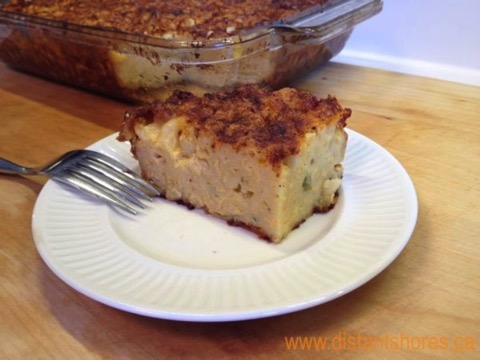
Bahamian Macaroni and Cheese Casserole
It is also a good meal to prepare for a passage because you can cut it up into convenient serving-sized squares and eat it hot or cold. In bad weather at sea it is easy to digest and gives you lots of energy. You can dress it up by adding more vegetables or chunks of chicken, tuna or ham but today I am giving you the traditional recipe.
Paul and I are home at the moment and last weekend we attended a potluck supper at Lagoon City Yacht Club in Ontario, Canada, one of the many events being hosted to celebrate the club's 50th anniversary. Since we just flew home from the Bahamas, Bahamian Macaroni and Cheese Casserole was what I contributed to the meal. It is a very traditional dish in the Bahamas where it is often served at dinner as the main starch.
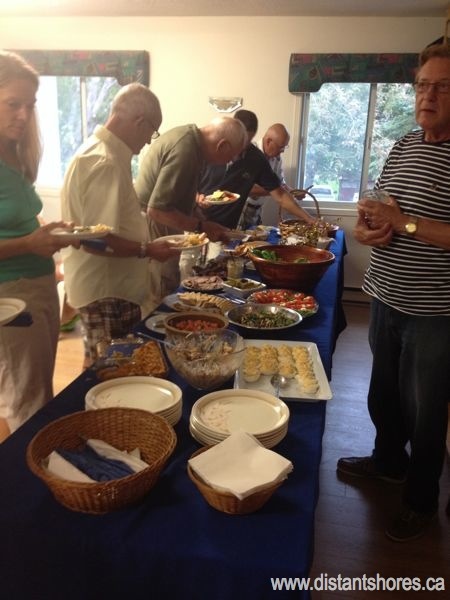
Potluck Supper at Lagoon City Yacht Club
My niece, Giorgia, and Paul's nephew, Sam, stayed with us last week and attended the Junior Sailing Program at LCYC so the LCYC Potluck Supper was also a nice way to conclude the week and celebrate having a couple of other sailors in the family!


Bahamian Macaroni and Cheese Casserole
Ingredients
1 X 1 lb/500 gram box of elbow macaroni (about 5 cups uncooked macaroni)
¼ cup/1/2 stick of butter
2 Tbsp/30 ml minced onion (about ½ the onion pictured)
2 Tbsp/30 ml minced green pepper
1 scotch bonnet pepper (Bahamians call these goat peppers), seeded, deveined and finely chopped. (Alternative: a jalapeño pepper or hot banana peppers)
1 lb/500 grams of grated cheddar cheese (6 cups or 3 X 8 oz packages)
2 X 12 oz/370 ml can of evaporated milk (about 3 cups total)
½ tsp/2 ml ground black pepper
½ tsp/2 ml salt
a few dashes hot sauce
3 eggs beaten
2 tsp/10 ml paprika
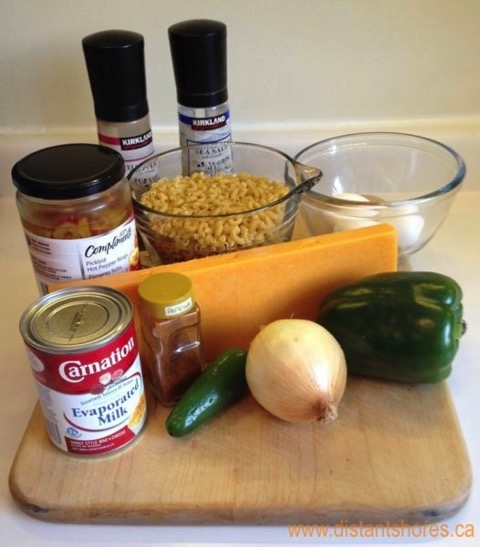
Ingredients for Bahamian Macaroni and Cheese Casserole
Method
Preheat oven to 400º F.
Boil a large pot of water to which a couple of pinches of salt have been added.
Add pasta and follow package directions to cook al dente, about 6 or 7 minutes.
Drain pasta then return it to the warm pot and add butter, stirring until melted.
Add minced onion, green pepper and scotch bonnet pepper (or alternative) and stir.
Next add about ¾ of the grated cheddar cheese, stirring until melted.
Then add milk, salt, pepper, hot sauce and beaten eggs, mixing quickly.
Transfer macaroni into a 9 X 13 inch baking pan or casserole dish.
Sprinkle with remaining cheese, then paprika.
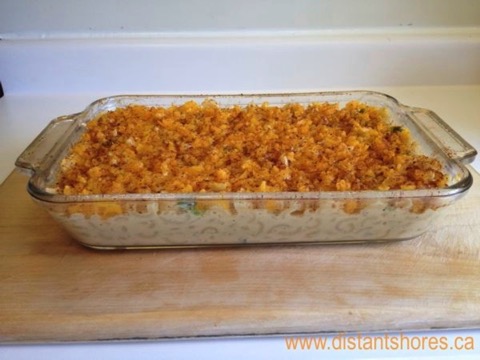
Macaroni mixture ready to go into the oven
Bake at 400º F for 35-40 minutes until top is golden brown.
Remove from oven and allow macaroni to cool for 45-50 minutes. THIS IS ESSENTIAL. Bahamian Macaroni and Cheese Casserole is cut into squares for serving (which makes it a good potluck supper dish) so it needs to set. It is not scooped up with a spoon. It can be reheated before serving if you like but needs to cool first to set. It is also good served at room temperature.
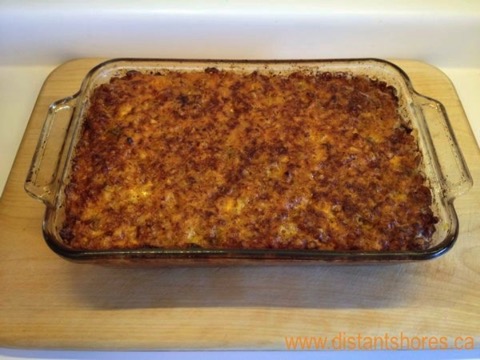
Out of the oven golden brown and resting for 45-50 minutes to set
Recipe - Mexican Appetizer
This week’s recipes, Mexican Appetizer, is a fast and easy appetizer for onboard entertaining. You can also turn it into lunch or a light dinner by adding more garnishes (see suggestions below).
I use this recipe a lot aboard Distant Shores since it is attractive, flavourful and quick to put together at a moment's notice from mostly canned and bottled goods that can be stored on board long-term, then topped with fresh ingredients.
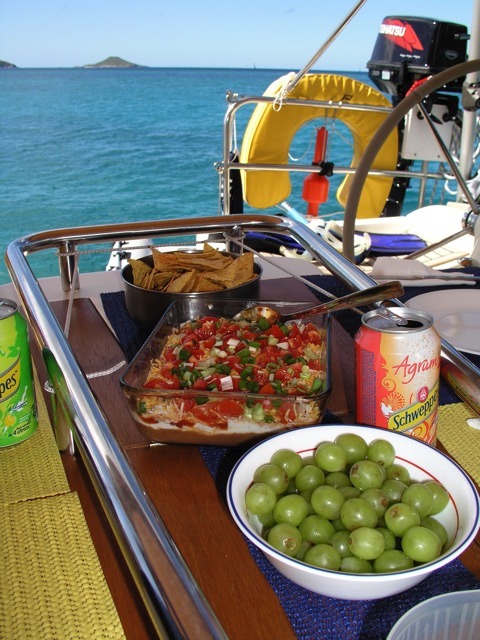
Adjust amounts slightly to suit the size and type of serving dish you choose to serve it in. I use a 6" x 8" x 2" glass casserole dish (pictured) to show off the layers of ingredients. Everything is prepared in the dish you serve it in so doesn't create a lot of dishes to wash up afterwards. Not only does this save water, it leaves you time to relax and enjoy your time on the boat.
My Mexican Appetizer became a reader favourite when it was published in the May 2013 Onboard Entertaining issue of Canadian Yachting magazine.
I hope you enjoy it too!
Mexican Appetizer
Basic Ingredients
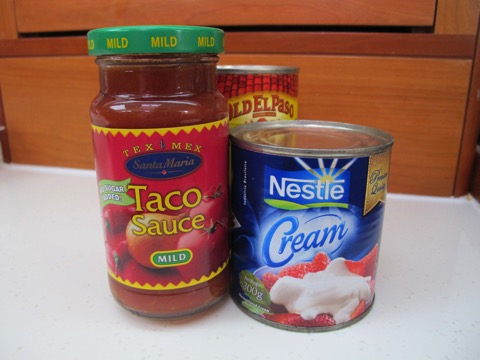
1 X 418 g can of re-fried beans
1 X 230 g jar of taco sauce
1-2 cups of sour cream (substitute 300 g can of cream thickened with a few splashes of lemon juice or vinegar and stirred)
Method
Open can of re-fried beans and spread out contents on the bottom of the dish you're planning to serve it in. A clear glass dish is nice since it shows off the layers.
Spread the sour cream gently on top of the beans with the back of a spoon or rubber spatula trying not to mix the 2 layers together too much.
The final layer is the taco sauce. Use your best judgement here. You don't want to drown the beans and sour cream layers so, depending on the size of your serving bowl or your personal taste, you may not need the whole jar.
Garnish suggestions:
Chopped fresh tomato (substitute canned chopped tomatoes, drained)
Chopped green onion
Chopped celery
Chopped black or green olives
Shredded cheddar cheese
Scoop with:
Natchos, corn chips, or crackers. It becomes a meal if you spread it on fresh bread and serve with a green salad or fruit. Also good eaten with a spoon!
You might also like...
Sunday Flank Steak with Yorkshire Pudding and Garlic “Roast” Potatoes
Seared Tuna with Coconut Rice
Easy Chocolate Cake
Sailing Mediterranean Spain - Barcelona to Valencia
Recipes - Sunday Flank Steak with Yorkshire Pudding and Garlic Roast Potatoes
Today I'm going to share my secrets for a quick and easy Sunday Roast dinner which is a British tradition both our families share. Paul's parents are from England and my grandparents from Ireland and Scotland so enjoying of a big roast dinner, usually a mid-day meal, on a Sunday with the family and close friends around the table is dear to both of us.
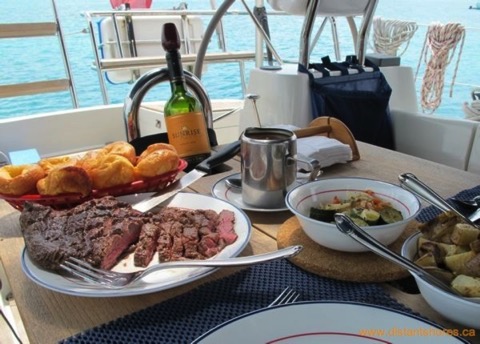
Sunday Flank Steak with Yorkshire Pudding and Garlic Roast Potatoes
Paul and I like to keep up this tradition while cruising, even when at sea on a passage if conditions allow, since it's a nice way to mark the end of the week and make the day special. Sometimes the days can all start to blend together when you're traveling.
Dressing up a bit, setting a lovely table in the cockpit in a beautiful location, then taking all afternoon to savour and slowly enjoy a delicious meal with cruising friends you're catching up with puts you in a great frame of mind for the week to come. After this special weekly meal, I always finish up so relaxed and with a joyful sense of gratitude for the many blessings the life of a cruising sailor offers.
When at home ashore, I’ll prepare a large roast beef and have the oven going for over an hour, but in the tropics having the oven going for a long time is really unappealing since it heats up the boat so much. Also, depending where you are, it’s often hard to find a good cut of beef for a roast.
So one day I came up with the idea of broiling a flank steak instead of doing a roast since recently I’ve found this cut of beef readily available in the Caribbean and Bahamas. Broiling a flank steaks takes 10-12 minutes - very little oven time. I slice it up and serve it like roast beef with gravy, horseradish, Yorkshire Pudding, roast potatoes and vegetables. It is quick and absolutely delicious! Every time I serve it people rave about how tender and flavourful it is.
Sunday Flank Steak with Yorkshire Pudding and Garlic Roast Potatoes
serves 4

Yorkshire Pudding Popovers
Yorkshire Pudding
from the Joy of Cooking by Irma S. Rombauer & Marion Rombauer Becker
Preheat oven to 400ºF
Ingredients
Note: The ingredients must be at room temperature when mixed or they will not puff.
7/8 cup of all-purpose flour
½ teaspoon salt
½ cup milk
2 eggs
½ cup water
Method
Sift flour and salt into a mixing bowl.
Make a well in the center and pour in the milk.
In a separate bowl beat the 2 eggs until fluffy. Then add to the batter.
Add the ½ cup water and beat the batter well until large bubbles rise to the surface. You can let this stand covered and refrigerated for 1 hour and then beat again.
Have ready a hot oven-proof dish about 9 X 12, or hot muffin tin (to make 12 muffins/popovers) containing about ¼ inch hot beef drippings, melted butter or vegetable oil (I use vegetable oil). Heat pan or muffin tin in the hot oven until oil is sizzling.
Pour the batter into the sizzling oil in the hot pan or muffin tin. The batter should be about 5/8 inch high. Bake the pudding/popovers for about 20 minutes at 400ºF.
Reduce the heat to 350ºF and bake 10 to 15 minutes longer until puffed and golden brown. (Some cooks recommend a 350ºF oven for a half hour or longer.)
Serve hot. Good with gravy! (See below.)
Note: Yorkshire Pudding or Popovers are best served right away but I sometimes make 12 popovers earlier in the day or even the day before and then warm them gently in the microwave or a hot oven before serving. This way I have less going on in the galley close to mealtime. Also I don't have the oven on heating up the boat for the whole afternoon which is good if I'm cooking this meal on a hot day or in a tropical climate.
I have also halved this recipe but I find the puddings don't puff up as much however they are still delicious.
Garlic Roast Potatoes
Serves 4
Ingredients
1-2 medium sized potatoes per person. (Judge your guests' appetites. We find 2 medium or 1 large potato is plenty for the 2 of us.)
8-12 cloves of garlic (depending on how much your guests like roast garlic), skins on but bottoms trimmed off.
Method
Wash potatoes. I leave the skins on but if you prefer to peel them go ahead.
Cut into quarters.
Place the potatoes and garlic cloves in a saucepan with just enough water to cover and boil until the potatoes are tender, about 20 minutes. Alternatively you can pressure cook them for 8-10 minutes which saves fuel and reduces heat in the galley.
Drain potatoes. Save water to make gravy with.
Place a little olive oil or vegetable oil in a frying pan and when the oil is hot add the potatoes and garlic cloves (now softened but still with skins on) and crisp them in the frying pan, turning often, until they have a golden “roasted” potato crust, about 10 minutes.
Place in a serving bowl and season with sea salt or seasoned salt. Adding crushed rosemary or other herb of your choice is also nice.
Note: I sometimes boil the potatoes and garlic ahead of time and then crisp them up as I'm slicing up the beef.
Sunday Flank Steak
Serves 4
Ingredients
2 to 3 lb flank steak
Steak Sauce (I find A1 or HP steak sauce gives a nice “roast” flavour. BBQ sauce is too tomatoey. In a pinch, worchestershire sauce works well too.)
Method
Score the meat in a diamond pattern with a sharp knife to break up the connective tissue and to open the meat to the flavour of the steak sauce marinade.
Place meat in a non-metallic pan, casserole or bowl and slather with steak sauce to marinade. Cover the bowl or put marinading meat into a self-seal plastic bag (takes up less room in the fridge) and refrigerate for at least half an hour or overnight.
Preheat broiler. You can also BBQ the meat but you lose the drippings for gravy if you do. Broil within 2 inches of source of heat for about 5-6 minutes on each side. It will blacken. Be sure to cook it rare or medium rare for melt-in-your-mouth tenderness. If cooked well done it can be tough.
Carve by slicing the meat against or across the grain to make it even more tender and serve it like sliced roast beef with gravy made from the drippings (recipe follows).
Quick Gravy
1 package classic brown gravy mix. (Yes, this is a cheat. I promised quick and easy)
Use water the potatoes were boiled in.
Pan drippings
Follow package directions using the water you’ve cooked the potatoes in (and/or other vegetables in) and mix it with a classic brown gravy mix for flavour and nutrition. I also add the drippings collected in the pan beneath my broiling rack which makes the gravy taste homemade.
Sunday Flank Steak served up with gravy, horse radish, Yorkshire pudding, bowls of vegetables and potatoes and a bottle of nice red wine makes this meal feel like a special Sunday Roast dinner you'd have at your grandmother's surrounded by family and friends.
Your Comments
If you try any of these recipes please let me know how they work out for you! You can post your comments below, on the Distant Shores TV Facebook Page or send me an email.
You might also like...
Recipe - Easy Chocolate Cake
Recipe - Seared Tuna with Coconut Rice
Turks and Caicos - Exploring Provo
Making Money While Cruising
Shallow Draft Cruising
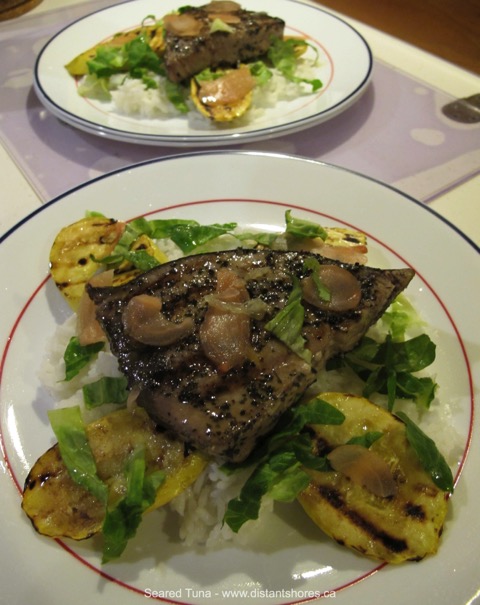
Recipe - Seared Tuna with Coconut Rice
Thanks for the great response I got to the suggestion of posting favourite cruising recipes. I love cooking onboard and obviously you do too!
Several requests for seafood recipes came in via email and Facebook over the last couple of weeks so here's a very simple recipe I’d like to share with you for Seared Tuna that I adapted from a recipe in Jamie Oliver's 15 Minute Meals. It's an absolutely delicious meal that always “wows” dinner guests, yet is SO easy to prepare.
I posted this recipe on the Distant Shores Facebook Page a few months ago and people seemed to really enjoy it. By the way, if you like social media I invite you to “Like” the Distant Shores Page, ask questions and join in the discussions. It's lots of fun!
Seared Tuna with Coconut Rice
serves 4
Ingredients:
Tuna:
4 fresh tuna fillets (ask for these at your local seafood shop or lucky you if you catch your own tuna!)
2 tbsp sesame seeds (optional)
1 tsp green tea powder (simply take a tea bag of green tea, rip it open and use one teaspoon of the powder. Oregano also works well.)
Salt and pepper
½ tsp vegetable or sesame oil
Rice:
270g can of reduced fat coconut milk (I often use dried coconut milk powder which is handy on the boat.)
1 cup Basmati rice
1 cup boiling water
Pinch of salt
Garnish:
1 yellow zucchini, sliced and sautéed or grilled (I like use a grill pan)
A handful of baby spinach leaves or large leaves, chopped. (I’ve used lettuce in a pinch. Chopped green onion is nice too.)
Slivers of pickled ginger
Method:
For the rice: Place the coconut milk, rice, boiling water and salt into a medium saucepan over medium-high heat. Bring to the boil, then reduce heat to a simmer, cover and cook for about 10 minutes, until the liquid is absorbed. Remove from the heat and let sit while you prepare the rest of the meal.
For the tuna: Mix the sesame seeds, if using, with the green tea, salt and pepper on a plate, then press each tuna fillet into the mixture until all sides of the tuna are coated. Heat the oil in a frying pan or grill pan over high heat, then add the tuna and cook for 30 seconds on each side, until barely cooked on the outside and still raw on the inside. If you prefer it a little more well done like we do, cook it a little longer, about 60-90 seconds a side. It doesn’t take much. Remove from the heat. Spoon rice out onto each plate and place a fillet on top of the rice on each plate. Garnish with spinach leaves, slices of zucchini and pickled ginger slivers. Serve and enjoy!
If you like this recipe please feel free to forward it to friends...
You might also like...
Recipe - Easy Chocolate Cake
Maintaining a Home Base while Cruising
10 Tips for Cooking at Sea
Is Your Anchor Dragging?
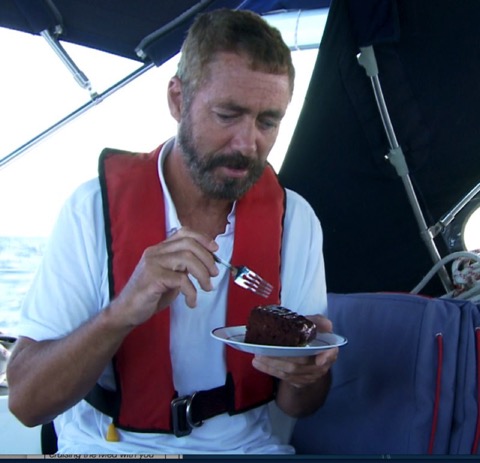
Recipe - Easy Chocolate Cake
Cooking and entertaining onboard is one of the pleasures of the cruising life for me and a topic I enjoy speaking and writing about. So in response to your enquiries about elegant-but-easy cooking onboard I am going to begin posting some of the recipes I use while sailing aboard Distant Shores II on a regular basis.
I've decided to start with an all-time favourite – Chocolate Cake!
The recipe I have used for years and can mix, bake and serve in one dish is called “Po'-Boy Chocolate Cake” from Janet Groene's cookbook for sailors, campers and adventurous vacationers called “Cooking on the Go”. Janet is the author of many books for sailors including “How to Live Aboard a Boat” and has a blog called Boat Cook you might enjoy.
I have found many versions of this quick chocolate cake recipe over the years under such names as Crazy Cake and Easy Chocolate Cake when searching in other cookbooks and also online.
This recipe is great for the boat because there aren't lots of mixing bowls and utensils to clean up (saves water) and requires no eggs, just simple ingredients that are easy to keep onboard long-term. The texture is rich and firm and it's so easy to whip up even when underway!
I recently made this yummy chocolate cake as a treat and to boost our energy mid-afternoon while on passage from the British Virgin Islands to the Turks and Caicos Islands which we filmed for Distant Shores season 10 which you can download as single episodes or buy the season pass and receive new episodes as they are uploaded.
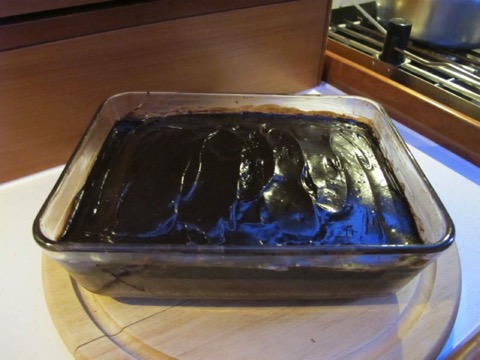
Po'-Boy Chocolate Cake
Ingredients
1 ½ cups flour
½ cup sugar
1 teaspoon baking soda
3 tablespoons unsweetened cocoa powder (not hot chocolate mix)
1 teaspoon salt
1 tablespoon white vinegar
5 tablespoons of vegetable oil
1 teaspoon of vanilla extract (I use rum)
1 cup cold water
Method
Mix the dry ingredients (the first five ingredients listed) in an eight-inch-square cake pan. I use a similar sized pyrex pan, pictured below, that has a plastic lid which makes storing the cake convenient.
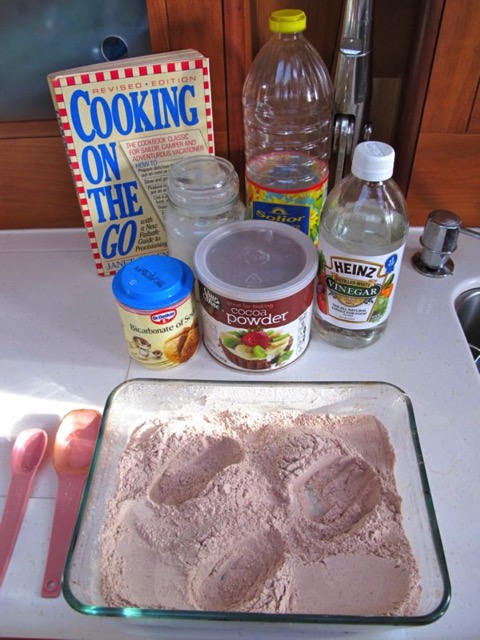
With the back of a spoon, make three holes in the mixture. Put the vanilla or rum in one, the vinegar in the second, and the oil in the third.
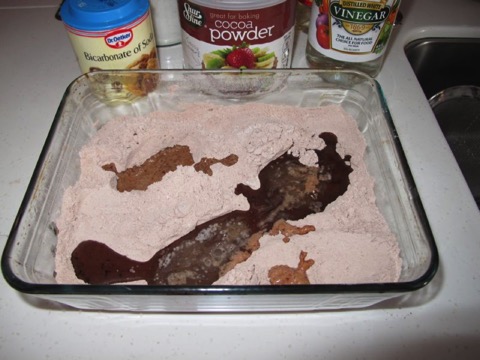
Pour the cold water over all. (It woks best if the water is really cold. I use water from a bottle I always keep chilled in the fridge. If you don't have cold water it still works but the cake is a little denser.)
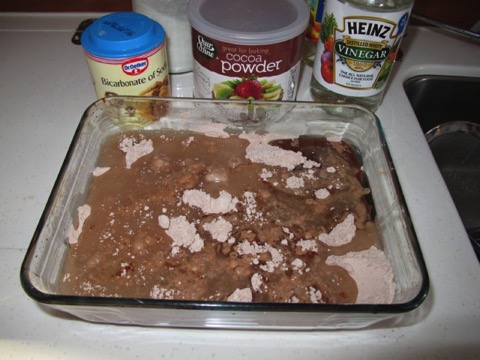
Work well with a spoon paying special attention to the corners, and make sure no unmixed dry ingredients remain.
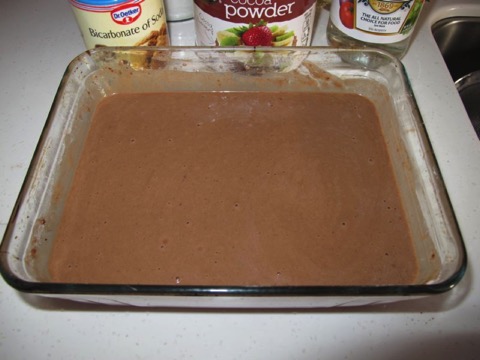
Bake in your oven at 350º F for 30-35 minutes or until springy to the touch.

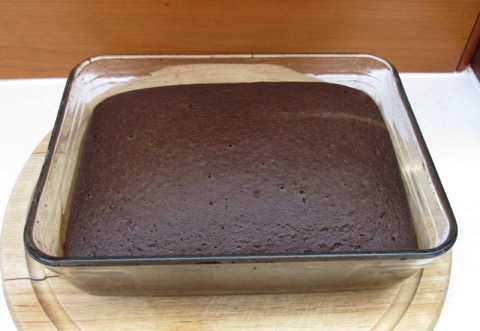
Let cool and top with your favourite homemade or store-bought chocolate icing.
Enjoy!
Researching Destinations for your Dream Cruise?
Check out the entire Distant Shores Super Pack which now includes the newest episodes in the Caribbean, Turks & Caicos and Bahamas from Season 10.