Launch!!!
30/11/07 03:15 Filed in: Southerly Boats
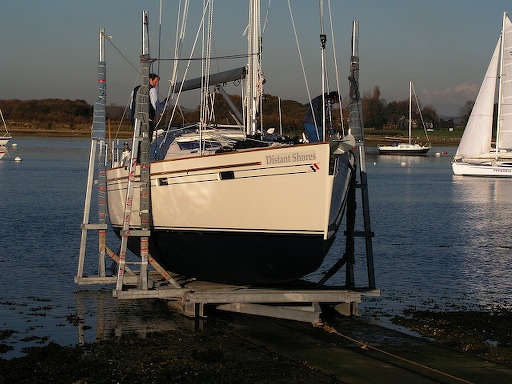
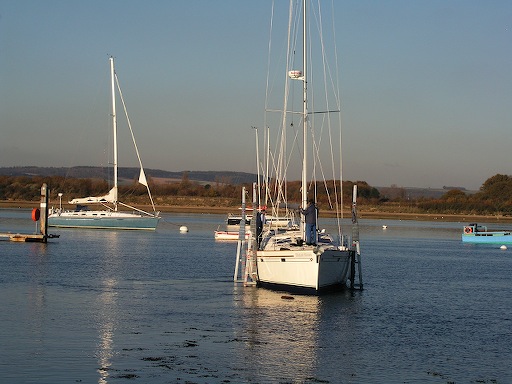
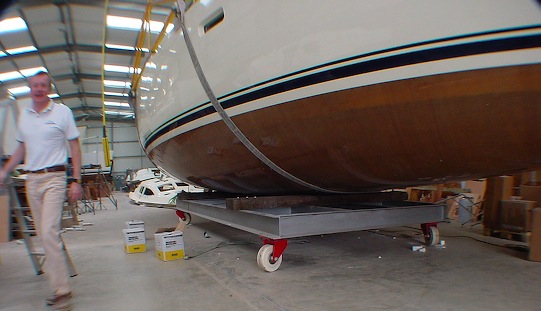
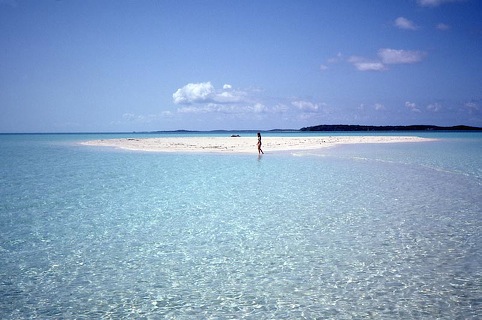
She's in the water. Sea trialled and we are off!!
From Itchenor (South coast of England not far from Portsmouth) we set off and did a marathon to Falmouth, crossing the bay of Biscay, and down the Spanish/Portuguese coasts to get away from the Northern winter. Here are a few quick pix of the launch and sea trials. I am going to keep the blog going (more frequently now we have a bit of breathing room) with updates on new equipment and our experiences with the new boat and her systems.
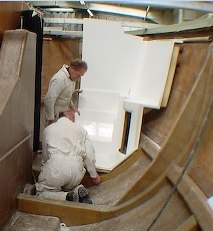
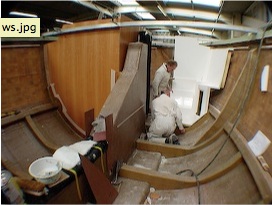
Out of the Factory - wooo hoo!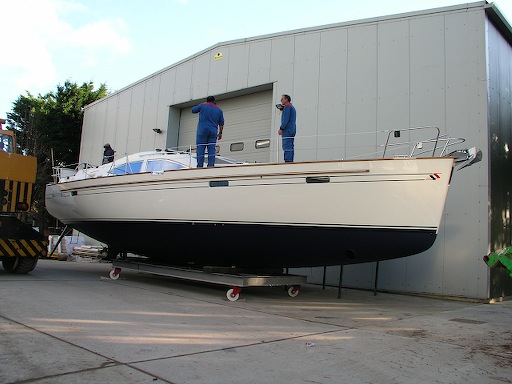
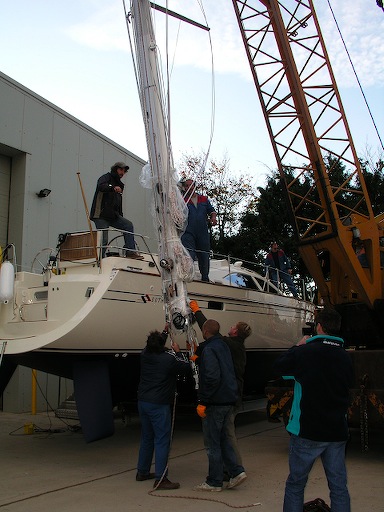
Mast goes up right in front of the factory
On to the travel trailer already rigged
Travel trailer loads to the marine railway.
With 5 meter tides we had to be ready by 1400 or wait till next day
From Itchenor (South coast of England not far from Portsmouth) we set off and did a marathon to Falmouth, crossing the bay of Biscay, and down the Spanish/Portuguese coasts to get away from the Northern winter. Here are a few quick pix of the launch and sea trials. I am going to keep the blog going (more frequently now we have a bit of breathing room) with updates on new equipment and our experiences with the new boat and her systems.
Out of the Factory - wooo hoo!
Mast goes up right in front of the factory
On to the travel trailer already rigged
Travel trailer loads to the marine railway.
With 5 meter tides we had to be ready by 1400 or wait till next day
Comments
Construction update
12/10/07 08:45 Filed in: Electrical | Southerly Boats
We just had another visit to the Northshore yard in Itchenor. "Distant Shores" (the new boat) is coming along great. Right now the final electrical and mechanical systems are going in and we met with David Payne of Mastervolt to inspect the electrical systems. As a cruising boat this couldn't be further from Two-Step. "Distant Shores" has a completely modern and advanced electrical system including a Generator, charger/inverter, isolation transformer, and triple the battery capacity of Two-Step. For more info on the electrical system see my blog entry on that.

The Northshore team are doing a really great job on the boat! Having built our first boat I have an appreciation of the thought and work that goes into building a boat. Ian, the engineer doing the installs of electrical and electronic gear is just excellent. I am afraid to say I would have been wasting time trying to figure out how to do something that Ian can do much more effectively. They have done almost of this stuff before and even if we have some new combination of gear to be fit in, Northshore's background of having built over 700 boats means some people there have experience with the right way to do things. No corners are being cut.
As an example - we are having Mastervolt AGM batteries fitted for both the main ships bank and also the generator and engine starting battery. CE and ABYC standards state that batteries should be in vented lockers. But this regulation was obviously intended for standard flooded batteries - not AGM or Gel cells which are sealed and do not vent gas while charging. I myself might have been tempted to install the AGM batteries and not bother with the vents - but not Northshore. They have done the best job I have ever seen on a vented battery box - running high quality breather tube to a beautiful stainless vent in the transom.
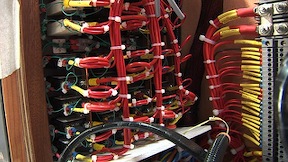 The whole boat is being built to that standard. Take a look at the back of the main electrical panel. Beautifully installed and so tidy it will be a joy to maintain this. Mark - who designs the electrical systems at Northshore has worked there for 27 years. The work he is doing is excellent and the systems shows the knowledge they have amassed over the years. In fact many people have been working there for more than 2 decades.
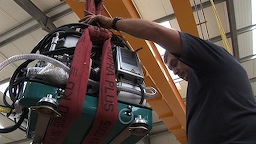 Next big milestone will be to put the deck on. So far the deck has been separate, and equipment is being installed on it as well. It will stay off until the last minute. It makes it much easier to do installations of large or heavy equipment since the overhead crane can be used. We shot this last visit when Ian was fitting the generator.
But now the launch is getting closer and much of the work in the hull is complete. So the deck install is imminent! Stay tuned!
The Northshore team are doing a really great job on the boat! Having built our first boat I have an appreciation of the thought and work that goes into building a boat. Ian, the engineer doing the installs of electrical and electronic gear is just excellent. I am afraid to say I would have been wasting time trying to figure out how to do something that Ian can do much more effectively. They have done almost of this stuff before and even if we have some new combination of gear to be fit in, Northshore's background of having built over 700 boats means some people there have experience with the right way to do things. No corners are being cut.
As an example - we are having Mastervolt AGM batteries fitted for both the main ships bank and also the generator and engine starting battery. CE and ABYC standards state that batteries should be in vented lockers. But this regulation was obviously intended for standard flooded batteries - not AGM or Gel cells which are sealed and do not vent gas while charging. I myself might have been tempted to install the AGM batteries and not bother with the vents - but not Northshore. They have done the best job I have ever seen on a vented battery box - running high quality breather tube to a beautiful stainless vent in the transom.
But now the launch is getting closer and much of the work in the hull is complete. So the deck install is imminent! Stay tuned!
Southampton Boat Show & Construction update
30/09/07 07:38 Filed in: Southerly Boats

Launching is scheduled for just 4 weeks from now!! To say we are excited is a massive understatement!! Right now we are filming in the southwest of England - last weekend sailing on an 82 year old pilot cutter in gorgeous Falmouth Harbour - more to follow as we try to get out a newsletter....
We will be setting sail from England in early November and getting ready for our 4th Atlantic crossing. Check the schedule for opportunities to join us on the new boat for the inaugural season!
Batteries
23/08/07 08:17 Filed in: Electrical
Continuing from earlier blogs on Electrical Budget I have been working on how to fit in all the batteries we need. From the budget calculations we would be using 130amp-hours (130ah) when hanging at anchor and 200 when passagemaking. Two basic assumptions to calculate battery capacity needed are as follows...
I have an additional criteria for batteries - at anchor it would be nice to be able to stay at anchor for 2 days without starting the engine. If we have found a sweet little anchorage we often decide to stay a day at anchor and then leave the next day. I hate having to fire up the engine in that rest day in a peaceful cove just to be able to run the fridge!
To have the power to run the ship for two days at anchor we would need 130 per day X 2 days = 260ah X 2 = 520ah capacity.
Now the tough part. Where to put all these wonderful batteries?

Luckily with the Southerly 42 there is sufficient room in the original battery box to place 3 of the Mastervolt AGM batteries to act as the house bank. We can fit in 2 of the 220ah large batteries (equivalent to the American 8D size) and one 160ah. Total capacity will be 2 x 220 + 160 = 600 ah. Only small changes to the compartment will be needed. The only problem is that this compartment was also meant to house the engine starting battery, so we needed to find another home for this. Mark at Northshore suggested a place under the floor where a battery box could be built for the 90ah starting battery.
The best part of this plan is that the additional 94kg of batteries will go in the exact center of the boat where they will not affect trim.
The decision to go with AGM batteries makes sense from a couple of reasons. First, the AGMs can be recharged faster than conventional flooded batteries. This means shorter running times for the engine or generator. They do not need water adding on a regular basis so we will not have to be going into the compartment and checking them every few weeks. And their sealed design means the extra battery box does not have to have such care for the venting and ease of access.
- Plan on recharging batteries once a day
- Do not discharge your batteries more than 50 percent on a regular basis
I have an additional criteria for batteries - at anchor it would be nice to be able to stay at anchor for 2 days without starting the engine. If we have found a sweet little anchorage we often decide to stay a day at anchor and then leave the next day. I hate having to fire up the engine in that rest day in a peaceful cove just to be able to run the fridge!
To have the power to run the ship for two days at anchor we would need 130 per day X 2 days = 260ah X 2 = 520ah capacity.
Now the tough part. Where to put all these wonderful batteries?
- Many boat manufacturers do not plan sufficient batteries for a boat that will be used for long-term cruising
- Batteries are quite heavy and should not put the boat out of balance
- Lead-acid "flooded" batteries must be vented - this restricts where they can be put
Luckily with the Southerly 42 there is sufficient room in the original battery box to place 3 of the Mastervolt AGM batteries to act as the house bank. We can fit in 2 of the 220ah large batteries (equivalent to the American 8D size) and one 160ah. Total capacity will be 2 x 220 + 160 = 600 ah. Only small changes to the compartment will be needed. The only problem is that this compartment was also meant to house the engine starting battery, so we needed to find another home for this. Mark at Northshore suggested a place under the floor where a battery box could be built for the 90ah starting battery.
The best part of this plan is that the additional 94kg of batteries will go in the exact center of the boat where they will not affect trim.
The decision to go with AGM batteries makes sense from a couple of reasons. First, the AGMs can be recharged faster than conventional flooded batteries. This means shorter running times for the engine or generator. They do not need water adding on a regular basis so we will not have to be going into the compartment and checking them every few weeks. And their sealed design means the extra battery box does not have to have such care for the venting and ease of access.
Weight calculations
04/08/07 08:54 Filed in: Planning
I am going through more calculations to see how the weight distribution is looking now that we have most of the equipment finalized for the new boat. I thought it might be useful for anyone planning a new boat or outfitting an existing boat for a cruise, to see how I have tried to predict the impact of all our stuff on the waterline. You can apply this method to your boat (or dreamboat) too!
In all the far off anchorages in the world we see cruising boats that have way too much stuff on, and waterlines painted higher to deal with the extra weight. But most designers would not be happy to see this - for reduced performance and possibly impaired safety. I want to minimize this so have been trying to get the best of both worlds - add the gear I want but trim the weight so she will still perform well.
I just love all this stuff!! But if the calculations and all are not your thing, you can skip to the punchline - or jump to the pictures of the hull with the keel being put on!
Calculating the effect of more weight
First step in this calculation is to find out how much the weight will effect the boat. Here is a very simplified method that can be applied to any boat. The first number we need is to find out the surface area of the boat in the water. By this I mean the area of the hull at the waterline. Assuming you can't just ask the designer - here is a simple method to calculate it yourself (also assuming you have a plan view drawing of the boat, Photoshop and a computer...)
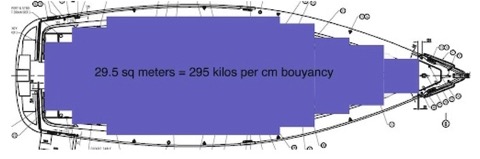
So we have a rough idea of the waterline area of the boat. 29.35 square meters rounded out to 30.
Now for the fun bit. We know the surface area of the boat so we can easily calculate how much weight will push the boat down by 1 centimeter. Its just 1cm multiplied by 30 square meters = 0.3 cubic meter. A 1 cubic meter of water weighs 1000 kilos (saltwater is slightly more but we will ignore this for simplicity). So 300 kilos of extra load would lower the boat down in the water one centimeter. Obviously this calculation is very rough but it does give us what we need to approximate the effects of weight on the design. For every 300 kilos we add to the boat, we will push her 1 cm lower in the water. (For US measurements this means 1680 pounds will push her down by one inch).
300kg of additional weight will push her down by 1cm
Additional Equipment - What does it all weigh?
Here is my list of equipment with weights. These are in addition to the prototype of the Southerly 42 that I have photographed. If you are looking at your own boat to which you plan to add a bunch of equipment - you can use the existing waterline to start your calculations - then add the weights of the gear you plan to buy.
Total weight = 571kg / 300 = 1.9cm
So all this equipment will push the boat down by less than 2cm. Not so bad as I had thought really!
Distribution
The next calculation is to see if the weight will be unbalancing the boat. This is much easier since the main problem normally comes if you add all the weight to the bow or stern. Then you can push the boat down in the stern or bow. You also will likely get worse motion if a lot of weight is added to the bow especially.
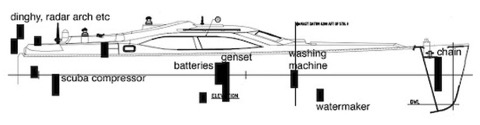
Here is a quick calculation where I have drawn blocks scaled to the weight of the various added equipment. I have added them on the side view showing where the equipment is. Note the heavy 100kg genset, plus the main battery bank are both right in the centre of the boat. This helps a lot. At the bow is the additional anchor chain, and the stern has much of the rest. Again a rough calculation but it shows that we might expect to be a bit more down in the stern, but not much.
I must point out that these are very rough calculations but its something anyone can do to at least approximate the effect of extra equipment on the waterline. And just doing the list of equipment weights can be quite informative.
In all the far off anchorages in the world we see cruising boats that have way too much stuff on, and waterlines painted higher to deal with the extra weight. But most designers would not be happy to see this - for reduced performance and possibly impaired safety. I want to minimize this so have been trying to get the best of both worlds - add the gear I want but trim the weight so she will still perform well.
I just love all this stuff!! But if the calculations and all are not your thing, you can skip to the punchline - or jump to the pictures of the hull with the keel being put on!
Calculating the effect of more weight
First step in this calculation is to find out how much the weight will effect the boat. Here is a very simplified method that can be applied to any boat. The first number we need is to find out the surface area of the boat in the water. By this I mean the area of the hull at the waterline. Assuming you can't just ask the designer - here is a simple method to calculate it yourself (also assuming you have a plan view drawing of the boat, Photoshop and a computer...)
- bring the plan drawing of your boat into photoshop
- you need the scale so you can measure things on the plan. My method is to resize the drawing so the "info" pallette shows the correct dimensions. Since the Southerly is 12.8 meters long I set the scale so the hull on the plan measures 12.8 cm by 4.03cm. Now anything I measure on the drawing will be at a scale of 1cm to 1 meter.
- for the weight calculation we need to determine the area at the waterline. If you have the waterline on the drawing this will be easy. If not (as I didn't) then you have to guess.
- use photoshop to draw a few rectangles on the drawing so that they approximate the area at the waterline. As you draw each rectangle, note the length and width on the "info" pallette in photoshop. My first rectangle is 3.4 by 5 meters - the main shape of the hull. 5 x 3.4=17 square meters. Now write this down.
- Continue making rectangles until you have a rough shape that approximates the waterline of the boat.
- Add together the rectangles. 17+1.6+2.8+3+2.2+1.75+1 = 29.35
So we have a rough idea of the waterline area of the boat. 29.35 square meters rounded out to 30.
Now for the fun bit. We know the surface area of the boat so we can easily calculate how much weight will push the boat down by 1 centimeter. Its just 1cm multiplied by 30 square meters = 0.3 cubic meter. A 1 cubic meter of water weighs 1000 kilos (saltwater is slightly more but we will ignore this for simplicity). So 300 kilos of extra load would lower the boat down in the water one centimeter. Obviously this calculation is very rough but it does give us what we need to approximate the effects of weight on the design. For every 300 kilos we add to the boat, we will push her 1 cm lower in the water. (For US measurements this means 1680 pounds will push her down by one inch).
300kg of additional weight will push her down by 1cm
Additional Equipment - What does it all weigh?
Here is my list of equipment with weights. These are in addition to the prototype of the Southerly 42 that I have photographed. If you are looking at your own boat to which you plan to add a bunch of equipment - you can use the existing waterline to start your calculations - then add the weights of the gear you plan to buy.
- Additional batteries for main house bank - 84kg
- Yamaha outboard 8hp - 27kg
- Mastervolt 3kw genset - 100kg
- Watermaker - 34kg
- Scuba compressor - 56kg
- 2 scuba tanks - 28kg
- Avon dinghy - 43kg
- Washing machine - 65kg
- Additional Chain - 94kg
- Radar Arch - 40kg
Total weight = 571kg / 300 = 1.9cm
So all this equipment will push the boat down by less than 2cm. Not so bad as I had thought really!
Distribution
The next calculation is to see if the weight will be unbalancing the boat. This is much easier since the main problem normally comes if you add all the weight to the bow or stern. Then you can push the boat down in the stern or bow. You also will likely get worse motion if a lot of weight is added to the bow especially.
Here is a quick calculation where I have drawn blocks scaled to the weight of the various added equipment. I have added them on the side view showing where the equipment is. Note the heavy 100kg genset, plus the main battery bank are both right in the centre of the boat. This helps a lot. At the bow is the additional anchor chain, and the stern has much of the rest. Again a rough calculation but it shows that we might expect to be a bit more down in the stern, but not much.
I must point out that these are very rough calculations but its something anyone can do to at least approximate the effect of extra equipment on the waterline. And just doing the list of equipment weights can be quite informative.
Attaching the keel!
03/08/07 07:45 Filed in: Southerly Boats
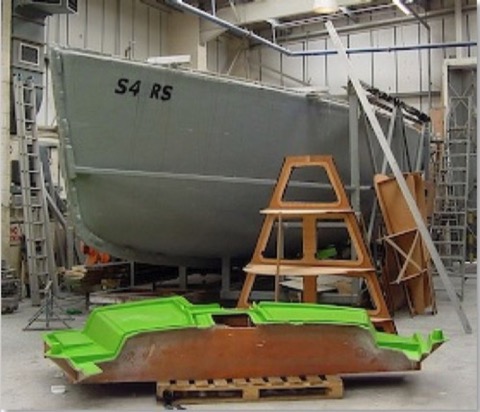
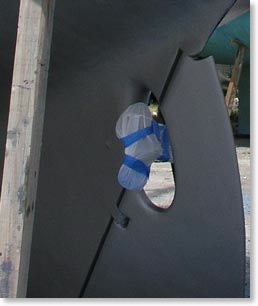
Today the keel was attached. In the old days there was a celebration when you laid the keel of a new boat - and this feels the same! With the Southerly the keel is in two pieces. The grounding plate and the keel itself. In this picture the swing keel is in the up position and ready to have the hull put on top. The hull is up in slings ready to be lowered in place. I have included all the pictures to show how it is done.
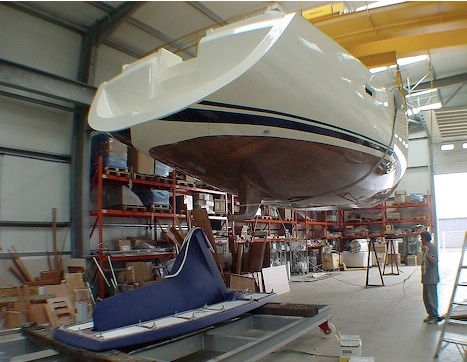
The bottom of the hull is moulded with an inset shape to take the keel plate. You can also see the moulded slot into the hull for the keel when it is raised up. This picture also shows the width of the keel plate. Bolts are widely spaced giving tremendous strength.
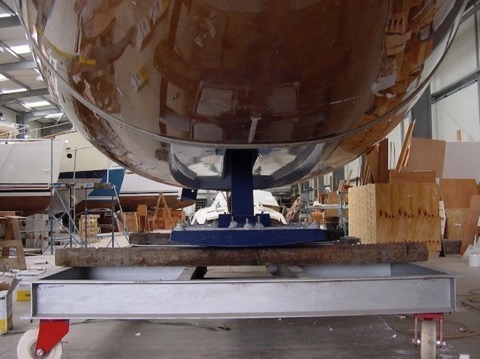
Here's a detail showing the plate and the hull moulding insert. The design of the boat allows her to dry out sitting on her keel. You can see she will sit on this grounding plate when she is aground - much safer than if she just sat on the fiberglass of the hull.
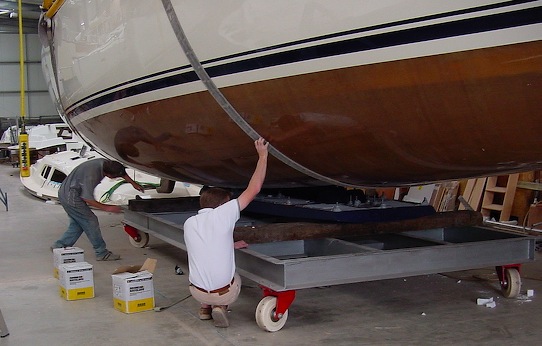
Final checking of the fit.
Keel installed and all done.
That's it for today... now back to editing Distant Shores! Sheryl and I are in the studio for the next few weeks until flying to the UK in September.
Paul

The bottom of the hull is moulded with an inset shape to take the keel plate. You can also see the moulded slot into the hull for the keel when it is raised up. This picture also shows the width of the keel plate. Bolts are widely spaced giving tremendous strength.
Here's a detail showing the plate and the hull moulding insert. The design of the boat allows her to dry out sitting on her keel. You can see she will sit on this grounding plate when she is aground - much safer than if she just sat on the fiberglass of the hull.
Final checking of the fit.
Keel installed and all done.
That's it for today... now back to editing Distant Shores! Sheryl and I are in the studio for the next few weeks until flying to the UK in September.
Paul
More new boat pix!! and the Keel!!
28/07/07 13:25 Filed in: Shoal draft
The New Boat and her keel!!
Here are some images from the Northshore yard in Itchenor. The new boat has just arrived from the moulding shop and is ready to be fitted out. There are also some pictures here of her lifting keel as that will be one of the first projects - to fit the keel in place. I though this would be a good time to look at the keel system in general since the keel and the Southerly's shallow draft abilities are a big part of the reason we chose her for our next boat!
 Keel System
Here the keel is prepped and ready to go into the boat. The keel system consists of a massive grounding plate that bolts into the bottom of the boat. This plate weighs 2100Kg (4600 pounds) which is quite a bit more than our car. In the picture you can see the swinging keel itself in the raised position. It weighs another 1570Kg (3500 pounds) which is about the weight of a BMW 525. So when you swing the keel down you are basically hanging the weight of a respectable car down for added performance. With 9 foot draft this boat sails well to windward! Its one of the advantages of a swinging keel that the designer could go as low as he wanted for good performance.
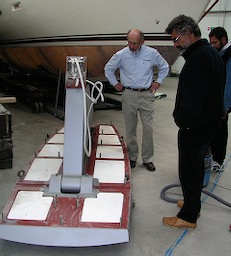 Here is a shot of the keel close up. This is a massively strong system that Northshore have refined since they started building swing-keel boats more than 20 years ago. You can see the widely spaced bolt pattern that connects the keel to the reinforced inset in the hull. One thing I specially like about the builder is their British engineering! Good and solid!
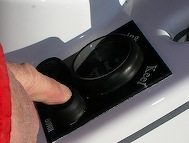 Raising and lowering the keel is done by a hydraulic system. There is an electric pump that runs the hydraulic system and it is remotely controlled from the helm. Just above the buttons is a series of LEDs that show how high the keel is. There is also an emergency handle to be used in case the electric system fails.
 Boat Design for a Swing Keel
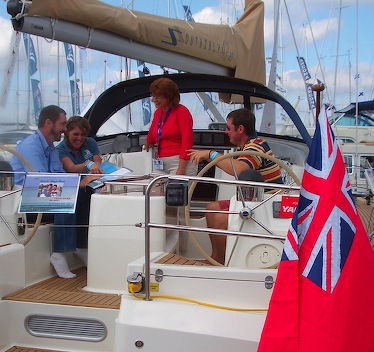
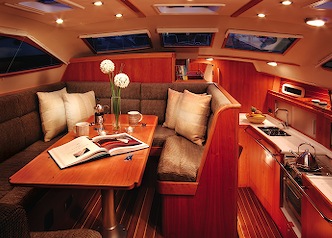
One of the toughest aspect of designing a good swinging or lifting keel boat is what to do with the keel when it comes up! It has to go somewhere and many designers have had trouble with this. We have been on lifting keel boats where the keel case divides the whole saloon. Very inconvenient. But Northshore have come up with an ingenious design for the 42 that hides the keel just under the starboard side of the raised saloon. The raised saloon has great views while sitting there, and I doubt anyone coming on board at the boat show would even guess there was a keel the weight of a BMW retracted under their seat. Here is a picture of the saloon - the keel retracts under the seat on the centreline of the boat. Very clever design.
Why go to all this bother?
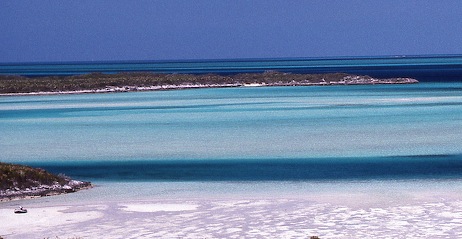
Well this image of a Bahamas Bank says it all. There are so many unspoiled anchorages we will be able to get to with a shallow keel - and the Bahamas is arguably the finest cruising ground within easy reach of North American East Coast sailors. We have sailed there 4 different cruises and have fallen in love with the place. There are whole island groups that are hard to visit with a deep draft yacht. We are going back with the Southerly!! (see below)
Shallow Draft
Many places in the world are easy to navigate if you have a shallower boat. The Trent-Severn Waterway in Canada is limited to 5 feet. Ditto the Midi Canal in France. Many places in the US Intra-Coastal Waterway are shoaling up around the inlets. Boats that draw more than 5 feet are deeper than the average so dredging often doesn't occur until that number is reached and the problem starts to affect the majority of boats.
But there is more to shallow draft cruising. Some powerboats draw just 3-4 feet but can't afford to run aground! By this I mean they have props hanging down being the lowest point. So if they hit it is likely expensive. With Two-Step we could often poke slowly into places that were just 6 feet deep since when we touched the bottom it didn't matter. Just our keel would touch and we would then reverse off again. The new boat is the best of both worlds - it draws just 3 feet but can also afford to run aground since it has the heavy keel and a grounding plate, and it protects its prop with a skeg. We will be able to poke slowly into really shallow spots.
Of course we wouldn't want to have the ability to get to shallow places and still not feel safe crossing oceans. The Southerly can do that too. Many have crossed oceans, and we are looking forward to a nice quick transatlantic passage this fall - en route to the Caribbean.
Shoal Draft Anchorages
The final advantage for the Southerly keel is the ability to dry out. It is actually one of the main reasons for the design. In the South of England and the north West of France there are many tidal anchorages. This would be a place that would be a good anchorage at high tide but would have no water at low tide. So the only kind of boat that can anchor there would need to be able to rest down on the bottom at low tide. In Two-Step we would have not been able to anchor there since the keel would cause the boat to heel further and further as the tide went down. We would finally be lying on our side. Most uncomfortable and possibly even at risk of flooding as the water came back in. With the new boat this is the perfect anchorage. And again, the Bahamas has many places like this. Comparing to Two-Step, I would imagine there are as many as double the Bahamian anchorages available for the Southerly as for Two-Step. Similar in the Chesapeake and Atlantic France.
Here are some images from the Northshore yard in Itchenor. The new boat has just arrived from the moulding shop and is ready to be fitted out. There are also some pictures here of her lifting keel as that will be one of the first projects - to fit the keel in place. I though this would be a good time to look at the keel system in general since the keel and the Southerly's shallow draft abilities are a big part of the reason we chose her for our next boat!
Keel SystemHere the keel is prepped and ready to go into the boat. The keel system consists of a massive grounding plate that bolts into the bottom of the boat. This plate weighs 2100Kg (4600 pounds) which is quite a bit more than our car. In the picture you can see the swinging keel itself in the raised position. It weighs another 1570Kg (3500 pounds) which is about the weight of a BMW 525. So when you swing the keel down you are basically hanging the weight of a respectable car down for added performance. With 9 foot draft this boat sails well to windward! Its one of the advantages of a swinging keel that the designer could go as low as he wanted for good performance.
One of the toughest aspect of designing a good swinging or lifting keel boat is what to do with the keel when it comes up! It has to go somewhere and many designers have had trouble with this. We have been on lifting keel boats where the keel case divides the whole saloon. Very inconvenient. But Northshore have come up with an ingenious design for the 42 that hides the keel just under the starboard side of the raised saloon. The raised saloon has great views while sitting there, and I doubt anyone coming on board at the boat show would even guess there was a keel the weight of a BMW retracted under their seat. Here is a picture of the saloon - the keel retracts under the seat on the centreline of the boat. Very clever design.
Why go to all this bother?
Well this image of a Bahamas Bank says it all. There are so many unspoiled anchorages we will be able to get to with a shallow keel - and the Bahamas is arguably the finest cruising ground within easy reach of North American East Coast sailors. We have sailed there 4 different cruises and have fallen in love with the place. There are whole island groups that are hard to visit with a deep draft yacht. We are going back with the Southerly!! (see below)
Shallow Draft
Many places in the world are easy to navigate if you have a shallower boat. The Trent-Severn Waterway in Canada is limited to 5 feet. Ditto the Midi Canal in France. Many places in the US Intra-Coastal Waterway are shoaling up around the inlets. Boats that draw more than 5 feet are deeper than the average so dredging often doesn't occur until that number is reached and the problem starts to affect the majority of boats.
But there is more to shallow draft cruising. Some powerboats draw just 3-4 feet but can't afford to run aground! By this I mean they have props hanging down being the lowest point. So if they hit it is likely expensive. With Two-Step we could often poke slowly into places that were just 6 feet deep since when we touched the bottom it didn't matter. Just our keel would touch and we would then reverse off again. The new boat is the best of both worlds - it draws just 3 feet but can also afford to run aground since it has the heavy keel and a grounding plate, and it protects its prop with a skeg. We will be able to poke slowly into really shallow spots.
Of course we wouldn't want to have the ability to get to shallow places and still not feel safe crossing oceans. The Southerly can do that too. Many have crossed oceans, and we are looking forward to a nice quick transatlantic passage this fall - en route to the Caribbean.
Shoal Draft Anchorages
The final advantage for the Southerly keel is the ability to dry out. It is actually one of the main reasons for the design. In the South of England and the north West of France there are many tidal anchorages. This would be a place that would be a good anchorage at high tide but would have no water at low tide. So the only kind of boat that can anchor there would need to be able to rest down on the bottom at low tide. In Two-Step we would have not been able to anchor there since the keel would cause the boat to heel further and further as the tide went down. We would finally be lying on our side. Most uncomfortable and possibly even at risk of flooding as the water came back in. With the new boat this is the perfect anchorage. And again, the Bahamas has many places like this. Comparing to Two-Step, I would imagine there are as many as double the Bahamian anchorages available for the Southerly as for Two-Step. Similar in the Chesapeake and Atlantic France.
Electrical System Update - MasterVolt
25/07/07 10:22 Filed in: Electrical
Electrical power use on a boat is one of the biggest issues for cruising sailors these days. Talk to any long-term cruising sailor and they will probably bend your ear for hours about the issues and problems in providing the power for their boat. Basically your boat is an independent system when you are away from the dock. Any power you use, and todays gadgets can use a lot, will have to be supplied from the ships systems. Most cruisers find that the gadgets they have draw too much for the boat's original electrical system - and require a substantial redesign.
First steps - to get started it is important to do a basic budget for the 12 Volt electrical system. I covered this in an earlier blog, and came up with 131 amp-hours at anchor, and 198 when we are on passage. Bear in mind this is from our own experience over 20 years of cruising on board Two-Step. Like most cruisers we conserve power when we can, we don't use much water, and we have installed efficient reading lights etc. If you plan a more hedonistic life you might want to budget more ;-)
Next we need to look at how to supply this power. There are two obvious scenarios - at anchor and on passage. On passage boats use more power, depending on autopilot draw it can be a lot more! Luckily the Raymarine pilot is quite good on power. But also on passage you might well find a time during the day when you need to run the engine anyway with light winds. So on those days you will likely get all the power you need from running the engine. The problem is on those wonderful tradewind passages when you are sailing well and don't need to run the engine. Then you must generate the power somehow. On Two-Step we just ran the engine anyway - in neutral. So on an ocean passage we found we had to run the engine twice a day for one hour each. Solar panels helped out somewhat but it is difficult to design a system that will provide the entire power requirements from solar - especially on passage since you use so much.
Power Options
AC Power Needs
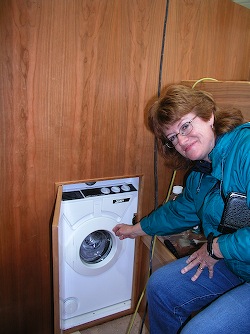
The other part of a complete electrical budget is planning the AC usage. This means anything you will need to run on house current - not 12 volts. For the modern more complicated cruiser (think Steve Dashew not Lin & Larry) this includes a washer or washer/dryer, vacuum cleaner, desalinator, air conditioning etc. And if you have anything in this category that will need to be run away from the dock, then you will need to figure out how to produce the power yourself - basically a generator is the most common solution here.
So for our new boat we had no option but a generator since we will have 2 big power users (washing machine and Scuba compressor) that need house current. Then it was a matter of trying to figure out which one.
 Fitting in a Generator
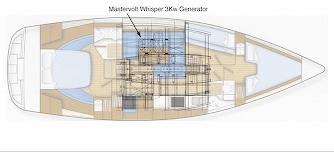
When Northshore did the original drawings for the Southerly 42 they took a genset into consideration. With the raised pilot house/saloon the boat has quite a large area under the saloon floor, that is also positioned nicely in the center of the boat. Many similar modern boats have raised saloon windows but did not raise the saloon seating - so there is no extra space (plus you can't see out either - go figure?!?). But the Southerly is a cunning design that provides space for tanks, generator etc right in the center where it is best to place heavy items like this. You can click on the plans for a larger view. The generator Northshore chose was a Mastervolt. I wasn't familiar with this make but when I looked into them they looked like the perfect solution.
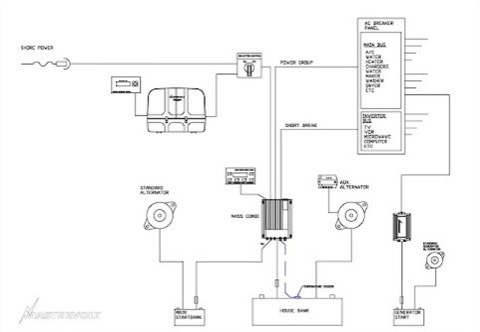
Mastervolt
Mastervolt has a very good reputation worldwide, and best of all they make almost all the components for a boats electrical system. So you can get the whole electrical system from them and the components are designed to work together. This means that the generator is designed to integrate with the charger/inverter. The two can cooperate and add their power output together. For example, if the generator is running but there is a surge of current drawn as the scuba compressor starts up, the inverter adds in the extra needed power. This should allow us to run the compressor - potentially the largest user we will have, on the smaller generator. We will certainly report back as the system progresses.
First steps - to get started it is important to do a basic budget for the 12 Volt electrical system. I covered this in an earlier blog, and came up with 131 amp-hours at anchor, and 198 when we are on passage. Bear in mind this is from our own experience over 20 years of cruising on board Two-Step. Like most cruisers we conserve power when we can, we don't use much water, and we have installed efficient reading lights etc. If you plan a more hedonistic life you might want to budget more ;-)
Next we need to look at how to supply this power. There are two obvious scenarios - at anchor and on passage. On passage boats use more power, depending on autopilot draw it can be a lot more! Luckily the Raymarine pilot is quite good on power. But also on passage you might well find a time during the day when you need to run the engine anyway with light winds. So on those days you will likely get all the power you need from running the engine. The problem is on those wonderful tradewind passages when you are sailing well and don't need to run the engine. Then you must generate the power somehow. On Two-Step we just ran the engine anyway - in neutral. So on an ocean passage we found we had to run the engine twice a day for one hour each. Solar panels helped out somewhat but it is difficult to design a system that will provide the entire power requirements from solar - especially on passage since you use so much.
Power Options
- Solar - For our example of needing 198ah per day - we would need quite a solar farm to provide even half of that. Perhaps 3 large panels would give 100ah. I estimated a solar array would be 5 feet by 7 feet and cost $4000, and generate 100ah per day. And not if its cloudy.
- Wind - Typically these might give 60-12ah per day if there is reasonable wind. Unfortunately many anchorages are protected from the wind and therefore don't produce what the marketing people might claim - even in the windy Caribbean. And a typical Mediterranean summer would not provide enough predictable wind either. They are popular in the Caribbean though - and if you don't mind a constant whirring noise you might consider one. For us the whirring is too annoying.
- Alternator - the mainstay of 12V power generation for most cruisers. We typically used our main engine as a generator by running it one or two hours per day just to make electricity. At anchor if we are careful and its sunny (for the solar panels) then we might just run one hour per day. At sea on passage we needed to run it twice for one hour. On the Southerly we will have a bigger alternator - 80Amps vs 50 on Two-Step. At sea we would need to run it at least 3 hours per day to come up with 198ah. Probably more since an 80Amp alternator is not really going to produce 80 full time for 2.5 hours. Count on maybe 60% of the rated output on a regular basis. So our new 80Amp unit might give us 50 amps - that means 4 hours running at sea and three at anchor.
- Generator - At the risk of oversimplifying - if you have any large power consumers on board you probably should consider a Generator. And I don't mean someone who always leaves the lights on!! A big power consumer would be an air conditioning system, a clothes washer/dryer, a microwave oven, a scuba compressor etc. Most boats have some form of inverter to allow you to run 120V devices from the 12V batteries. This works great for small items, but running anything with real power requirements will need too many batteries to be practical. For example, running a typical small vacuum cleaner for 10 minutes would require 25ah from your batteries. Running a 120V watermaker for 2 hours would take 300-350ah. And if you did have such a big bank of batteries you would still need to put the power back in. Neither the alternator, the solar panels nor the wind generator can produce this much easily. So as you decide on more 120V devices, you are increasingly pointed to a GenSet. We have been considering a generator for a few reasons. First, the genset can easily produce enough 12 volt power to replace 198 amps in roughly 2 hours. It is quieter than the engine since they are usually very well insulated and typically installed with a dry exhaust. Best of all a generator will allow for Sheryl's and my two dream options for the new boat. A washing machine and a scuba compressor!! There are a number of small units meant for sailboats in the 40-foot range.
AC Power Needs
The other part of a complete electrical budget is planning the AC usage. This means anything you will need to run on house current - not 12 volts. For the modern more complicated cruiser (think Steve Dashew not Lin & Larry) this includes a washer or washer/dryer, vacuum cleaner, desalinator, air conditioning etc. And if you have anything in this category that will need to be run away from the dock, then you will need to figure out how to produce the power yourself - basically a generator is the most common solution here.
So for our new boat we had no option but a generator since we will have 2 big power users (washing machine and Scuba compressor) that need house current. Then it was a matter of trying to figure out which one.
Fitting in a GeneratorWhen Northshore did the original drawings for the Southerly 42 they took a genset into consideration. With the raised pilot house/saloon the boat has quite a large area under the saloon floor, that is also positioned nicely in the center of the boat. Many similar modern boats have raised saloon windows but did not raise the saloon seating - so there is no extra space (plus you can't see out either - go figure?!?). But the Southerly is a cunning design that provides space for tanks, generator etc right in the center where it is best to place heavy items like this. You can click on the plans for a larger view. The generator Northshore chose was a Mastervolt. I wasn't familiar with this make but when I looked into them they looked like the perfect solution.
Mastervolt
Mastervolt has a very good reputation worldwide, and best of all they make almost all the components for a boats electrical system. So you can get the whole electrical system from them and the components are designed to work together. This means that the generator is designed to integrate with the charger/inverter. The two can cooperate and add their power output together. For example, if the generator is running but there is a surge of current drawn as the scuba compressor starts up, the inverter adds in the extra needed power. This should allow us to run the compressor - potentially the largest user we will have, on the smaller generator. We will certainly report back as the system progresses.
Electronics - Radar, Chart Plotter, Instruments and Pilot
23/07/07 08:11 Filed in: Electronics | Radar
I have been in the middle of planning the instruments for the new boat. Most of it is sorted out now so I thought I'd give you an overview of the (nearly) final system.
First, regular viewers of our TV show will know I installed a Raymarine C80 and associated system a few years ago. To say I have been happy with the C80 is a huge understatement! I mean, all the Raymarine stuff works great, the autopilot was strong and quick and handled Two-Step very well, and the instruments were excellent too. But the C80 Plotter was a revelation!! It has an 8.4" screen which was a huge inprovement over our last plotter (with a small 5" screen). But the best feature is the integration with the other components of the system. I had not realized what it could mean to have information from the wind, speed, autopilot and especially the radar communicated to the plotter.
So here's the list of electronics we are getting for the new boat.
Chart-plotters - One E120 for the nav station. I never wanted a plotter in the nav station on Two-Step since you can't see out. But the new boat has a pilot house and it will be just perfect there. But I also want one outside for when we're sailing. So we are also getting a E80 - looks exactly like our trusted C80 but is able to network with the E120 below. This means we just have one Radar antenna, and one chart chip with the navigation charts on, but can display the info on both displays. This is a picture of the nav station on a Southerly 42 like ours with the Raymarine E120 in the nav station. I am still trying to figure out where to put the E80 display. It will be in the cockpit somewhere but I'm not sure where. My plan is to wait until we have sailed a bit to see where it would be best. Two obvious spots are up under the dodger (sprayhood) where its visible from the main cockpit, or back on the table where it would be easier for someone at the helm to see.
Autopilot - Raymarine S2G Smartpilot with two control stations. One in the nav station as pictured above and one at the helm. We are also getting a remote for the pilot in case we are sitting forward from the helm.
Radar - 2KW radome will be installed up the mast. (Raymarine also). This can do the Marpa functions since we have the Gyro series autopilot controller - S2G above.
Instruments - Raymarine ST60+ series wind, speed and depth separate instruments. Also a graphic display which can repeat any of the info on the "bus". This will be at the nav station - although strictly speaking the E120 plotter can provide the same info and more - its convenient to have it already up on a dedicated repeater.
Lifetag - Raymarines new safety MOB system. More on this in a future blog.
AIS - WAY COOL!! I have been so looking forward to having AIS. More in a special AIS blog!
Thats it for now. I'm off to plan the battery/genset etc.
Cheers
Paul
First, regular viewers of our TV show will know I installed a Raymarine C80 and associated system a few years ago. To say I have been happy with the C80 is a huge understatement! I mean, all the Raymarine stuff works great, the autopilot was strong and quick and handled Two-Step very well, and the instruments were excellent too. But the C80 Plotter was a revelation!! It has an 8.4" screen which was a huge inprovement over our last plotter (with a small 5" screen). But the best feature is the integration with the other components of the system. I had not realized what it could mean to have information from the wind, speed, autopilot and especially the radar communicated to the plotter.
- Wind: the C80 can display the wind as a yellow arrow blowing toward your boat - on the chart. This means you can instantly see the actual wind direction on the chart. For sailors this means all the calculations on which is the favoured tack is much easier.
- Speed: naturally the plotter knows the boat's speed from the GPS, but it also gets the speed through the water from the knot-log sender. So the plotter can calculate what currents are affecting the boat as well. If you have entered a waypoint then it can also calculate the progress you are making toward that. The C80 can display a small arrow showing the direction of the current/leeway.
- Radar: Here is my favourite integration feature of the Raymarine plotters. The radar image can be overlaid on top of the chart! It is actually quite difficult to do this from a technical point of view. On a big ship the heading doesn't change much, so the radar image can be simply set up to line up with the heading of the ship. But on a sailboat in perky conditions, the heading is changing quite a lot. So in the time it takes for one rotation of the radar scanner, the heading has changed. Without getting into too much detail, it is DARNED DIFFICULT to plot the radar image on top of the chart. But the Raymarine system does a good job. So good in fact that it can make accurate calculations on a single radar target... which leads to my next favourite feature!
- MARPA: this is really a result of the radar integration but deserves a heading all to itself since it is SO COOL! MARPA means mini automatic radar plotting aid. This is an amazing tool and really made us feel safer at sea whenever there were big ships around, and especially at night. Basically it allows you to identify a ship on the radar and have the MARPA track that target - giving you the direction and speed of the target. Marpa will draw an arrow on the chart showing the course of the ship! It also calculates the ship's speed, and whether it will pose a threat to you! It really is hard to explain just how great this feature is. I have featured it a couple of times in our TV show since I am really convinced it is a huge safety and confidence plus for anyone who gets out in open water where there are ships. Very cool! Here is the link to a good description of this on Raymarine's website For this to work well you should have a gyro compass - luckily one is built into the G series of Raymarine Pilots. We had the S2G on Two-Step and will get it again on the new boat. Bringing us to the next point...
- Autopilot: the plotter gets exact course and heading info from the autopilot. Put a waypoint on the plotter, press goto, and the autopilot can be engaged to steer along the track to that exact point. This means it will use the plotter and GPS to insure it doesn't deviate from the line due to currents and leeway. This is not possible if the autopilot doesn't have some level of integration with the GPS. Of course the best is to have a plotter since you can then plot the position visually on the chart - and just go there.
So here's the list of electronics we are getting for the new boat.
Chart-plotters - One E120 for the nav station. I never wanted a plotter in the nav station on Two-Step since you can't see out. But the new boat has a pilot house and it will be just perfect there. But I also want one outside for when we're sailing. So we are also getting a E80 - looks exactly like our trusted C80 but is able to network with the E120 below. This means we just have one Radar antenna, and one chart chip with the navigation charts on, but can display the info on both displays. This is a picture of the nav station on a Southerly 42 like ours with the Raymarine E120 in the nav station. I am still trying to figure out where to put the E80 display. It will be in the cockpit somewhere but I'm not sure where. My plan is to wait until we have sailed a bit to see where it would be best. Two obvious spots are up under the dodger (sprayhood) where its visible from the main cockpit, or back on the table where it would be easier for someone at the helm to see.
Autopilot - Raymarine S2G Smartpilot with two control stations. One in the nav station as pictured above and one at the helm. We are also getting a remote for the pilot in case we are sitting forward from the helm.
Radar - 2KW radome will be installed up the mast. (Raymarine also). This can do the Marpa functions since we have the Gyro series autopilot controller - S2G above.
Instruments - Raymarine ST60+ series wind, speed and depth separate instruments. Also a graphic display which can repeat any of the info on the "bus". This will be at the nav station - although strictly speaking the E120 plotter can provide the same info and more - its convenient to have it already up on a dedicated repeater.
Lifetag - Raymarines new safety MOB system. More on this in a future blog.
AIS - WAY COOL!! I have been so looking forward to having AIS. More in a special AIS blog!
Thats it for now. I'm off to plan the battery/genset etc.
Cheers
Paul
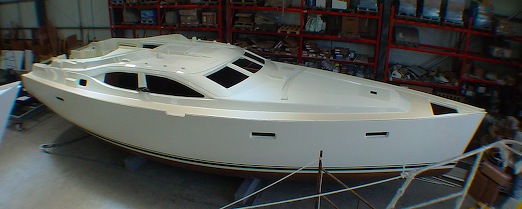
Our New Boat being Built!!!
17/07/07 13:58 Filed in: Southerly Boats
 Sheryl and I have just got back to the studio from the spring filming in Italy and this morning received some picture from the yard at Northshore where the new boat is being built! How exciting!!! I just had to share some of the images with you.
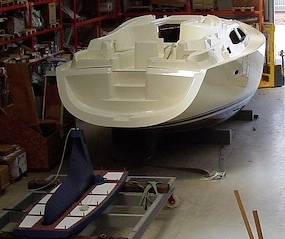
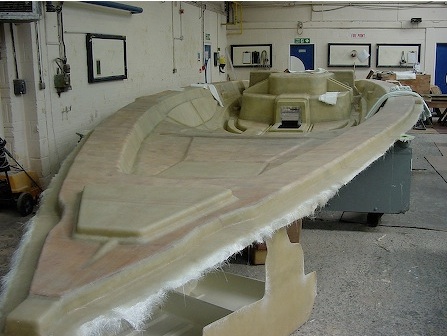
Here is the Hull mould. The boat is moulded then a bunch of structure is put in before the mould is removed. This is so the hull is strong before the mould is taken off. So the plant is putting in bulkheads and stringers (lengthwise stiffeners). These will all be glassed in place.
The hull mould you see is carefully cleaned and then waxed on the inside. Then the gelcoat is sprayed in. So, the first part of the boat to be built is, somewhat bizarrely, the gelcoat (like paint). Then fibreglass is applied to the gelcoat in layers according to the designers specification until the desired thickness has been reached. Then coring is applied where specified - in this case above the waterline. Then the grid of stiffeners and finally the bulkheads.
 Northshore has two facilities. The one pictured here is in Havant, and here they do all the fibreglass moulding. Then the boat will be trucked a few miles around to the main workshop in Itchenor (South England Near Chichester). This is the main Northshore headquarters where they complete and also launch the boat.
In the moulding shop in Havant they are also making the small mouldings that will be the two heads. These are normally made as a single moulding since it means they are waterproof - just like a built-in shower stall in a house. So here they are fitting the forward head moulding in place!
 In the middle of the hull you can see a tall fibreglass structure. This is the keel casing. Since it is a lifting-keel boat the keel needs a place to retract into. But the keel will not be added until the boat has been trucked to Northshore in Itchenor.
Anyway, as you can imagine, Sheryl and I are VERY EXCITED about this. The new boat is a real thing!!
I will post more pictures as soon as they are available!
Cheers!!
Paul
This is the deck mould with the finished deck still on the mould.
Propellors
15/06/07 13:57 Filed in: Propulsion
So the new boat is definitely going to have a feathering prop.
One problem with a new propellor, especially on a new boat, is knowing what the pitch and diameter should be. With Two-Step we got it fairly close so we didn't need to change anything. Nevertheless, after a few years I decided we might reduce the diameter and try to reduce noise transmitted through the hull. Tip-clearance is the measurement from the tip of the prop to the hull at its closest point, and it is generally recommended that the clearance should be 15% of the diameter (or more). We were close and wanted to exceed that. With the Southerly it is an issue as well since there is a skeg that protects the prop when the boat is in very shallow water (less than 1 meter!). So planning a new propeller has meant we are in the same situation - trying to fit in that restricted space.
One thing I always wanted for Two-Step was to try a feathering prop – but I wasn't able to find one to fit (they mostly have a longer cone out front that is too long for the aperture between rudder and keel where the prop is). For the new boat I am very excited to find the Variprop that looks like it will solve all problems! It has a short cone so the smaller space isn't an issue and best of all it is available in a four-blade version that offers greater efficiency when you have had to choose a smaller diameter than normal. The actual business of ordering a propellor can seem daunting since there are a lot of questions to be answered. Maximum diameter and clearances around the prop are just the start! Engine horsepower, and transmission ratios are used to calculate diameter and pitch. Shaft diameter, taper and nut dimensions are obviously important to insure the prop just slides on. In the case of the Variprop we will be able to keep the basic prop as a spare since the Variprop will be made with the same dimensions as the original.
One of the best things about a feathering prop is that they are generally adjustable so if you do guess wrong and the pitch is not correct, you can reset it. With a fixed prop you would have to have it expensively re-pitched if it wasn't right. Most of the feathering props let you realign gears or adjust something and set the pitch. In most cases you have to haul the boat out, disassemble the prop and fix it. But the Variprop even allows you to re-pitch it in the water – saving a haul-out.
I only wish we had tried one on Two-Step so we could compare it to the performance of our fixed blade prop. But I will definitely report back on how it goes on the Southerly.
Weighing in on the MOVE!
28/05/07 13:53 Filed in: Life Aboard | Outfitting
Two-Step has been sold here in Malta! We are very happy about this since Malta is one of our favourite places – now we will have an excuse to come back and visit. The buyers are planning to sail her here and around Greece, an probably further afield in the future. Sheryl and I will be doing one more short cruise on her over the next two weeks – then packing up our gear and shipping it up to the UK, where we pick up the new boat in September!!
SO this weeks blog is on STUFF ON A BOAT THAT HAS ACCUMULATED OVER 18 YEARS!!!!
I started this project by trying to work out how much weight we might be adding to the new boat as we put gear on her. I was trying to figure how much impact all our stuff would have on the waterline and trim of the new boat. Although I am keen on many of the new gadgets and comforts available to sailors, I do believe there is a limit to how much equipment you can safely add before the boats handling is impaired. So my project started off by noting the weights for everything we were proposing to add to the new boat. This project is ongoing as we add and subtract gear from the plan. I will post a list with weights in a few weeks.
Meanwhile I realized that the general accumulated gear that were planning to move from Two-Step to the new boat would weight substantially more than all the toys I had been worrying about. So I have created a spreadsheet and am in the middle of systematically weighing the contents of every locker, itemising the contents and putting them in a spreadsheet. Rather than list each item I sometimes group a few and list the bunch and where they are such as “Port Bookshelf : cookbooks – 4.4Kilograms” (10 pounds). At this point the list has almost 300 entries, total weight is 571Kg and I am just 2/3 of the way done!!
The fun part of putting it on the computer is that I can find such interesting trivia as...
I guess the key here is that our boat is just 37 feet long and we do try to keep an eye on total weight on board – but still we will likely have more than 800Kg (almost 1800 pounds) which is heavier than a Smart Car (Smart Fortwo weighs 730Kg). So the next time you are thinking of stocking up on cheap beer just to save a few dollars – consider that 4 cases of 24 cans would add almost 40Kg. And you can forget taking up rock collecting!!
I am also working on a weight distribution plan for the new boat. Over the years we have repainted the waterline on Two-Step to cover her overweightness. I am hoping the new boat will not suffer the same fate! See you next time...
SO this weeks blog is on STUFF ON A BOAT THAT HAS ACCUMULATED OVER 18 YEARS!!!!
I started this project by trying to work out how much weight we might be adding to the new boat as we put gear on her. I was trying to figure how much impact all our stuff would have on the waterline and trim of the new boat. Although I am keen on many of the new gadgets and comforts available to sailors, I do believe there is a limit to how much equipment you can safely add before the boats handling is impaired. So my project started off by noting the weights for everything we were proposing to add to the new boat. This project is ongoing as we add and subtract gear from the plan. I will post a list with weights in a few weeks.
Meanwhile I realized that the general accumulated gear that were planning to move from Two-Step to the new boat would weight substantially more than all the toys I had been worrying about. So I have created a spreadsheet and am in the middle of systematically weighing the contents of every locker, itemising the contents and putting them in a spreadsheet. Rather than list each item I sometimes group a few and list the bunch and where they are such as “Port Bookshelf : cookbooks – 4.4Kilograms” (10 pounds). At this point the list has almost 300 entries, total weight is 571Kg and I am just 2/3 of the way done!!
The fun part of putting it on the computer is that I can find such interesting trivia as...
- All gear stored in or forward sleeping cabin weighs 135Kg and in the Saloon (not including Galley and Quarterberth) weighs 213Kg.
- Together all three cockpit lockers contain 200Kg of gear.
- Books weigh a startling 69Kg and that doesn't yet include the paperbacks we keep in the Quarterberth
- The category of “food” has a number of entries totalling 59Kg and we are quite low on provisions at the moment. Wine alone weighs 21Kg and we usually have at least 2-3 times as much. (Hey – we're in the Med!)
- All the ropes stored in lockers total 28Kg and doesn't include any running rigging – mainly dock lines and a spare 60 meter anchor rode - 10Kg.
- I have everything in a category such as food, electronics, books, clothes, and NGATI (Never Got Around To It) Items I bought but haven't installed. This is actually at it's lowest in years but we still carry 5Kg of stuff I never installed!
- Clothing totals 69Kg and in the interests of political correctness I an not going to reveal whether “pink or blue” clothes are heavier ;-)
I guess the key here is that our boat is just 37 feet long and we do try to keep an eye on total weight on board – but still we will likely have more than 800Kg (almost 1800 pounds) which is heavier than a Smart Car (Smart Fortwo weighs 730Kg). So the next time you are thinking of stocking up on cheap beer just to save a few dollars – consider that 4 cases of 24 cans would add almost 40Kg. And you can forget taking up rock collecting!!
I am also working on a weight distribution plan for the new boat. Over the years we have repainted the waterline on Two-Step to cover her overweightness. I am hoping the new boat will not suffer the same fate! See you next time...
Easter in Malta & Water Systems
15/04/07 13:45 Filed in: Life Aboard
Back on board Two-Step in time for Easter! Malta celebrates Easter in a big way with processions in the streets and it was excellent!! Against a great backdrop of the most amazing fortified city of Valletta we filmed men carrying very heavy statues and dressed in costumes from the Easter story – quite moving!
Now we are working on Two-Step – getting her ready for sale – or sail! Two-Step is up for sale of course (see web link where I have added more pictures showing the cabins in more detail). The plan is to sail her up to England leaving in 2 weeks (first of May) since that is where our new boat is being built. So anyone interested in a Med Cruise and looking for a super cruising boat handily prelocated in the Med and ready to go – should let us know immediately. Otherwise we will be sailing her further west.
SOOOO – if you want to turn your dreams of a Mediterranean Summer cruise into reality!! Come on over to Malta and hop aboard Two-Step – fully equipped and ready to go – we will spend a week or two with you as you like to get familiar with her and even help reposition her to Greece or Turkey – our personal recommendations for the some of the best cruising in the world!! Contact us for more information!
And now, back to our regularly scheduled blog...
Water Budget and Systems – Continued
Actually I have never seen anyone attempt to do an actual budget for water use. I do remember years ago ready cruising books recommending average use for a boat in a long passage and saying to allow 4 litres per person per day. But I think modern boats tend to use more (or much more!!) so designing a system to allow us to safely cross oceans is going to take into account more than that simple rule of thumb.
Assumptions:
1. We will have a watermaker
2. The watermaker might stop working partway through a passage
3. Pressure water system might also either stop working, or use too much water
4. We will have a system that safely crosses oceans even assuming 1,2 & 3.
Watermaker – In order to be able to run the watermaker in the most different situations I believe the 12 volt ones are the best. Then even if the inverter/generators pack up, you can still run it from the battery or solar panel. We are looking at Spectra watermakers at this point.
Pressure Water – In my experience a pressure water system encourages sailors to use too much water. If there was ever a problem with the watermaker, it would be extremely difficult to conserve water, so I am planning to install the ubiquitous Whale foot pumps in the heads and galley. This way if the pressure system goes down we can still get at our water, and on passage we can conserve water easily. And for anyone who hasn't used a Whale footpump – they really are excellent. Did I mention that I have known cruisers who retired ashore and were planning to install these footpumps in their houses?!
Water tanks – The Southerly 42 has two water tanks. Total capacity is actually slightly less than Two-Steps water tanks – although you can order an optional tank to increase it. It think we will stick with the original tankage plan, add the watermaker and try to keep the tanks filled up on passages.
Water safety on Passage – My plan is to regularly refill the tanks from the watermaker whenever we are in a remote cruising ground or are on passage. For instance, plan to run the watermaker when we have used one third of our water. That way if the watermaker stops working one day, we will still have a 2/3 full tanks. It will not be a disaster! We will immediately switch into conservation mode – no more showers, use footpumps etc and the 2/3 capacity will be plenty to allow us to reach port safely or fix whatever the problem is.
Watermaker usage – One of the changes I have noticed in the years we have been cruising is that more and more cruisers use their watermakers all the time. Originally when we met a cruiser with a watermaker they used it primarily on passages or in remote areas like the Bahamas where water is expensive. But in port where water was easily available on the dock, they would use that to fill their tanks. Now more people seem to run them all the time. And in many cases I understand the rationale. For instance, here in Malta, the municipal water is quite safe to drink, but a little brackish (salty). So tea tastes a bit crumby, and we choose to drink bottled water. So cruisers who have a watermaker, will often choose to run that when they need to fill their tanks. The issue is that you have to be very careful about the filters you have in the system. It is often an option to have a water/oil separator as a preliminary filter before it is safe to take in harbour water. The other option is to run the municipal tap water as the input to the watermaker – in this case you would need more plumbing to connect the hose, and a very good chlorine filter to make sure the chlorine in the city water didn't damage the membrane in the watermaker. I would like more information on this option and will ask around here to find someone who has it all sorted out.
Well, thats it for today, for the past couple of weeks I have been working on designs for a stern arch to act as dinghy davits/solar panel mount and a bimini. I will see if I can post these drawings for the next blog entry this week!
Ciao!
Water Budget and Planning
02/04/07 13:43 Filed in: Life Aboard | Planning
What a wonderful 3 weeks we have had in the Virgin Islands!!! First 2 weeks cruising on our friends “Diesel Duck” - a 42 foot motor sailor immaculately fitted out in Cherry with all the best equipment. Benno and Marlene have been cruising before on a 37 foot steel sloop and decided for their next cruise they would like a power boat. So they built the Diesel Duck and have now sailed from Canada down to the Caribbean as far as Venezuela. We met them in St Thomas USVI and had a great 2 weeks cruising the USVI, over to Culebra and then back upwind to the BVI. It was especially nice to have a chance to try out and live with modern hi-tech equipment, some of which we are planning on installing on the new boat. With an 800amp-hour battery bank, and large inverter, watermaker, washer-dryer and a diesel generator, Diesel Duck gave us first hand experience of managing water and electricity on a modern well equipped cruiser. We were filming for “Distant Shores” of course, and the weather was great. Thanks guys!!
Water Budget
The first thing I learned was just how much water a modern cruising boat could use. On Two-Step we have only foot-pumps for the water – no pressurised system. And no real shower. So our four 80 litre water tanks will last us 2 weeks or more with the two of us on board. But a modern boat with pressure water tends to use more. It is just not possible to wash your hands of brush your teeth with as little water as we use with our foot pump. Similarly washing dishes tends to use more when you have a regular tap. One of the biggest factors is water supply. On Two-Step, we do not have a watermaker. So an ocean crossing passage of 21 days (our longest to date) means we have to make our 320 litres last that long. For anyone planning ocean passages, note that you must budget your water for as long as you might be out there. We usually add a 50 percent safety factor to our voyage planning when we are provisioning. So our Atlantic Crossing to Brazil of 2200 miles was planned to be at sea for an entire month. We had enough food for that, and planned the water for that as well. Since we have four tanks, we know we shouldn't finish more than one per week.
Anyway, the net result of this is that long ago we learnt we could make do with just 80 litres of water a week for the two of us. Sun shower and sponge baths, washing dishes in salt water, and using foot pumps to help conserve.
Enter the modern cruising boat!! I read in a cruising magazine not so long ago that you could budget 25 gallons per person per day!!!! Are they talking about life on a cruising boat of on the QE2 I thought? Well, it turns out that if you have all the gadgets you just might (although 25 gallons might still be too much even for those who leave the water running while they brush their teeth).
Water Budget Factors
* Toilets – some modern marine toilets hook up to the fresh water to flush. If you have these on your boat then factor in 3 litres per flush. Possibly 20 litres per person per day.
* Showers – a modern shower can use quite a lot of water. Its a great luxury to have a shower on board, and many cruisers have them. If used frugally they may use just 10 litres per shower or even less if you instruct crew to turn it off while soaping up. I haven't done clinical tests but I imagine a wasteful shower head just left on all the time would use more than 20 litres in a long shower.
* Pressure water syndrome – probably the most insidious – PWS (pressure water syndrome) affects people by encouraging them to just leave the water running. Where campers and old-time sailors know its easy to brush your teeth in just 1 cup of water, modern city dwellers afflicted with PWS can use 10-20 times as much. Choosing a faucet that is easy to turn on and off can help somewhat. And instructing the crew can help too.
* Watermakers – For the new boat I am looking at a watermaker that will produce 24 litres per hour. To supply our modest needs on Two-Step, this would only need to run one hour every two days. Even when we are more careless and use water more casually we would still only need to use it for 1 hour a day. The factor seems to be you will use more since you know you have it! Cruisers I have spoken with who have watermakers, all said they wanted one so they wouldn't have to worry about water use. So add a factor of 2-times if you are in this category. Just remember that nothing is free. Running a watermaker for twice as long as you need, will use twice the power. It also might be noisy. Check out the sound of a potential watermaker before you buy. Many people recommend you plan a watermaker to supply your water needs by running in the time you will be running your engine or generator to charge the batteries. The rational here is that watermakers use a fair bit of power, so you will want to run the generator or engine at the same time. So a watermaker that is too small will need to run for hours. The alternative is a smaller watermaker that you might be able to run during times your solar or wind generator is producing surplus power. But more on power generation later...
See you next time – in the Med when we are back aboard Two-Step in Malta for Easter.
Electrical Budget and the Virgin Islands
05/03/07 09:21 Filed in: Planning | Electrical
SNOW SNOW SNOW!! Its blowing horizontally outside the studio window as I write this and tonight its meant to drop to -24C. Tomorrow we are heading south for 3 weeks filming in the Virgin Islands and not a minute too soon. Although we did have fun out on the lake filming a few days ago with iceboats and Bombardiers – more on that later.
The past few days I have been working on the electrical system design for the new boat. Basically all the gadgets and how many batteries we will need to run them all. As any long-term cruising sailor knows, the pile of modern goodies we have all been adding to our boats can drain the batteries pretty quickly. The question is how quickly! What you need to do is calculate how much power each device will use, and how long you will use it each day. I actually do two calculations, one for when we are at anchor and one when we are at sea on passage (assuming sailing 24 hours).
In order to do this calculation you need to assemble all the information on what power is required for each gadget, and this can be the most demanding part. Traditionally we calculate this in “amp-hours” which is how many amps it draws over so many hours. For example, the Autopilot uses 1.5 amps and I plan to run it for 24 hours when we are on passage. So it uses 36 amp-hours in my table. Note you must stick with the same voltage when you do this – so I am using 12V – but the same calculation can be done at 24Volt as well.
If you only have a wattage rating on the device – such as a 60 watt bulb – divide by the voltage to find the amps uses – 60/12=5 amps.
To do my table I used the internet and was able to find specs on a number of the gadgets I intend to put on the new boat. For instance, the cappuccino maker (;-) uses 1400 watts so I calculated 1400/12 is 118 amps at 12 volts. Not really accurate since the inverter will use some as well but this is meant as a rough calculation – after all, the number of hours we will use is a bit of a guess anyway.
Calculating the number of hours a gadget will be used is a fun activity on a winter day! You can visualize the situation and put yourself on the boat. How long would you play (I mean work) on the computer every day? If you are doing this calculation for a boat you already own you can make notes from past excursions. And hopefully you have an ammeter so you know how much the gadgets use as well. (If not its definitely worth getting one! An ammeter is a great tool to help manage your electrical system).
So Here's the first pass through this calculation for sizing the ship's battery bank. And it hasn't even got the washer/dryer in ;-)
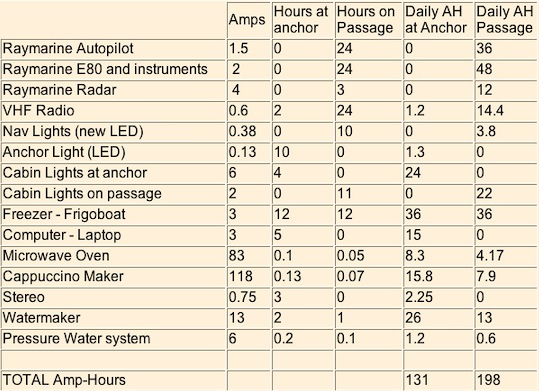
Notes:
Assume windlass is used only when the engine is running so it is not included - budget is only for calculations of battery capacity.
- Radar is in transmit mode for 3 hours. This is a assuming a bad night because we normally leave it in standby mode. Of course in fog it would be on 24 hours.
- Refrigeration is always a big user. I hope this will be efficient but it may be on more than I budget, and may be on more when its really hot.
- Cabin lights don't use much. I am assuming a few reading lights and thats it. If you like it brighter be prepared to have lighting as one of the largest users of power.
- Autopilot use is for moderate sea conditions. In my experience they can use very little if the sea is light or the boat balances well. The Southerly has a very light helm so I predict it will be a low power user in "auto" mode.
- cabin lights are entered twice since we use them differently at sea and at anchor. At sea we just have 2 small lights on for watch the whole night. At anchor we have more but plan it for a typical sailors early night!
If you are planning a budget like this, you might want to splash out on lights, a big deep freeze and other things, but whatever you plan, your batteries should be able to supply the needs without needing a charge more than once a day. I am assuming I will want to recharge once a day, and that I shouldn't use more than 50% of the capacity of my batteries. So I am planning a bank somewhat larger than 400AH. Basically double the "Daily AH on Passage" total of 198 amp-hours).
That's it for now. Got to run and pack!!
The past few days I have been working on the electrical system design for the new boat. Basically all the gadgets and how many batteries we will need to run them all. As any long-term cruising sailor knows, the pile of modern goodies we have all been adding to our boats can drain the batteries pretty quickly. The question is how quickly! What you need to do is calculate how much power each device will use, and how long you will use it each day. I actually do two calculations, one for when we are at anchor and one when we are at sea on passage (assuming sailing 24 hours).
In order to do this calculation you need to assemble all the information on what power is required for each gadget, and this can be the most demanding part. Traditionally we calculate this in “amp-hours” which is how many amps it draws over so many hours. For example, the Autopilot uses 1.5 amps and I plan to run it for 24 hours when we are on passage. So it uses 36 amp-hours in my table. Note you must stick with the same voltage when you do this – so I am using 12V – but the same calculation can be done at 24Volt as well.
If you only have a wattage rating on the device – such as a 60 watt bulb – divide by the voltage to find the amps uses – 60/12=5 amps.
To do my table I used the internet and was able to find specs on a number of the gadgets I intend to put on the new boat. For instance, the cappuccino maker (;-) uses 1400 watts so I calculated 1400/12 is 118 amps at 12 volts. Not really accurate since the inverter will use some as well but this is meant as a rough calculation – after all, the number of hours we will use is a bit of a guess anyway.
Calculating the number of hours a gadget will be used is a fun activity on a winter day! You can visualize the situation and put yourself on the boat. How long would you play (I mean work) on the computer every day? If you are doing this calculation for a boat you already own you can make notes from past excursions. And hopefully you have an ammeter so you know how much the gadgets use as well. (If not its definitely worth getting one! An ammeter is a great tool to help manage your electrical system).
So Here's the first pass through this calculation for sizing the ship's battery bank. And it hasn't even got the washer/dryer in ;-)
Notes:
Assume windlass is used only when the engine is running so it is not included - budget is only for calculations of battery capacity.
- Radar is in transmit mode for 3 hours. This is a assuming a bad night because we normally leave it in standby mode. Of course in fog it would be on 24 hours.
- Refrigeration is always a big user. I hope this will be efficient but it may be on more than I budget, and may be on more when its really hot.
- Cabin lights don't use much. I am assuming a few reading lights and thats it. If you like it brighter be prepared to have lighting as one of the largest users of power.
- Autopilot use is for moderate sea conditions. In my experience they can use very little if the sea is light or the boat balances well. The Southerly has a very light helm so I predict it will be a low power user in "auto" mode.
- cabin lights are entered twice since we use them differently at sea and at anchor. At sea we just have 2 small lights on for watch the whole night. At anchor we have more but plan it for a typical sailors early night!
If you are planning a budget like this, you might want to splash out on lights, a big deep freeze and other things, but whatever you plan, your batteries should be able to supply the needs without needing a charge more than once a day. I am assuming I will want to recharge once a day, and that I shouldn't use more than 50% of the capacity of my batteries. So I am planning a bank somewhat larger than 400AH. Basically double the "Daily AH on Passage" total of 198 amp-hours).
That's it for now. Got to run and pack!!
London Boat Show
09/02/07 09:11
Wow its been a month! Right now we are back in the studio north of Toronto in the middle of a huge blizzard. Already have 60cm of snow and plenty more coming tonight.

Site-seeing on a cold London Evening
But the month hasn't been all snow. First Sheryl and I went to the London Boat Show (http://www.londonboatshow.com/). What a great time! We had not been to that show before and found it very different from the north American shows we have attended. First there were lots of sailboats! Almost half the show was devoted to sail – one half the huge ExCel center in London's Docklands. And many of the stands (thats British-speak for booths) were very elaborate. On second thought maybe thats why they were called stands. Some of the swankier powerboat booths incorporated multi-storey restaurants serving champagne to potential clients!!
Meeting a Distant Shores Fan at the Raymarine Stand
Of course we were also filming for “Distant Shores” - sort of “what sailors do in the winter” kind of thing. And we were at the Raymarine Stand chatting to people who have seen our show in the UK. It was fun. We have had Raymarine gear on Two-Step for the past 3 years and love it. Especially the C80 plotter which has become the center of our navigation. With Radar image overlaid on the chart, as well as the info from the autopilot, wind, speed and depth as well – the C80 is a revelation! Certainly we will be putting one on the new boat – or maybe the networked version, the E80. So the boat show was a good time to meet fans of the TV show and chat about Raymarine kit at the stand (kit is stuff, stand is booth. There, I'm getting better at the proper English).
Southerly Stand
But one of the main reasons we went to London was to see the Southerly sailboats. I have been leaning toward the Southerly for a few reasons.
1. It is a solidly built fiberglass boat. I had been looking at aluminum as a building material since it is very strong but difficulties with paint systems and potential corrosion issues has diminished my enthusiasm. So although there are a few attractive aluminum monohulls built with retracting keel I guess they are not for me.
2. Shallow draft! Still a main concern as mentioned above. And although there are a number of shallow draft keels, they are mostly not meant to be dried out. In some cases what is shallow draft is merely relative to the standard keel. So the shallow draft Oyster 655 is 6 foot 8! (which isn't exactly shallow but certainly beats the standard draft of 9 foot 4!)
3. Multihulls look quite appealing, but are generally too beamy to be welcome in many of the more crowded marinas. In the Caribbean they are perfect, but I really want a boat that can go anywhere. The French Canals are another potential cruising ground that we would like to poke our nose into. And with limiting widths of 5 meters most modern cats longer than 35 feet would be too wide.
4. Quality. Northshore have been building Southerly swing keel boats for almost 30 years and have acquired a reputation for solid quality.
So we looked at the Southerly display at the London Boat Show. They had both their smallest boat – the 110, and their new 42RST. The 110 (at roughly 11 meters or 35 feet long) is a very nice looking boat that packs a lot into a relatively compact footprint. It is a lot larger inside than Two-Step. Actually. if we were just to replace Two-Step it would be a top contender. But we are looking for something larger.
Part of our plan with the new boat is to be able to have guests come and stay on board. Besides being able to accommodate additional film crew for our TV series, we are hoping to have space to have other guests to share the sail. Over the past few years we have had a number of requests from viewers of the show who would like to come on-board and share the sail with us. So the new boat we are looking at would have room to accommodate this. Watch this space for more news on this.
The Southerly 42RST (Raised Saloon Twin Wheel steering) was our current odds on favourite even before we saw her at the boat show. We had sailed on a couple of Southerlies earlier, and were impressed with them – but this model – with twin wheel looks just perfect.
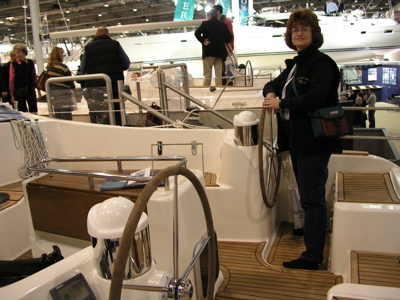
Southerly 42RST Twin Wheel cockpit - his and hers wheel!!
There aren't any pix of the model we are going to get but the main specs are the same.
So, there's our big news!! We will be getting the new boat this summer – and getting her in shape to do the Atlantic crossing this coming fall. From England (where they are built) we will sail south across the Bay of Biscay, then Portugal as a shakedown. Then off to Madeira and the Canaries before crossing in November.
But we have a long way to go before then! For now I am working away on electrical budgets, figuring out how the sailplan will work best for the passages we are planning, and what seem like a million other details. The boat will be built starting in late April, and launched in August. Boy are we excited!! The last time we had a new boat was when when launched Two-Step – 19 years ago year – and we had to do all the work ourselves.
So, coming up over the next few weeks I will be doing more work on planning ships systems to make the new boat into our ultimate passagemaker – with shoal draft ability. Electrical systems, water system planning, anchor tackle, weight calculations for all this new equipment and more.
AND, if anyone thinks they might be interested in a chance to come along for a leg of the journey, I am working out a schedule for the next 8 months. The new boat has 2 guest cabins. One is a vee-berth and the other is a cabin with 2 bunks. I am just working out costs for a few of the different legs, we will be doing – starting in a few interisland passages around Madeira and the Canaries, possibly a chance to crew on the transatlantic passage in November/December and a few hops around the Caribbean. If you think one of these chances to gain some cruising experience would work for you, please drop me a email and I will send you out our schedule when its ready and add you to our special “share the sail” mailing list.
Tower Bridge - near St Katharine Docks where we stayed
Site-seeing on a cold London Evening
But the month hasn't been all snow. First Sheryl and I went to the London Boat Show (http://www.londonboatshow.com/). What a great time! We had not been to that show before and found it very different from the north American shows we have attended. First there were lots of sailboats! Almost half the show was devoted to sail – one half the huge ExCel center in London's Docklands. And many of the stands (thats British-speak for booths) were very elaborate. On second thought maybe thats why they were called stands. Some of the swankier powerboat booths incorporated multi-storey restaurants serving champagne to potential clients!!
Meeting a Distant Shores Fan at the Raymarine Stand
Of course we were also filming for “Distant Shores” - sort of “what sailors do in the winter” kind of thing. And we were at the Raymarine Stand chatting to people who have seen our show in the UK. It was fun. We have had Raymarine gear on Two-Step for the past 3 years and love it. Especially the C80 plotter which has become the center of our navigation. With Radar image overlaid on the chart, as well as the info from the autopilot, wind, speed and depth as well – the C80 is a revelation! Certainly we will be putting one on the new boat – or maybe the networked version, the E80. So the boat show was a good time to meet fans of the TV show and chat about Raymarine kit at the stand (kit is stuff, stand is booth. There, I'm getting better at the proper English).
Southerly Stand
But one of the main reasons we went to London was to see the Southerly sailboats. I have been leaning toward the Southerly for a few reasons.
1. It is a solidly built fiberglass boat. I had been looking at aluminum as a building material since it is very strong but difficulties with paint systems and potential corrosion issues has diminished my enthusiasm. So although there are a few attractive aluminum monohulls built with retracting keel I guess they are not for me.
2. Shallow draft! Still a main concern as mentioned above. And although there are a number of shallow draft keels, they are mostly not meant to be dried out. In some cases what is shallow draft is merely relative to the standard keel. So the shallow draft Oyster 655 is 6 foot 8! (which isn't exactly shallow but certainly beats the standard draft of 9 foot 4!)
3. Multihulls look quite appealing, but are generally too beamy to be welcome in many of the more crowded marinas. In the Caribbean they are perfect, but I really want a boat that can go anywhere. The French Canals are another potential cruising ground that we would like to poke our nose into. And with limiting widths of 5 meters most modern cats longer than 35 feet would be too wide.
4. Quality. Northshore have been building Southerly swing keel boats for almost 30 years and have acquired a reputation for solid quality.
So we looked at the Southerly display at the London Boat Show. They had both their smallest boat – the 110, and their new 42RST. The 110 (at roughly 11 meters or 35 feet long) is a very nice looking boat that packs a lot into a relatively compact footprint. It is a lot larger inside than Two-Step. Actually. if we were just to replace Two-Step it would be a top contender. But we are looking for something larger.
Part of our plan with the new boat is to be able to have guests come and stay on board. Besides being able to accommodate additional film crew for our TV series, we are hoping to have space to have other guests to share the sail. Over the past few years we have had a number of requests from viewers of the show who would like to come on-board and share the sail with us. So the new boat we are looking at would have room to accommodate this. Watch this space for more news on this.
The Southerly 42RST (Raised Saloon Twin Wheel steering) was our current odds on favourite even before we saw her at the boat show. We had sailed on a couple of Southerlies earlier, and were impressed with them – but this model – with twin wheel looks just perfect.
Southerly 42RST Twin Wheel cockpit - his and hers wheel!!
There aren't any pix of the model we are going to get but the main specs are the same.
So, there's our big news!! We will be getting the new boat this summer – and getting her in shape to do the Atlantic crossing this coming fall. From England (where they are built) we will sail south across the Bay of Biscay, then Portugal as a shakedown. Then off to Madeira and the Canaries before crossing in November.
But we have a long way to go before then! For now I am working away on electrical budgets, figuring out how the sailplan will work best for the passages we are planning, and what seem like a million other details. The boat will be built starting in late April, and launched in August. Boy are we excited!! The last time we had a new boat was when when launched Two-Step – 19 years ago year – and we had to do all the work ourselves.
So, coming up over the next few weeks I will be doing more work on planning ships systems to make the new boat into our ultimate passagemaker – with shoal draft ability. Electrical systems, water system planning, anchor tackle, weight calculations for all this new equipment and more.
AND, if anyone thinks they might be interested in a chance to come along for a leg of the journey, I am working out a schedule for the next 8 months. The new boat has 2 guest cabins. One is a vee-berth and the other is a cabin with 2 bunks. I am just working out costs for a few of the different legs, we will be doing – starting in a few interisland passages around Madeira and the Canaries, possibly a chance to crew on the transatlantic passage in November/December and a few hops around the Caribbean. If you think one of these chances to gain some cruising experience would work for you, please drop me a email and I will send you out our schedule when its ready and add you to our special “share the sail” mailing list.
Tower Bridge - near St Katharine Docks where we stayed