ARC Report - Rigs & Rigging
24/12/12 05:41 Filed in: Offshore sailing | Rigging
With the strong winds of this years ARC there were a number of breakages in the rigging department. On board the good ship Distant Shores II we were lucky and had no major problems. Our biggest problem was with the boom preventer I had rigged up, which was not up to the job...
 Boom Preventer
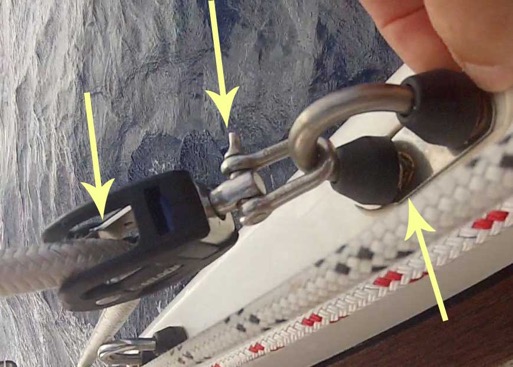
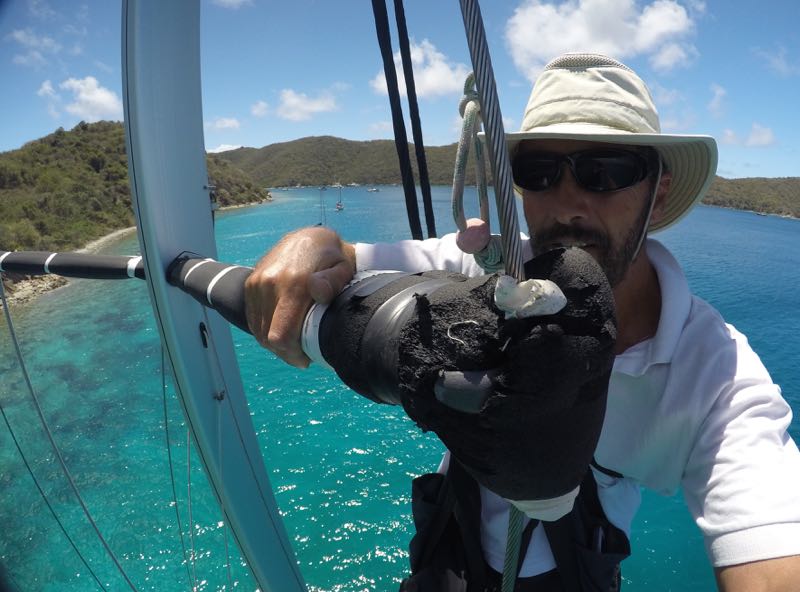
I installed this U-Bolt fitting in the rail (to the left) to allow us to run a preventer back to the cockpit. Good idea but not quite strong enough and not quite far enough forward to get a good angle.
We spent 14 days of the 15 day crossing sailing downwind and only jibed once. We were sailing with reefed main and the genny out on the pole when we got a gust of nearly 40 knots. A large wave smacked the stern around and this coincided with the gust so we rounded up and backed the jib. Trying to get back on course we overcorrected and that’s when we jibed! The preventer took a mighty strain and did actually prevent the boom swinging all the way across.
You can see the U-Bolt is bent, the shackle pin is banana shaped and the block shattered leaving only the stainless centre pin holding the line.
The problem was I hadn’t rigged the preventer far enough forward to get a good angle. We re-rigged it to the forward cleat and it was fine for the rest of the crossing.
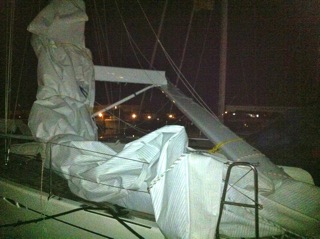
Not everyone was so lucky. A number of boats suffered breakages due to jibing. Our neighbour very nearly lost their mast when they jibed and broke their upper spreader, upper shroud and boomvang. The rest of the crossing was done under double reefed main alone!
 Booms and Boomvangs
A number of boats broke their boomvangs, and/or broke their booms or boom-gooseneck fittings. Many had damage to their downwind pole. One boat was dismasted and diverted to the Cape Verde Islands. But looking at it another way... 230 boats started off on a journey of almost 3000 miles. That’s 690,000 sea miles to be travelled in total. With strong conditions for much of the crossing, it was a good test of equipment and preparation. Only a few boats retired back to the Canaries or to the Cape Verde Islands. The ARC recorded the fastest overall average time in recent memory, and most of the boats are now enjoying a Caribbean Christmas!
I installed this U-Bolt fitting in the rail (to the left) to allow us to run a preventer back to the cockpit. Good idea but not quite strong enough and not quite far enough forward to get a good angle.
We spent 14 days of the 15 day crossing sailing downwind and only jibed once. We were sailing with reefed main and the genny out on the pole when we got a gust of nearly 40 knots. A large wave smacked the stern around and this coincided with the gust so we rounded up and backed the jib. Trying to get back on course we overcorrected and that’s when we jibed! The preventer took a mighty strain and did actually prevent the boom swinging all the way across.
You can see the U-Bolt is bent, the shackle pin is banana shaped and the block shattered leaving only the stainless centre pin holding the line.
The problem was I hadn’t rigged the preventer far enough forward to get a good angle. We re-rigged it to the forward cleat and it was fine for the rest of the crossing.
Not everyone was so lucky. A number of boats suffered breakages due to jibing. Our neighbour very nearly lost their mast when they jibed and broke their upper spreader, upper shroud and boomvang. The rest of the crossing was done under double reefed main alone!
A number of boats broke their boomvangs, and/or broke their booms or boom-gooseneck fittings. Many had damage to their downwind pole. One boat was dismasted and diverted to the Cape Verde Islands. But looking at it another way... 230 boats started off on a journey of almost 3000 miles. That’s 690,000 sea miles to be travelled in total. With strong conditions for much of the crossing, it was a good test of equipment and preparation. Only a few boats retired back to the Canaries or to the Cape Verde Islands. The ARC recorded the fastest overall average time in recent memory, and most of the boats are now enjoying a Caribbean Christmas!
Comments
ARC Report - Communications
20/12/12 14:43 Filed in: Communications | Offshore sailing
One nice thing about taking part in the ARC has been the ability to chat with so many other skippers and get feedback on what works and what doesn’t on ocean passages. Over the next few weeks I will be posting a series of blogs on equipment and techniques based on our experiences and feedback from their ARC skippers as well.
This time I will cover communications, from VHF and AIS, to HF Radio and Satellite, and email/internet on the ocean.
 AIS
AIS
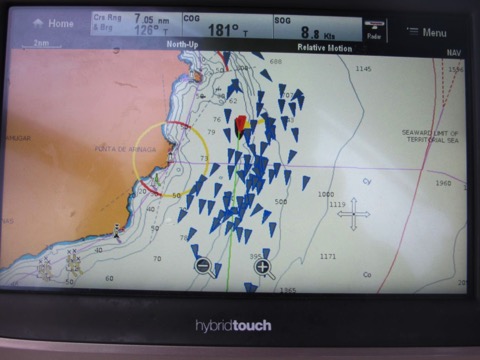
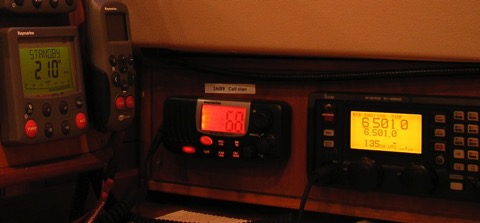
Regular followers of my blog will know I am a big fan of AIS, and highly recommend having an AIS transceiver. We have a Raymarine AIS650, which is a class-B AIS unit. This standard has been designed for pleasure boats and means that it broadcasts your position at a low power, usually visible to others from 5-8 miles away. We regularly saw ships over 25 miles away, and they always see us at least 5 miles off. Very comforting to know they are seeing us as they come towards us... the ARC requires boats to have an AIS receiver so we know all other ARC boats can see us. Somewhat puzzling is the ARC recommendation that boats fit an AIS class-A transceiver rather than the Class-B designed for yachts. At any rate, I would estimate more than half the ARC boats have just a receiver - meaning we will not see them at sea. So this picture of our AIS screen as we left Las Palmas is less than half the fleet!!!
VHF
Of course everyone has a VHF radio these days, and on the ARC it is much more use than normal since we saw so many other boats on this crossing. Out in the open ocean I think we have not seen more than a handful of boats in all our miles at sea. On the ARC we saw boats almost every day! And it was nice to call them up for a chat! I highly recommend a handheld VHF as a backup in case of a problem with the main set.
HF Radio
The ARC regularly organizes SSB nets for the crossing. We have always made use of HF radio nets and the ARC nets were very fun. Even in the satellite age, for long-distance cruising the HF marine radio is still a great tool.
 Satellite Phone
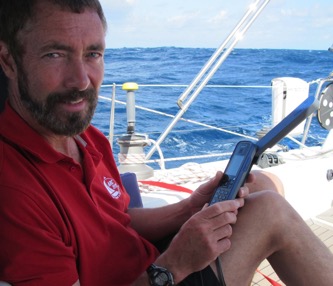
We bought an ISatphone-Pro and it was our first experience with a sat-phone. As a phone it is actually pretty good and we made a couple of phone calls from mid-ocean. The signal was good and did not have an appreciable delay. However we had planned to do SMS messages and also use the phone for internet access and in this case the experience it was not so positive.
Email
I should preface this with the warning... I am still grumpy about all the trouble I had with the satphone on this trip. But realistically it was a good phone! Just not so good for data and SMS.
Perhaps you remember back about 20 years when you had a 9600 baud modem to get on the internet? Well, satellite phones are lucky to get speeds like that! The Iridium phone can offer data at speeds up to 9600 and our ISatphone reaches just 1/4 of that at the lofty speed of 2400 baud. There is no way to get on the internet for regular web access. The only possibility is email access. We understood that and had tested it out in Las Palmas before we got under way. it worked alright and would take 3-4 minutes of access to retrieve a few short emais plus our GRIB file.
One complaint I have is that the actual speed we got is not up to the promised 2400 baud. Connect time and signal dropouts on the voyage meant that we took many minutes just to connect and retrieve a few small emails.
 We were mainly interested in downloading GRIB files for weather information - these would be just 10 to 50KB. At 2400 baud a 50KB file could download in 30 seconds but the handshaking and errors meant it could take more than a minute. In the middle of the passage we were unable to get the email to work at all. Despite holding the phone and trying to point it at the satellite we still had a 4 day period where we never managed to get any GRIB files downloaded. This meant up to 8 minutes of satellite time ($8US) with no emails received at all. All together over that 4 day period we used more than half an hour and got nothing at all! At our "pay-as-you-go" data rate of about $1/minute that was $30. As a phone it was good, but if you want email at sea look somewhere else. Now Inmarsat (who make the ISatphone) also make built-in units such as the Fleet-Broadband - starting around $6000 for a dome with monthly contracts for data starting about $100 for a few megabytes. ARC People with these units were much happier. You are still not getting high-speed internet access but email was reliable and they didn’t report the signal problems we had. Rates seem to start at $10-15 per megabyte for these options. That would compare to our "potential" rate of 1MB/hour =$60/Megabyte. Ouch.
SMS
The ISatphone can also do SMS messaging and we planned to do regular twitter updates using this feature. It is not exactly user friendly for text. Remember back before smart-phones when you typed texts through the number pad? That is how the SMS feature worked. Not so bad but our particular phone had a bug that caused it to mysteriously reboot while I was typing texts. Sigh... I hope this was just a random defect in our phone.... I will investigate further.
Yellowbrick
This is a nifty satellite tracker device that the ARC fits to every participating boat. It looks like a handheld VHF and was just Velcro-ed to the stern rail. This unit transmitted our position every 4 hours. The ARC website has an excellent tracker program which allowed family, friends and everyone to view the race! Yellowbrick also make these units for purchase (ours were special ARC race units) that apparently also allow you to use it to send texts from your phone. We haven’t tested this kind of unit but it seems interesting.
SSB Radio with Pactor Modem for Email
This is the other main email service people used on the ARC. We haven’t tried this but all the people who have one have been satisfied. Basically you get a Pactor Modem (~$1200) to connect to your SSB radio (such as the Icom M802). Speeds are comparable to Satellite at perhaps 4800bps. No web surfing but the big advantage is you aren’t paying for satellite time! The $250 annual fee for Sailmail HF service is much less than anything you might pay for a satellite service.
This time I will cover communications, from VHF and AIS, to HF Radio and Satellite, and email/internet on the ocean.
Regular followers of my blog will know I am a big fan of AIS, and highly recommend having an AIS transceiver. We have a Raymarine AIS650, which is a class-B AIS unit. This standard has been designed for pleasure boats and means that it broadcasts your position at a low power, usually visible to others from 5-8 miles away. We regularly saw ships over 25 miles away, and they always see us at least 5 miles off. Very comforting to know they are seeing us as they come towards us... the ARC requires boats to have an AIS receiver so we know all other ARC boats can see us. Somewhat puzzling is the ARC recommendation that boats fit an AIS class-A transceiver rather than the Class-B designed for yachts. At any rate, I would estimate more than half the ARC boats have just a receiver - meaning we will not see them at sea. So this picture of our AIS screen as we left Las Palmas is less than half the fleet!!!
VHF
Of course everyone has a VHF radio these days, and on the ARC it is much more use than normal since we saw so many other boats on this crossing. Out in the open ocean I think we have not seen more than a handful of boats in all our miles at sea. On the ARC we saw boats almost every day! And it was nice to call them up for a chat! I highly recommend a handheld VHF as a backup in case of a problem with the main set.
HF Radio
The ARC regularly organizes SSB nets for the crossing. We have always made use of HF radio nets and the ARC nets were very fun. Even in the satellite age, for long-distance cruising the HF marine radio is still a great tool.
We bought an ISatphone-Pro and it was our first experience with a sat-phone. As a phone it is actually pretty good and we made a couple of phone calls from mid-ocean. The signal was good and did not have an appreciable delay. However we had planned to do SMS messages and also use the phone for internet access and in this case the experience it was not so positive.
I should preface this with the warning... I am still grumpy about all the trouble I had with the satphone on this trip. But realistically it was a good phone! Just not so good for data and SMS.
Perhaps you remember back about 20 years when you had a 9600 baud modem to get on the internet? Well, satellite phones are lucky to get speeds like that! The Iridium phone can offer data at speeds up to 9600 and our ISatphone reaches just 1/4 of that at the lofty speed of 2400 baud. There is no way to get on the internet for regular web access. The only possibility is email access. We understood that and had tested it out in Las Palmas before we got under way. it worked alright and would take 3-4 minutes of access to retrieve a few short emais plus our GRIB file.
One complaint I have is that the actual speed we got is not up to the promised 2400 baud. Connect time and signal dropouts on the voyage meant that we took many minutes just to connect and retrieve a few small emails.
SMS
The ISatphone can also do SMS messaging and we planned to do regular twitter updates using this feature. It is not exactly user friendly for text. Remember back before smart-phones when you typed texts through the number pad? That is how the SMS feature worked. Not so bad but our particular phone had a bug that caused it to mysteriously reboot while I was typing texts. Sigh... I hope this was just a random defect in our phone.... I will investigate further.
Yellowbrick
This is a nifty satellite tracker device that the ARC fits to every participating boat. It looks like a handheld VHF and was just Velcro-ed to the stern rail. This unit transmitted our position every 4 hours. The ARC website has an excellent tracker program which allowed family, friends and everyone to view the race! Yellowbrick also make these units for purchase (ours were special ARC race units) that apparently also allow you to use it to send texts from your phone. We haven’t tested this kind of unit but it seems interesting.
SSB Radio with Pactor Modem for Email
This is the other main email service people used on the ARC. We haven’t tried this but all the people who have one have been satisfied. Basically you get a Pactor Modem (~$1200) to connect to your SSB radio (such as the Icom M802). Speeds are comparable to Satellite at perhaps 4800bps. No web surfing but the big advantage is you aren’t paying for satellite time! The $250 annual fee for Sailmail HF service is much less than anything you might pay for a satellite service.
Safety Inspection - ARC
21/11/12 01:58 Filed in: Offshore sailing
One of the prerequisites of participating in the ARC is to pass a safety inspection. Many cruisers are worried about this as they haven’t done ocean racing before and will not have had such an inspection in the past. I thought I would describe how the inspection went on Distant Shores II.
For many years all offshore races have had safety requirements to insure boats meet a minimum requirement for seaworthiness and safety. For an offshore rally it is the same, and the ARC has borrowed from the Ocean Racing community to make up their requirements. Many of the boats taking part have never crossed an ocean before, and even if they have, an inspection reminds us to focus on the important things and get the boat safe for sea.
The ARC information pack (check here for info) includes specific details for required safety equipment so most people have got a handle on the items they will need to upgrade before they reach Las Palmas. Most of the items will already be installed on the average cruising boat. A VHF with external speaker, a bilge pump operable from on deck, a SOLAS approved EPIRB, jacklines to clip on while going forward etc.
However, a number of items regularly give people trouble. For instance, we use a powerful rechargeable handheld spotlight, but the ARC requires the spotlight to be plugged into ships power. There was a huge pile of these spotlights in the chandlery last week, mostly gone now, indicating it is a common problem. So I have just finished installing and wiring up a 12Volt outlet by the helm.
The ARC also requires a very specific liferaft standard - which is another major consideration as it is quite a pricey piece of equipment. The raft must be either an ISO9650-1 standard, or SOLAS or ISAF (Racing). Most commonly found is the ISO-9650 standard. However, our liferaft (just 2.5 years old) is not an ISO certified raft and therefore failed the test. We have had to purchase a new one - 1800Euro - OUCH!! The new one comes today...
Inspection Day
Our inspector, Rob, arrived with a cheerful smile and described the procedure for the inspection, normally taking less than an hour. Normally he chats with the skipper to determine the experience and sailing history, and to try to put people at ease - it does feel slightly like a test... Next we follow him around the deck as he notes our nice tight lifelines with lashings so they can be cut away to get a man out of the water easily. He tugs on our jacklines and glances at the rigging as we head forward. In 15 minutes we have been around the deck and are back in the cockpit to inspect the emergency steering system. I point out that our Southerly has 2 duplicate steering systems, each with a wheel driving a rudder, and a beefy link arm between them. However, Northshore also fitted a backup for the backup with an additional spare tiller arm. Although we don’t need this for the ARC inspection I get it out and fit it anyway since I have never actually tried it before. It seems to work fine although I wouldn’t want to steer far with it ;-)
We demonstrate the external/manual bilge pump, check clipping on points in the cockpit and admire my new 12V outlet for the spotlight.
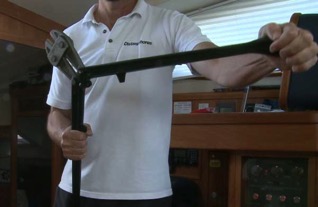
Heading down below we look at tie-downs for heavy equipment to make sure items like the batteries are well secured. We notice our stove clip needs adjusting as it is not correctly clipped. If the boat went over past 90 degrees the forward gimbal would fall out. Quickly corrected... We also pull out our bolt cutters for clearing away rigging.
In the bilge we check there are bungs ready to go by the thru-hulls. We get out our grab back, and check over our flares. Most boats will need to add a few flares to qualify for the ARC. They have a requirement for 4 white handheld flares as well as 6 SOLAS parachutes and 4 red handheld. I don’t know anyone who uses the white flares. The idea is to add light to a rescue scene. Personally I would never fire a flare just to add light - too much chance of an injury caused by the flare itself. Like everyone else we lined up in the fabulous local chandlery "Rolnautic" and added the required flares. As they work with the ARC directors, they know in advance which are the tricky items everyone will need. They have boxes of white flares!
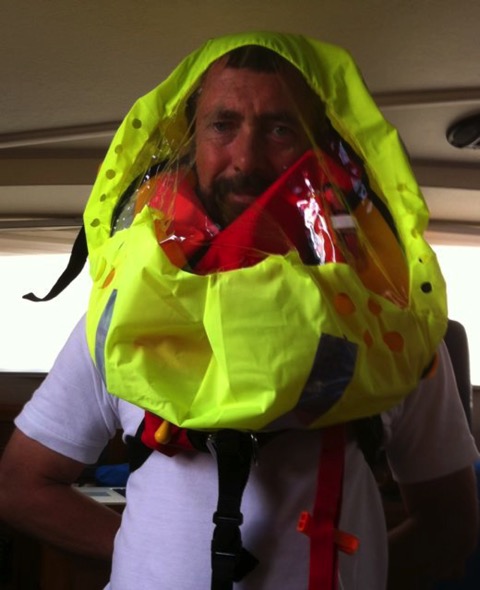
Lifejackets are another interesting one. If you are a US flagged vessel you can get a way with USCG Type-1 jackets. Everyone else will need jackets with a crotch-strap and also a face mask. These are also available in Rolnautic nearby. We purchased these attractive facemasks to add to our existing inflatable jackets along with the light and whistle we already had stuffed inside them....
The rest of the inspection was relatively straight-forward, but we still had a middling list of small items for the chandlery.
Check out the following video from the ARC.
Check out this EXTENDED video feature of the ARC Safety Check.
For the Whole Atlantic Rally Experience and much more check out our whole Season 9 set of programs - on DVD or Vimeo
Plan your passages around the world with us aboard Distant Shores
Order the Super Pack on DVD and get Season 1-10 Downloadable.
Order the Super Pack on Vimeo and we will send you the code for Season 10 as a bonus.
Why have a safety Inspection
For many years all offshore races have had safety requirements to insure boats meet a minimum requirement for seaworthiness and safety. For an offshore rally it is the same, and the ARC has borrowed from the Ocean Racing community to make up their requirements. Many of the boats taking part have never crossed an ocean before, and even if they have, an inspection reminds us to focus on the important things and get the boat safe for sea.
What are the safety requirements
The ARC information pack (check here for info) includes specific details for required safety equipment so most people have got a handle on the items they will need to upgrade before they reach Las Palmas. Most of the items will already be installed on the average cruising boat. A VHF with external speaker, a bilge pump operable from on deck, a SOLAS approved EPIRB, jacklines to clip on while going forward etc.
However, a number of items regularly give people trouble. For instance, we use a powerful rechargeable handheld spotlight, but the ARC requires the spotlight to be plugged into ships power. There was a huge pile of these spotlights in the chandlery last week, mostly gone now, indicating it is a common problem. So I have just finished installing and wiring up a 12Volt outlet by the helm.
The ARC also requires a very specific liferaft standard - which is another major consideration as it is quite a pricey piece of equipment. The raft must be either an ISO9650-1 standard, or SOLAS or ISAF (Racing). Most commonly found is the ISO-9650 standard. However, our liferaft (just 2.5 years old) is not an ISO certified raft and therefore failed the test. We have had to purchase a new one - 1800Euro - OUCH!! The new one comes today...
Inspection Day
Our inspector, Rob, arrived with a cheerful smile and described the procedure for the inspection, normally taking less than an hour. Normally he chats with the skipper to determine the experience and sailing history, and to try to put people at ease - it does feel slightly like a test... Next we follow him around the deck as he notes our nice tight lifelines with lashings so they can be cut away to get a man out of the water easily. He tugs on our jacklines and glances at the rigging as we head forward. In 15 minutes we have been around the deck and are back in the cockpit to inspect the emergency steering system. I point out that our Southerly has 2 duplicate steering systems, each with a wheel driving a rudder, and a beefy link arm between them. However, Northshore also fitted a backup for the backup with an additional spare tiller arm. Although we don’t need this for the ARC inspection I get it out and fit it anyway since I have never actually tried it before. It seems to work fine although I wouldn’t want to steer far with it ;-)
We demonstrate the external/manual bilge pump, check clipping on points in the cockpit and admire my new 12V outlet for the spotlight.
Heading down below we look at tie-downs for heavy equipment to make sure items like the batteries are well secured. We notice our stove clip needs adjusting as it is not correctly clipped. If the boat went over past 90 degrees the forward gimbal would fall out. Quickly corrected... We also pull out our bolt cutters for clearing away rigging.
In the bilge we check there are bungs ready to go by the thru-hulls. We get out our grab back, and check over our flares. Most boats will need to add a few flares to qualify for the ARC. They have a requirement for 4 white handheld flares as well as 6 SOLAS parachutes and 4 red handheld. I don’t know anyone who uses the white flares. The idea is to add light to a rescue scene. Personally I would never fire a flare just to add light - too much chance of an injury caused by the flare itself. Like everyone else we lined up in the fabulous local chandlery "Rolnautic" and added the required flares. As they work with the ARC directors, they know in advance which are the tricky items everyone will need. They have boxes of white flares!
Lifejackets are another interesting one. If you are a US flagged vessel you can get a way with USCG Type-1 jackets. Everyone else will need jackets with a crotch-strap and also a face mask. These are also available in Rolnautic nearby. We purchased these attractive facemasks to add to our existing inflatable jackets along with the light and whistle we already had stuffed inside them....
The rest of the inspection was relatively straight-forward, but we still had a middling list of small items for the chandlery.
Check out the following video from the ARC.
Stormy Seas Autopilot Steering Video
Stormy Sailing Sneak Peek
Check out this EXTENDED video feature of the ARC Safety Check.
For the Whole Atlantic Rally Experience and much more check out our whole Season 9 set of programs - on DVD or Vimeo
Plan your passages around the world with us aboard Distant Shores
Order the Super Pack on DVD and get Season 1-10 Downloadable.
Order the Super Pack on Vimeo and we will send you the code for Season 10 as a bonus.
ARC Atlantic Rally for Cruisers - Stats
10/11/12 02:43 Filed in: Offshore sailing
Sheryl and I have decided to take part in, and to document, the Atlantic Rally for Cruisers - popularly known as the ARC this year. Naturally we have been preparing for the transatlantic crossing for some time now , but now we are also getting to see what its like to get ready for the ARC. We have downloaded an ARC manual/handbook which is actually quite a big booklet with information on safety, boat equipment requirements, port information, sailing tips and MUCH more.
Some ARC statistics of interest concerning the average boat that is entering the ARC this year..
15.1Meters long - that’s 49.7 feet
- biggest boat is the 28 meter superfast "Bristolian" ex "Mari Cha II" - its for sale too!!
- smallest boat is 32 feet - 9.7 meters
- 28 boats are brand new!! - launched in 2012
- The oldest boat is 76 years old!
- less than 10% of the boats are cats - just 21 of 230
- we have 3 crew as our friend Matt is joining us from Dubai
- if you fancy joining the ARC, some yachts take paying crew ...
So Distant Shores II is just about average - we are a 49 foot monohull (a few inches shorter) and a few years newer but with just 3 crew instead of 5.
If you are interested, here is a list of all the boats in the ARC this year
and a tracker to see how everyone is doing
.
We are looking forward to getting in to Las Palmas next week to see what the preparation is all about!
Anyone out there been thinking of doing the ARC??
Anchor Dragging?
15/10/12 02:56 Filed in: Anchoring
One of the great pleasures of the cruising life is settling down in a lovely anchorage to watch the sun set. Your boat is your own little island!
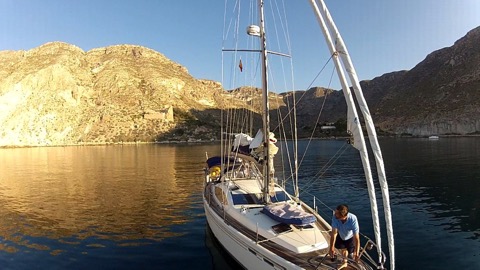
Hopefully your anchor is well set and will hold even if the wind in the night gets up a bit, or shifts and you swing around...
This often means I am up in the night checking all is well and we are where we are supposed to be. Check bearings on other nearby boats, check the beach astern hasn’t come any closer....
For many years I have been using a small handheld GPS beside the bunk to make a plot of where we have swung., After a few hours it shows an arc of dots indicating we are (hopefully) where we should be. But this means I have to wake up and check the plot. I haven’t been able to find a good anchor alarm. The ones I have seen are all add-ons to a GPS - not a purpose built system. They all seem to require me to set the alarm while we are anchoring otherwise the centre of the alarm circle is where we pushed the button - not where the anchor is on the bottom. I have always hoped for an anchoring alarm designed just for that purpose - where you can set the centre of the circle where your anchor is, and plot the anchor position.
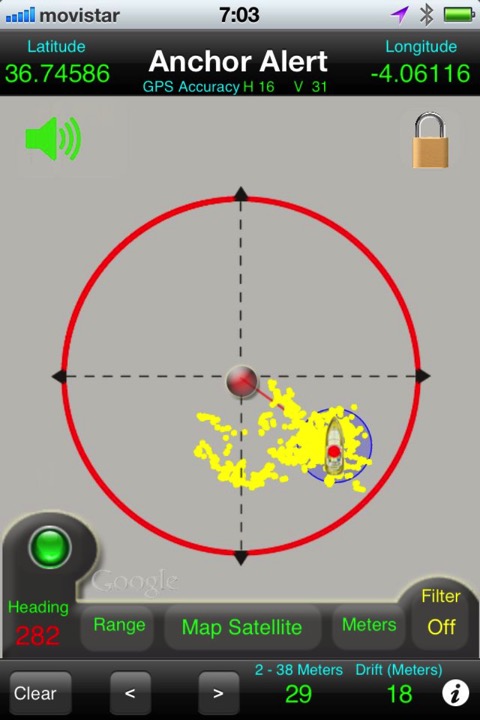
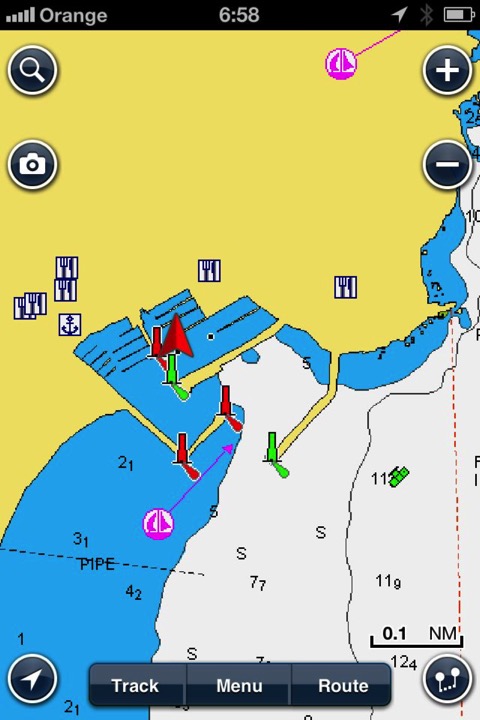
This is an iPhone App that does just that... I had a chance to test it as we anchored in the remote Cala San Pedro on Spains coast a few days ago. You can set the spread of yellow dots showing where we have drifted within the red circle I have set as a safe radius. The centre dot is our anchor. Drift shows we are currently 18 meters from the anchor. This was done with the iPhone down in the cabin - try it on your own boat to see if the smartphone has a sufficiently sensitive GPS to receive belowdecks.
To set the Anchor Alert with an "offset" is quite straight forward although I had trouble at first since it isn’t in the manual. I emailed the developer (from our anchorage!!) and he kindly sent me directions.
1) Press the "lock" icon in the upper right of the screen
2) Point the phone to where the anchor is.
3) Drag the boat back until the position on screen reflects your current position back from the anchor in real life
4) Press the Set button (currently showing "clear" in the lower left) and choose "Offset"
5) Press the lock icon again.
I set the alarm and it didn’t give any false alarms during the night - nicely plotting the yellow dots. The blue circle is the GPS uncertainly of our actual position (shown in the top menu GPS accuracy). A fancy feature is the overlay of a Google Earth Satellite photo if your phone is on the internet to download it.
If you have an iPhone I recommend this App - for the mere fee of $3.99 (Check Here for Update July 2014)
If you use Android you also have an App, and its also called Anchor Alert, although it has nothing to do with the iPhone one!! It looks even better as it has an exclusion zone option so you can set an area of the circle you want to remove from your safe-zone. This would be useful and would alert you if the wind switched and you wanted to wake up to check if the anchor was safely reset. Its 12Euros. Also looks like excellent value. Anyone out there with an Android phone who has tried it?
Hopefully your anchor is well set and will hold even if the wind in the night gets up a bit, or shifts and you swing around...
This often means I am up in the night checking all is well and we are where we are supposed to be. Check bearings on other nearby boats, check the beach astern hasn’t come any closer....
For many years I have been using a small handheld GPS beside the bunk to make a plot of where we have swung., After a few hours it shows an arc of dots indicating we are (hopefully) where we should be. But this means I have to wake up and check the plot. I haven’t been able to find a good anchor alarm. The ones I have seen are all add-ons to a GPS - not a purpose built system. They all seem to require me to set the alarm while we are anchoring otherwise the centre of the alarm circle is where we pushed the button - not where the anchor is on the bottom. I have always hoped for an anchoring alarm designed just for that purpose - where you can set the centre of the circle where your anchor is, and plot the anchor position.
Anchor Alert - SEE UPDATE July 2014
This is an iPhone App that does just that... I had a chance to test it as we anchored in the remote Cala San Pedro on Spains coast a few days ago. You can set the spread of yellow dots showing where we have drifted within the red circle I have set as a safe radius. The centre dot is our anchor. Drift shows we are currently 18 meters from the anchor. This was done with the iPhone down in the cabin - try it on your own boat to see if the smartphone has a sufficiently sensitive GPS to receive belowdecks.
To set the Anchor Alert with an "offset" is quite straight forward although I had trouble at first since it isn’t in the manual. I emailed the developer (from our anchorage!!) and he kindly sent me directions.
1) Press the "lock" icon in the upper right of the screen
2) Point the phone to where the anchor is.
3) Drag the boat back until the position on screen reflects your current position back from the anchor in real life
4) Press the Set button (currently showing "clear" in the lower left) and choose "Offset"
5) Press the lock icon again.
I set the alarm and it didn’t give any false alarms during the night - nicely plotting the yellow dots. The blue circle is the GPS uncertainly of our actual position (shown in the top menu GPS accuracy). A fancy feature is the overlay of a Google Earth Satellite photo if your phone is on the internet to download it.
If you have an iPhone I recommend this App - for the mere fee of $3.99 (Check Here for Update July 2014)
Android??
If you use Android you also have an App, and its also called Anchor Alert, although it has nothing to do with the iPhone one!! It looks even better as it has an exclusion zone option so you can set an area of the circle you want to remove from your safe-zone. This would be useful and would alert you if the wind switched and you wanted to wake up to check if the anchor was safely reset. Its 12Euros. Also looks like excellent value. Anyone out there with an Android phone who has tried it?
Downwind Sailing - Preparation
For anyone planning a tradewind crossing of the Atlantic - Canary Islands to the Caribbean - planning for downwind sailing is important. Heading east to west in the tropics generally means the wind at your back, and this will also be the case on passages across the Pacific. So we have to prepare for 3000 miles of (hopefully) downwind sailing, and we haven’t done that with this boat. In the next few weeks I will be setting her up to make sure it runs as smoothly as possible.
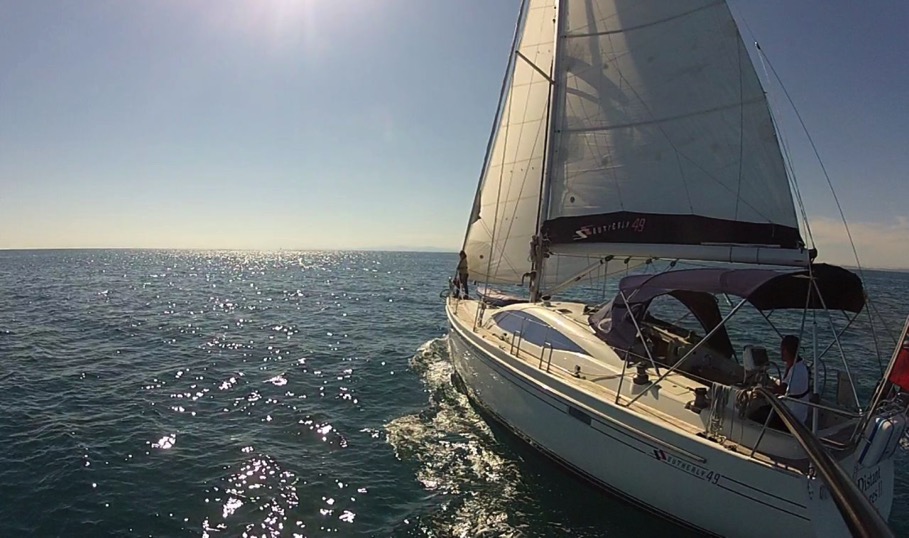
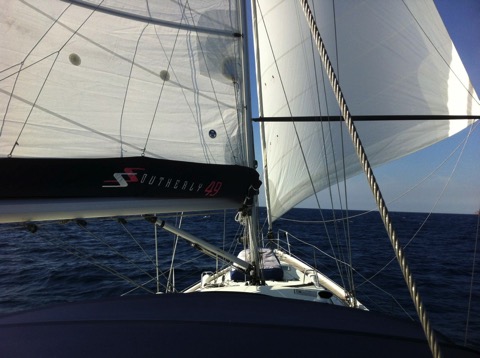
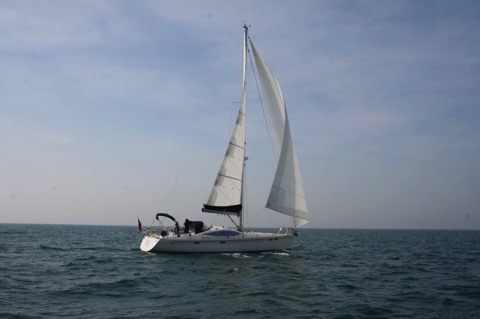
Prevailing winds on the standard transatlantic route will be almost dead astern. Sailing with the wind this far aft means we need to pole out a headsail. While bigger crews might try to fly a spinnaker, we use a jib or genoa. Some boats even have two poles allowing them to put out two headsails. The twizzle rig is another alternative... google it ;-)
Here is our basic setup - main well out (with a preventer) and genoa poled out opposite.
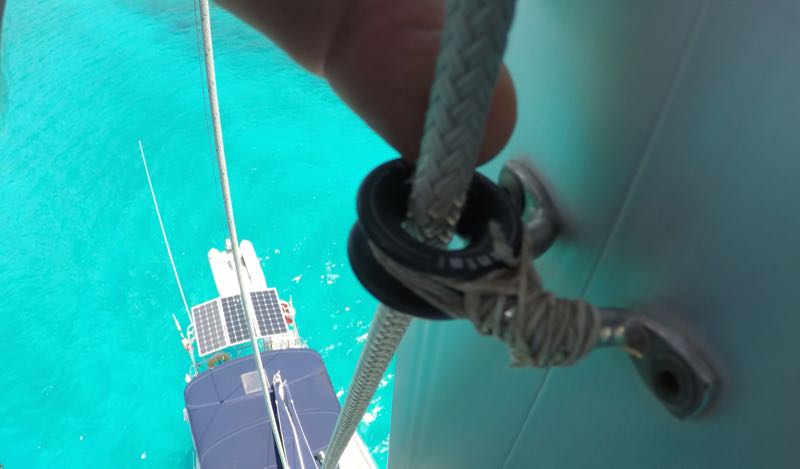
In this picture you can see our pole downhaul running up to the pole end from near the shrouds. This has worked well enough for occasional use but it is better to have a foreguy. This will be a line running from the foredeck back to the pole end. That’s a project I am working on now, putting a block on the foredeck and running the rigging for it back to the cockpit. I figure $200-300 for this. We already have a nice pole topping lift and a very nice system controlling the pole inboard end on its track.
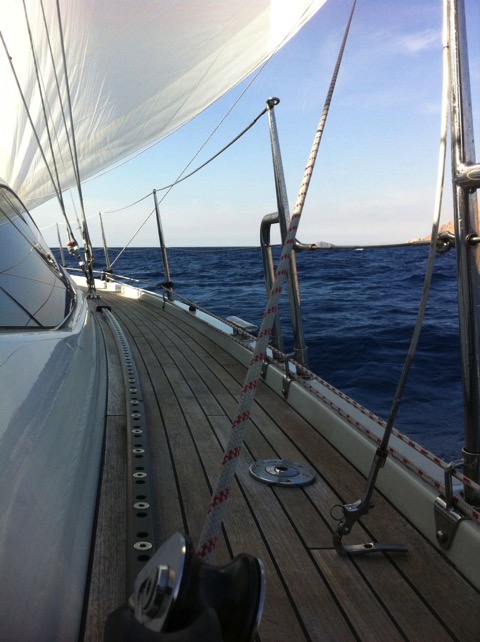
In our case we have an inboard genoa track, so the sheet rubs on the lifeline when it is poled out. This won’t be good for a long crossing so I set it up running out the gate. This isn’t a very good long term solution so I plan to run the sheet aft t a block on the aft corner. This will reduce stress and friction as well.
For many long downwind miles, the autopilot will be steering and we want to be sure we have the boat as well balanced as possible for easy steering (actually we would want this also if we were hand steering). Today wasn’t a bad day to test since tide against the swell was producing a bit of a roll. The transatlantic will be rolly since you are generally running in 15-20 knots with seas astern. In our experience these can be 2-3 meters. I find our very deep keel steadies the roll quite a bit. We draw over 10 feet with the keel down and that does seem to help. Also the twin rudders seem to make her track very well downwind. For our previous boat Two-Step (which was a full keeler info here) it was tougher to balance downwind. I found we had to reduce the mainsail to double reef so she didn’t slew around. This effectively moved the centre of effort forward so she didn’t want to round up.
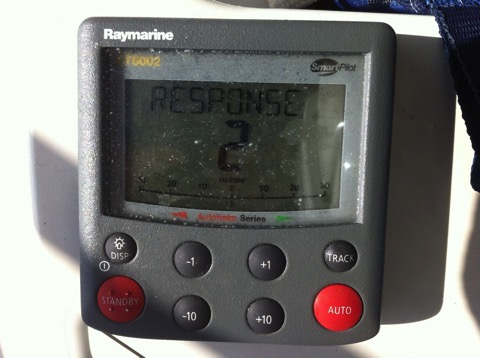
Reduce the autopilot settings to match the seas and use minimum power. We have a Raymarine Autopilot system tat has a "response" setting. By default this is set at 5 every time you turn on the breaker. I generally reduce that number (making it less sensitive) and have been using a setting of 3. For rougher water the boat will naturally weave bit around her set course, so a higher setting just means the autopiot is doing more work correcting when the boat would come back anyway. I have been trying settings of 1 and 2 and they seem to work very well. You might try adjusting the settings on your autopilot to see what you can get.

With our swept spreader rig we will need to watch chafe on the spreader ends. I will be adding chafe patches to the sail where it rubs on the spreaders. I will do this for the 1st and second reefs since we are likely to use these on the breezier days. Discs of the adhesive sailcl;oth about 20 cm in diameter work well and are easy to apply.
I also take a very close look at reefing lines, sheets and blocks etc to check for any small chafe. Over a long passage this can add up quickly to a bigger problem. This one passage will be more downwind miles than we have done so far in the 8000 miles we have sailed Distant Shores II.
The tradewind passage across to the Caribbean should be an enjoyable crossing. It will take between 2-3 weeks so time spent preparing for it is well worth it. And will help make it fun!
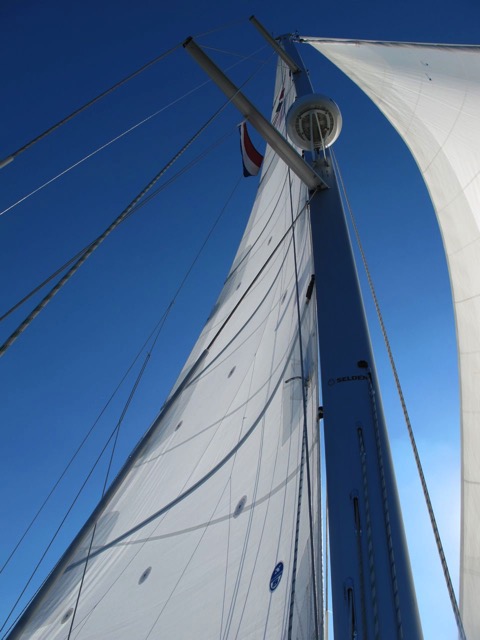
The Downwind Rig
Prevailing winds on the standard transatlantic route will be almost dead astern. Sailing with the wind this far aft means we need to pole out a headsail. While bigger crews might try to fly a spinnaker, we use a jib or genoa. Some boats even have two poles allowing them to put out two headsails. The twizzle rig is another alternative... google it ;-)
Here is our basic setup - main well out (with a preventer) and genoa poled out opposite.
Pole Setup
In this picture you can see our pole downhaul running up to the pole end from near the shrouds. This has worked well enough for occasional use but it is better to have a foreguy. This will be a line running from the foredeck back to the pole end. That’s a project I am working on now, putting a block on the foredeck and running the rigging for it back to the cockpit. I figure $200-300 for this. We already have a nice pole topping lift and a very nice system controlling the pole inboard end on its track.
Genoa sheet
In our case we have an inboard genoa track, so the sheet rubs on the lifeline when it is poled out. This won’t be good for a long crossing so I set it up running out the gate. This isn’t a very good long term solution so I plan to run the sheet aft t a block on the aft corner. This will reduce stress and friction as well.
Balance the helm
For many long downwind miles, the autopilot will be steering and we want to be sure we have the boat as well balanced as possible for easy steering (actually we would want this also if we were hand steering). Today wasn’t a bad day to test since tide against the swell was producing a bit of a roll. The transatlantic will be rolly since you are generally running in 15-20 knots with seas astern. In our experience these can be 2-3 meters. I find our very deep keel steadies the roll quite a bit. We draw over 10 feet with the keel down and that does seem to help. Also the twin rudders seem to make her track very well downwind. For our previous boat Two-Step (which was a full keeler info here) it was tougher to balance downwind. I found we had to reduce the mainsail to double reef so she didn’t slew around. This effectively moved the centre of effort forward so she didn’t want to round up.
Autopilot Setting
Reduce the autopilot settings to match the seas and use minimum power. We have a Raymarine Autopilot system tat has a "response" setting. By default this is set at 5 every time you turn on the breaker. I generally reduce that number (making it less sensitive) and have been using a setting of 3. For rougher water the boat will naturally weave bit around her set course, so a higher setting just means the autopiot is doing more work correcting when the boat would come back anyway. I have been trying settings of 1 and 2 and they seem to work very well. You might try adjusting the settings on your autopilot to see what you can get.
Chafe
With our swept spreader rig we will need to watch chafe on the spreader ends. I will be adding chafe patches to the sail where it rubs on the spreaders. I will do this for the 1st and second reefs since we are likely to use these on the breezier days. Discs of the adhesive sailcl;oth about 20 cm in diameter work well and are easy to apply.
I also take a very close look at reefing lines, sheets and blocks etc to check for any small chafe. Over a long passage this can add up quickly to a bigger problem. This one passage will be more downwind miles than we have done so far in the 8000 miles we have sailed Distant Shores II.
Enjoy!
The tradewind passage across to the Caribbean should be an enjoyable crossing. It will take between 2-3 weeks so time spent preparing for it is well worth it. And will help make it fun!
Tuning the Rig
28/09/12 00:41 Filed in: Rigging | Maintenance
Update: 2016 - Checking the Rig
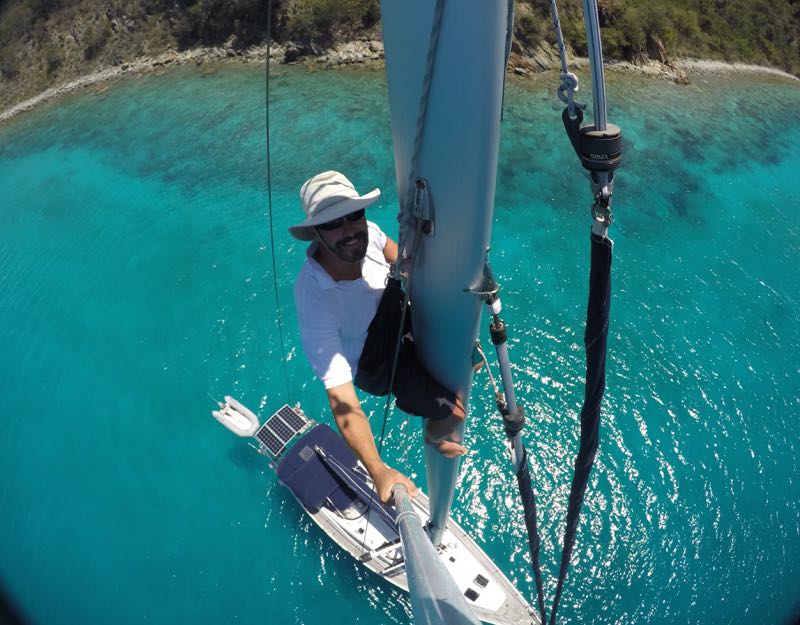
We have now sailed Distant Shores II across the Atlantic Ocean 3 times. Before and after each crossing I do a rig inspection (and annually as well). Today in the BVI I went up to the top to have a look…
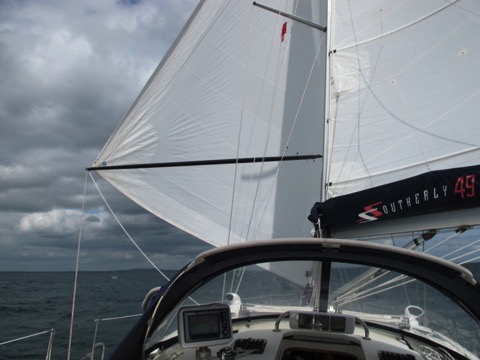
Before the 3000 miles downwind from Canary Islands - Cabo Verde Islands - Caribbean this November, we added this chafe protection to the spreader tips. Its a common problem with today's popular swept-spreader rigs that the mainsail chafes on the spreaders when going downwind. We added these foam covers (actually for plumbing to cover pipes) and they absorbed some of the chafe. Now I'll take off the covers again.
When we arrived in the Caribbean we had our favourite sailmaker (Kenny in St Lucia) add chafe protection to the mainsail to try and reinforce the sail at these chafe points.
Another chafe problem we tackled was where the lazy-jack lines run down to the sail cover. They used to run through the stainless fittings here, but they chafed badly. This time I tried these new Low Friction Rings made by Antal. I lashed them in place in Las Palmas and they now show zero friction after 3000 miles. COMPLETELY cured the problem.
After Crossing France 2012
We had the mast down as we went through the canals and just put it up a couple of weeks ago, so I have been checking it and tuning it up ready for the miles ahead. Here are some thoughts on "care and tuning" of the rig...
Check-UP
I regularly go up the mast to check it over, and since we just put the mast back up, I have checked it carefully. The rig is arguably the most important system on the boat, and regular care is needed to keep it in tune and working properly.
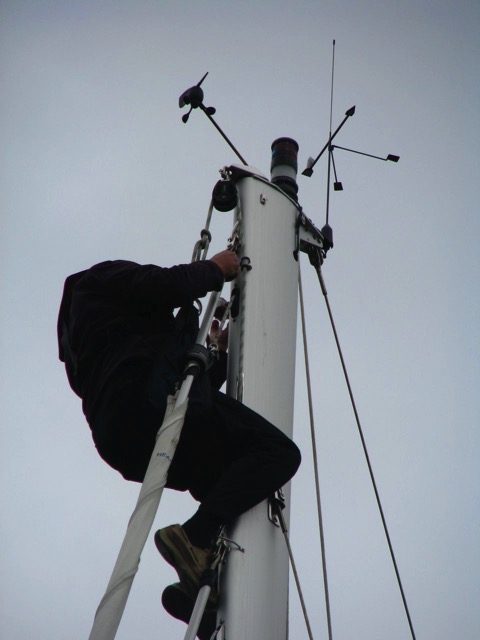
I look carefully at the standing rigging, spreaders, masthead, checking running rigging as well. On my way up I stop at the spreaders, radar and anywhere there are fittings to check! This also provides a break for the person winching you up!
Tune-up
Putting the mast back up means you have to tune the rig - basically setting the tension up on the shrouds and stays to the correct specs. If you have never done this before, having a professional rigger help out might be a good idea. But you can follow along and it will be a good idea to get to know the rig yourself - as the captain you are responsible and its got to be best to know about this important system.
Our mast is made by Selden, and they have an excellent guide that helps new owners to become familiar with their rig. Although it concentrates on Selden products it is also a great overview of tuning and managing any modern mast. Here is the PDF link
Under Tension
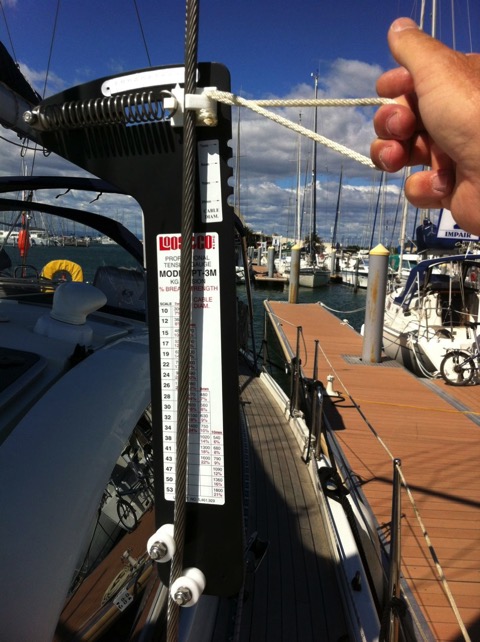
Setting the proper tension on the shrouds is one of the trickier parts of tuning. I have seen "experts" who claim to just give a wire a tug and know if the tension is correct. Possibly they have an ability to judge this, but I know I can’t. Instead I got this lovely "Loos" gauge that measures tension in different wire diameters up to 10mm (which is our upper cap shrouds).
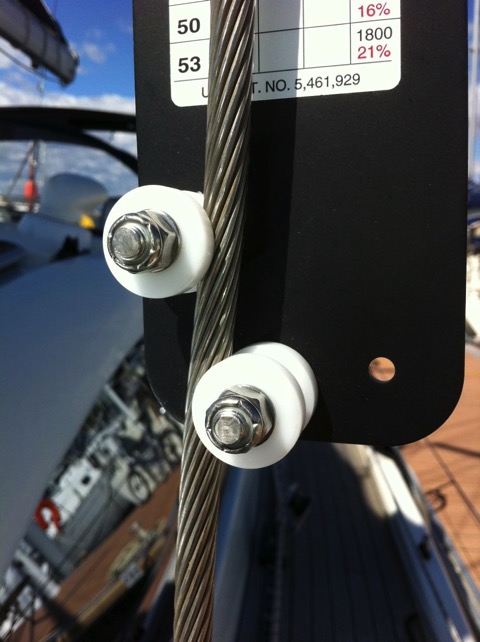
Simple to operate, you position the gauge on the wire with the two white rollers at the bottom. Then pull the rope to hook the clip around the wire. This puts a tiny bend in the wire and you read the tension off the pointer (below you can see the pointer is on the high end of the scale - at 50). The number corresponds to a tension for your diameter of wire. In this case "50" means 1360 kilograms - 16% of our 10mm wire’s breaking strength (from the image above).
It is important to clean and lubricate the turnbuckles before adjusting them as they operate under tremendous pressure! We don’t want to grind grit into the threads. I thoroughly cleaned the turnbuckles using white-spirit and a toothbrush to get in the threads. Selden have a recommended rigging lubricant. In the past I used lanolin.
Test sailing
With the rigging set up its off for a test sail checking everything with 15-20 degrees of heel. I needed to increase tension just slightly on the intermediates (which I did at the dock). Then tape up the turnbuckles to prevent getting anything caught in the split pins, Ready to get going!!
Do you dream of sailing the Bahamas?
iPhone Sailing the World
18/09/12 00:53 Filed in: Communications
Communications must be the most dramatic of all the aspects that have changed for us in 22 years of sailing internationally. From the first cellphone we were able to be in touch without writing a letter LOL or lining up at a phone centre OMG. (see I even have the modern lingo down too!)
As we have been Apple users since 1998, we naturally have iPhones now. Here are a few of our fave Apps for the cruising sailor.
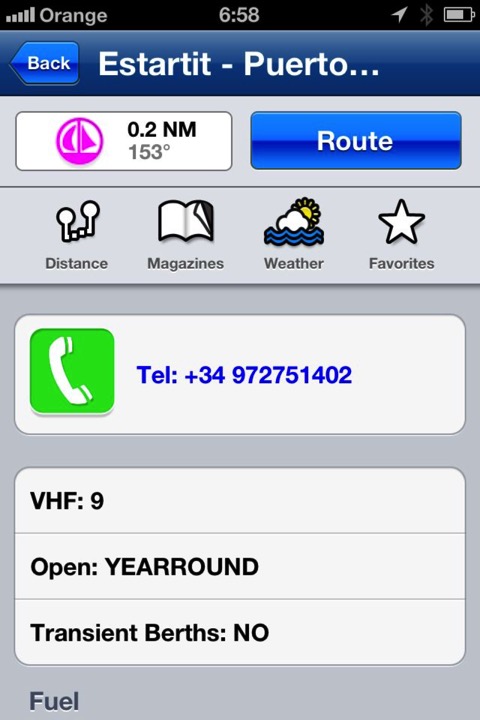
Our Raymarine multifunction plotters on Distant Shores II use Navionics mapping - and you can also get those same charts for the iphone. There are separate apps for each region you sail in, so we have a few (UK, Europe, Caribbean etc) The regions are large and not expensive. We are talking about fully detailed charts.
Unlike google maps which download as you look at them - Navionics charts are stored on your iDevice so there is no roaming charges incurred to see them. iPhone integration on the app is nice too - I clicked on the marina icon and find the phone number - press the number and you can call the marina to see if they have space and where you should tie up!
iPhone too small? Admittedly charting on a small phone screen is a bit of a pain - we also have the iPad Navionics app and it is a great tool on that bigger screen.
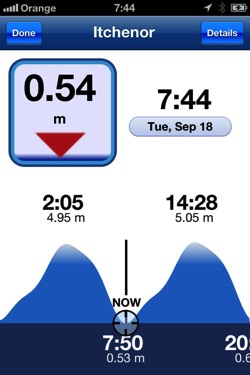
I did buy a tide app to calculate tides. It was OK and would have been good if we didn’t already have the Navionics apps. They have tides as well so we use that. They are much easier to use than printed tables, and more accurate I think. Note how they show the strange standing high tide of the Solent where high water stands for quite a while before falling quickly.
Not sure about these apps yet. My hope is they can raise the alarm if we drag out of a preset area. I have tried Anchor Alert and Anchor Alarm". I did not get on with "Anchor Alarm", but I will give Anchor Alert another try as they have a new version which added my MUST HAVE feature to offset your center point after you anchor.
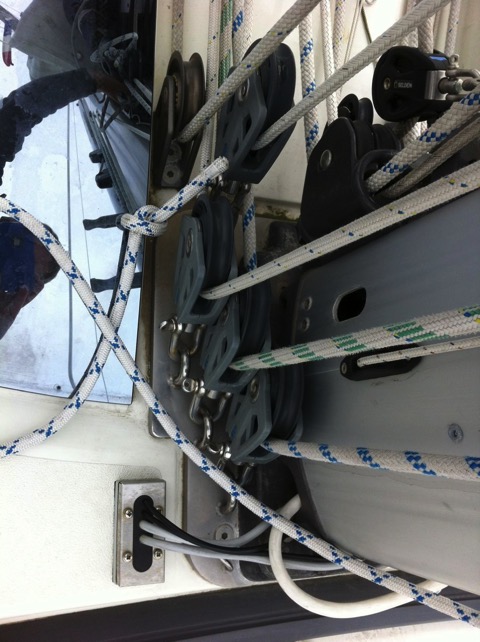
Of course the iPhone has other tools I use a lot already included. The camera comes in handy since I already have the phone in my pocket ready to shoot. Taking down the rig, I photographed the detail of the lines exiting the mast to remember how to put it back together. Quite good images from this camera.
For a couple of seasons we used the iPhone as a communications hub. We would sign up for a data plan in the country (say the UK) and then use the iphone as a "tethered" data connection for our computers. This means 2 computers, plus our iPad could all be online through one data plan. Now we use a separate "mifi" device for this since I want mu iPhone with me!
Yes the iPhone is also a good phone. BUT remember you will need an "open" phone - not restricted to your local carrier at home or else you will be roaming. Coming from Canada where we have possibly the most ridiculous phone rates and terrible plans this is not a good idea. We bought our phone from Apple direct so it would be open and accept any SIM card as we travel.
The iPhone is also an iPod music player so we use it on watch to listen to music and podcasts. I have even tried watching a movie but maybe thats not for me on the small screen...
 Speaking of movies - if you haven’t seen all the latest episodes of Distant Shores television program, you can get them on DVD and watch on a bigger screen on your laptop. There are some things the iPhone isn’t best at I guess!
What do you think? Whats your fave App on your smartphone?
As we have been Apple users since 1998, we naturally have iPhones now. Here are a few of our fave Apps for the cruising sailor.
Navionics Charts
Our Raymarine multifunction plotters on Distant Shores II use Navionics mapping - and you can also get those same charts for the iphone. There are separate apps for each region you sail in, so we have a few (UK, Europe, Caribbean etc) The regions are large and not expensive. We are talking about fully detailed charts.
Unlike google maps which download as you look at them - Navionics charts are stored on your iDevice so there is no roaming charges incurred to see them. iPhone integration on the app is nice too - I clicked on the marina icon and find the phone number - press the number and you can call the marina to see if they have space and where you should tie up!
iPhone too small? Admittedly charting on a small phone screen is a bit of a pain - we also have the iPad Navionics app and it is a great tool on that bigger screen.
Tide Planning
I did buy a tide app to calculate tides. It was OK and would have been good if we didn’t already have the Navionics apps. They have tides as well so we use that. They are much easier to use than printed tables, and more accurate I think. Note how they show the strange standing high tide of the Solent where high water stands for quite a while before falling quickly.
Anchor Alert
Not sure about these apps yet. My hope is they can raise the alarm if we drag out of a preset area. I have tried Anchor Alert and Anchor Alarm". I did not get on with "Anchor Alarm", but I will give Anchor Alert another try as they have a new version which added my MUST HAVE feature to offset your center point after you anchor.
Camera, Notepad and Email
Of course the iPhone has other tools I use a lot already included. The camera comes in handy since I already have the phone in my pocket ready to shoot. Taking down the rig, I photographed the detail of the lines exiting the mast to remember how to put it back together. Quite good images from this camera.
Wifi Router
For a couple of seasons we used the iPhone as a communications hub. We would sign up for a data plan in the country (say the UK) and then use the iphone as a "tethered" data connection for our computers. This means 2 computers, plus our iPad could all be online through one data plan. Now we use a separate "mifi" device for this since I want mu iPhone with me!
Hey - its also a phone!!
Yes the iPhone is also a good phone. BUT remember you will need an "open" phone - not restricted to your local carrier at home or else you will be roaming. Coming from Canada where we have possibly the most ridiculous phone rates and terrible plans this is not a good idea. We bought our phone from Apple direct so it would be open and accept any SIM card as we travel.
Music, Movies etc
The iPhone is also an iPod music player so we use it on watch to listen to music and podcasts. I have even tried watching a movie but maybe thats not for me on the small screen...
What do you think? Whats your fave App on your smartphone?
Sailing South - Keeping Cool
06/09/12 02:24 Filed in: Outfitting | Life Aboard
Now that we have got to the south of France we are having the hottest weather we have experienced on this boat to date. So we are making sure Distant Shores II will be keeping cool for the tropical sailing ahead.
Air Conditioning?
Before you make a big investment in air-conditioning it pays to make the boat as cool as possible with simpler methods. Check out all the possible easy and environmentally friendly options... before going to AC.
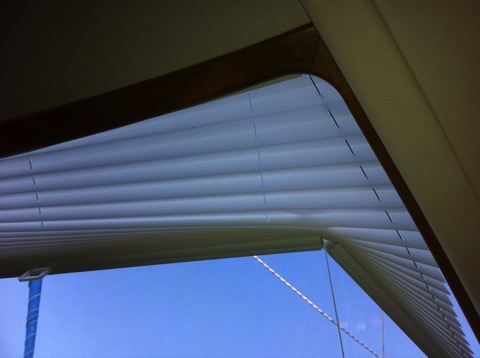
It’s curtains for you now...
Our saloon has big lovely windows for great views in exotic locations, but when the sun is shining in directly it does get hot. Keeping the sun out is the first thing to do. But traditional curtains don’t work on boats. We have added these nifty boat blinds that have slide easily up and down on guide lines so they don’t sway around at sea. This one is over our forward windows - probably the biggest heat absorber as they are nearly horizontal.
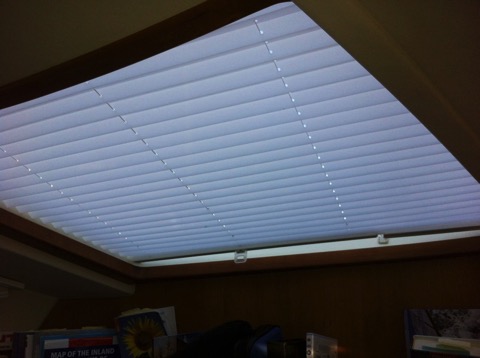
These are made by Breeze-blinds in the UK. You can see they have to be custom made since most boat windows are odd shapes. These are cunningly made so they conform to the non-square space. They can be left partially up as well (see below)
Fans
Now that we have reduced the sun coming in on a hot day we tackled the heat with some quality marine fans.
These units use VERY little power and are a great way to move air and keep cool. I have installed this lovely Caframo Fan in the galley.
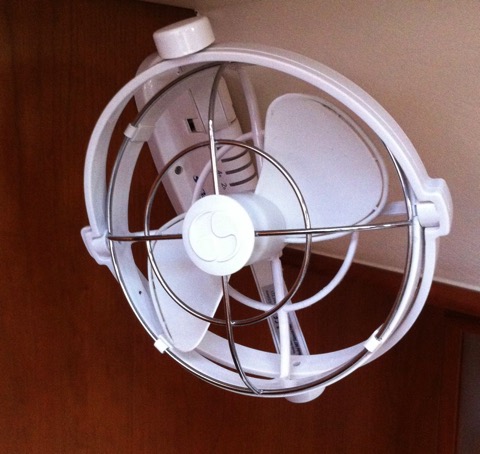
It turns and tilts so you can aim it anywhere. It has 3 speeds and even a timer so it can turn off automatically after a number of hours. But I think its best feature is its very clever folding and directional ability. It can tun any which way to get air into the galley or across into the saloon. Beautifully built and nice and quiet too!
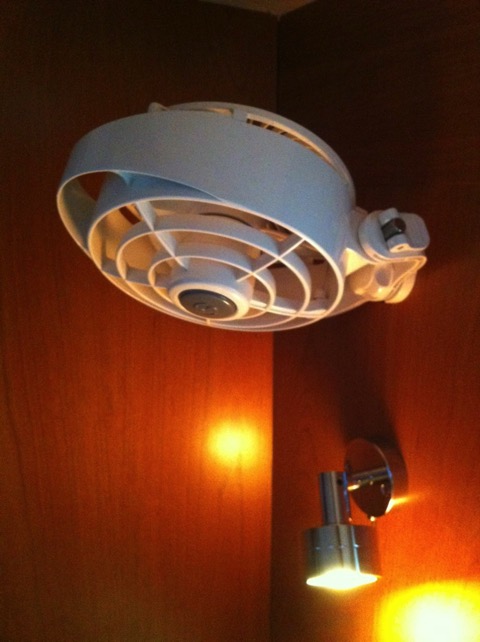
Fans for all Sleeping Cabins
On a hot night it’s luxury to turn on the fan and feel that cool air! I installed two fans over our main double berth and one in each guest cabin. One over each bedside lamp. These are Caframo 3 speed units. Very sturdy and quiet. They also adjust to almost any angle.
Economical to Run
Even if we have all 5 fans up and running at full speed we are using very little power. It would be a infinitesimal amount compared to running an Air-Con unit. So at anchor or in a marina where you can pay quite a lot for power - fans and curtains are the best option for us!
Air Conditioning?
Before you make a big investment in air-conditioning it pays to make the boat as cool as possible with simpler methods. Check out all the possible easy and environmentally friendly options... before going to AC.
It’s curtains for you now...
Our saloon has big lovely windows for great views in exotic locations, but when the sun is shining in directly it does get hot. Keeping the sun out is the first thing to do. But traditional curtains don’t work on boats. We have added these nifty boat blinds that have slide easily up and down on guide lines so they don’t sway around at sea. This one is over our forward windows - probably the biggest heat absorber as they are nearly horizontal.
These are made by Breeze-blinds in the UK. You can see they have to be custom made since most boat windows are odd shapes. These are cunningly made so they conform to the non-square space. They can be left partially up as well (see below)
Fans
Now that we have reduced the sun coming in on a hot day we tackled the heat with some quality marine fans.
These units use VERY little power and are a great way to move air and keep cool. I have installed this lovely Caframo Fan in the galley.
It turns and tilts so you can aim it anywhere. It has 3 speeds and even a timer so it can turn off automatically after a number of hours. But I think its best feature is its very clever folding and directional ability. It can tun any which way to get air into the galley or across into the saloon. Beautifully built and nice and quiet too!
Fans for all Sleeping Cabins
On a hot night it’s luxury to turn on the fan and feel that cool air! I installed two fans over our main double berth and one in each guest cabin. One over each bedside lamp. These are Caframo 3 speed units. Very sturdy and quiet. They also adjust to almost any angle.
Economical to Run
Even if we have all 5 fans up and running at full speed we are using very little power. It would be a infinitesimal amount compared to running an Air-Con unit. So at anchor or in a marina where you can pay quite a lot for power - fans and curtains are the best option for us!
Isolation Transformer Install
03/09/12 02:37 Filed in: Electrical
MasterVolt Isolation Transformer Install
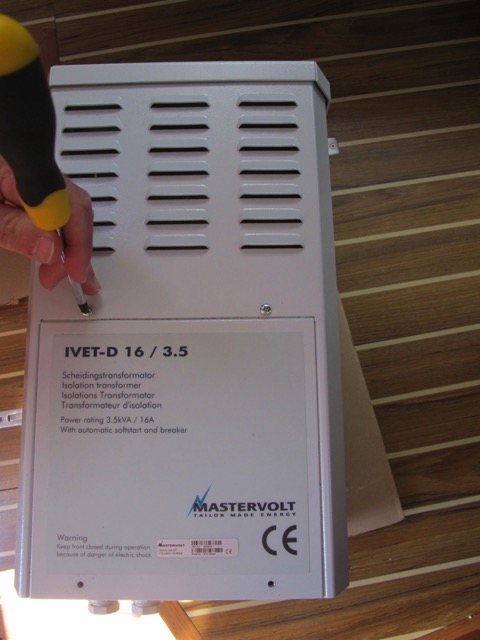
Yesterday was spent getting things back in order on board, and installing a shiny new Isolation Transformer! This one is a MasterVolt IVet D - Multi-tap
Why is an isolation transformer a good idea?
An isolation transformer means the shorepower ground wire is not connected directly so there is no stray DC current entering the boat and no galvanic corrosion.
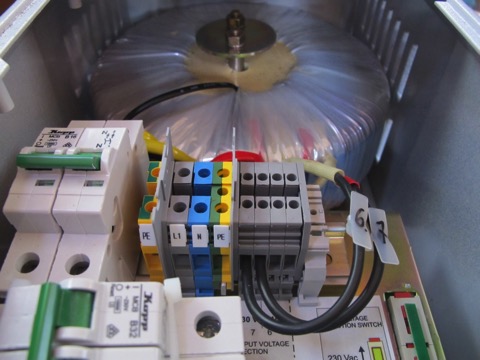
The second reason to have a transformer like this is to be able to connect to either 110 or 220 Volt power. This kind of transformer is called a Multi-Tap transformer and allows us to connect to either of the world power standards. When connecting to power here in Europe we need accept 220-230 volts. In north America we will need to take 110-120 volts. In this case I can slide the green switch on the right of the photo) down to accept 120 volts. The transformer will take in 110 volt power and convert it to 220 volts (note it will not convert the frequency - so we will have 220Volt 60Hz but this is fine for most appliances)
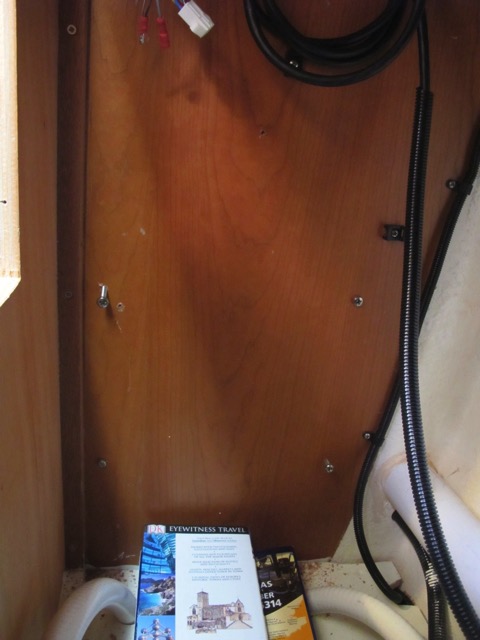
This is 28kg piece of equipment. It needs a solid bulkhead to mount it on. Note the books piled on the floor underneath the spot... this means I can lift it in and sit it down on the books as I manoeuvre it into place.
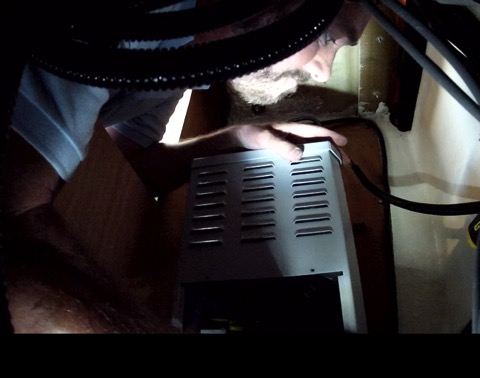
Concentrating!!
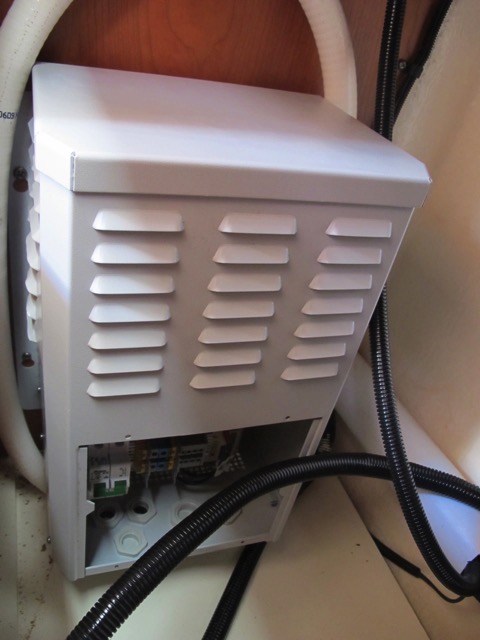
Hanging in place - ready to be connected
DISCONNECT shorepower before working with any boat wiring!!!
I cut the shorepower input line and connected the transformer. If you are at all unsure of how to work on wiring you should have an electrician do this part.
Now to test it.
Everything works fine. We are in business.
Yesterday was spent getting things back in order on board, and installing a shiny new Isolation Transformer! This one is a MasterVolt IVet D - Multi-tap
Why is an isolation transformer a good idea?
- Galvanic corrosion can be a problem on all boats. This means stray DC currents coming onboard through the ground when you connect to shorepower. The DC currents can easily dissolve metal fittings on your boat that are in contact with seawater - or even the hull itself if you have a metal hull. Yikes!
- Shorepower can be incorrectly wired in different marinas. For instance we have seen power where both legs of 220 volt power was live with 110 volts each! Interesting but not correct. Without the transformer we could not connect safely to this supply.
- 110 or 220 volt - we use the Multi-tap transformer to convert from one to the other so we can plug in anywhere around the world
An isolation transformer means the shorepower ground wire is not connected directly so there is no stray DC current entering the boat and no galvanic corrosion.
The second reason to have a transformer like this is to be able to connect to either 110 or 220 Volt power. This kind of transformer is called a Multi-Tap transformer and allows us to connect to either of the world power standards. When connecting to power here in Europe we need accept 220-230 volts. In north America we will need to take 110-120 volts. In this case I can slide the green switch on the right of the photo) down to accept 120 volts. The transformer will take in 110 volt power and convert it to 220 volts (note it will not convert the frequency - so we will have 220Volt 60Hz but this is fine for most appliances)
This is 28kg piece of equipment. It needs a solid bulkhead to mount it on. Note the books piled on the floor underneath the spot... this means I can lift it in and sit it down on the books as I manoeuvre it into place.
Concentrating!!
Hanging in place - ready to be connected
DISCONNECT shorepower before working with any boat wiring!!!
I cut the shorepower input line and connected the transformer. If you are at all unsure of how to work on wiring you should have an electrician do this part.
Now to test it.
Everything works fine. We are in business.
Planning a Passage
17/08/12 08:08 Filed in: Planning
Where to Go?
Sounds like a funny question... where will we go. But a lot of the success of your cruise will be a result of figuring out a reasonable plan in the first place. First timer’s often come up with a plan that involves too many miles, optimistically planning the route without taking into account the realities of small-boat voyaging. After all a whole year must be enough time to travel around the world? :-) And while it might be possible to make a string of long passages - for most of us this will be more of an endurance test.
How long will it take?
When Sheryl & I are getting ready to make a passage we plan a few extra days to prepare for the passage (provisioning, boat projects etc) and a number of days to rest and enjoy the destination as well (and do those bat jobs that crop up afterwards).
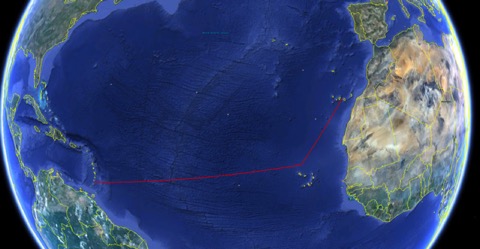
This cruise from France to the Caribbean will involve three main legs...
Cruising Routes
Our next step in planning a passage is to look it over in Jimmy Cornell’s "World Cruising Routes". We have just bought Jimmy’s latest book on passage planning for the world called "World Voyage Planner". If you are planning long-term sailing I would highly recommend you look at these guides. For us we have done this passage before so already did the research. But I will look over passage planning for the Gibraltar - Madeira leg.
Internet Weather
Weather resources on the internet have come a long way. You probably are using some of these resources already, but I would recommend you start assembling a folder of weather internet sites that specialize in the weather of where you are going. I do this in advance so I am watching the weather to try to learn the patterns for the places we will visit. Here are a few links...
http://passageweather.com/ Excellent all-round page for overview of offshore weather
http://www.windguru.cz/fr/index.php?sc=58 Detailed local site forecasts - this one for the BVI
http://www.windfinder.com/forecasts/wind_caribbean_animation.htm Nice local weather animations for anywhere - Here’s our Caribbean Landfall
http://www.xcweather.co.uk/forecast/port_saint_louis Another I have been using in Europe for local forecasts
Cruiser Blogs
Of course you will have already found cruiser blogs on the internet as well - you found this one?! I usually check out sailors blogs on destinations I am going to for the first time. For example, our cruise through the French Canals I found these two sites - one a cruisers blog giving the flavour of the cruise, and the other an amazing site organized like a cruising guide - excellent!
http://rosadvfrenchcanals.blogspot.ca/2008_05_11_archive.html - Very nice blog on the French Canals
http://www.french-waterways.com/ - Amazing detail - we bought the downloadable guide since we could use it when out of internet range.
Planning a passage should be a lot of fun! Here is where you turn your cruising dreams into reality! Enjoy!
Paul
Sounds like a funny question... where will we go. But a lot of the success of your cruise will be a result of figuring out a reasonable plan in the first place. First timer’s often come up with a plan that involves too many miles, optimistically planning the route without taking into account the realities of small-boat voyaging. After all a whole year must be enough time to travel around the world? :-) And while it might be possible to make a string of long passages - for most of us this will be more of an endurance test.
How long will it take?
When Sheryl & I are getting ready to make a passage we plan a few extra days to prepare for the passage (provisioning, boat projects etc) and a number of days to rest and enjoy the destination as well (and do those bat jobs that crop up afterwards).
This cruise from France to the Caribbean will involve three main legs...
- South France to Gibraltar - The Med - I am making a rough estimation of 1 month to involve a number of stops along the Spanish coast
- Gib to the Canaries - African Coast - 6 weeks hopefully visiting Madeira and Morocco as well as the eastern Canaries we haven’t seen before
- Canaries to Caribbean - Crossing the Atlantic - 4 weeks including prep and a few days rest at the end
Cruising Routes
Our next step in planning a passage is to look it over in Jimmy Cornell’s "World Cruising Routes". We have just bought Jimmy’s latest book on passage planning for the world called "World Voyage Planner". If you are planning long-term sailing I would highly recommend you look at these guides. For us we have done this passage before so already did the research. But I will look over passage planning for the Gibraltar - Madeira leg.
Internet Weather
Weather resources on the internet have come a long way. You probably are using some of these resources already, but I would recommend you start assembling a folder of weather internet sites that specialize in the weather of where you are going. I do this in advance so I am watching the weather to try to learn the patterns for the places we will visit. Here are a few links...
http://passageweather.com/ Excellent all-round page for overview of offshore weather
http://www.windguru.cz/fr/index.php?sc=58 Detailed local site forecasts - this one for the BVI
http://www.windfinder.com/forecasts/wind_caribbean_animation.htm Nice local weather animations for anywhere - Here’s our Caribbean Landfall
http://www.xcweather.co.uk/forecast/port_saint_louis Another I have been using in Europe for local forecasts
Cruiser Blogs
Of course you will have already found cruiser blogs on the internet as well - you found this one?! I usually check out sailors blogs on destinations I am going to for the first time. For example, our cruise through the French Canals I found these two sites - one a cruisers blog giving the flavour of the cruise, and the other an amazing site organized like a cruising guide - excellent!
http://rosadvfrenchcanals.blogspot.ca/2008_05_11_archive.html - Very nice blog on the French Canals
http://www.french-waterways.com/ - Amazing detail - we bought the downloadable guide since we could use it when out of internet range.
Planning a passage should be a lot of fun! Here is where you turn your cruising dreams into reality! Enjoy!
Paul
Getting Ready to Cross Oceans
09/08/12 07:48 Filed in: Communications | Maintenance
We are getting Distant Shores II ready for her first Transatlantic Passage coming up this fall!
The French Canals trip was wonderful and the previous 2 summers exploring Scandinavia, Scotland etc were excellent as well. But now we are looking to get back to the warm weather! So the next couple of months will involve heading south to Spain, Gibraltar, Morocco, Madeira and the Canary Islands. And will involve getting ready for an Atlantic crossing.
Although we have done this route before (crossing from the Canary Islands to the Caribbean in Distant Shores Season 5 and Cruising with the Shards), we haven’t done any long passages with the new Southerly 49. The longest to date on Distant Shores II is 220 miles, and this passage will be roughly 3000!
Passage Plan
We will leave the Canary Islands in late November to avoid hurricane season in the Caribbean. Arriving in the Caribbean before Christmas. Definitely do not plan a specific arrival date. We made this mistake last time and couldn’t enjoy the last few days of light wind sailing since we were trying to meet a deadline. And if you have additional crew onboard, try to plan their return flights and schedule to allow a flexible arrival date.
Downwind Sailing
Of course the boat must be ready for anything for an ocean crossing. But the likelihood is that there will be many miles of running downwind. We have a downwind pole and will carefully go over this before to make sure all is in order. I am adding a foreguy for the pole and will cover this in a future blog. We will also look over the rig carefully for chafe. We haven’t sailed much downwind with the 49 yet. Sure we have sailed 10-15 hours at a shot but this upcoming passage might involve 10-15 days on one tack - and in breezy conditions!! Chafe can definitely add up! Looking over your boat you must plan for many many hours of sailing on the same point of sail.
Spare Parts
Purchase all the spare parts you need well in advance. Travelling around Europe the past 2 seasons we haven’t been as self-sufficient as we normally are. We could order pieces and get them in a few days. I will be planning a much more extensive spares list. Engine parts, electrical spares, rigging and sail repair. We had all this on our previous boats but must rebuild the spares lockers for the new boat.
Watermaker?
We had a watermaker on the Southerly 42 and quite liked having the freedom of (virtually) unlimited water. We still carried lots of spare water in case of a breakdown, but definitely enjoyed many nice showers ... we will be investigating adding a desalinator this fall.
Communications
On both previous boats we had an SSB radio. We haven’t added one on Distant Shores II ... yet. And we must look into a satellite phone. It might be time to add that as well. Although I am sure there is still a place on a modern sailboat for the SSB radio. Here’s a link on communications I did in 2010...
More to come in the next weeks... exciting!!
ps. Please forward this blog link to anyone you know who might be interested or planning a trans-ocean passage! Welcome onboard!
Canals - Recommendations
Well we finished the French Canals after a very successful trip lasting almost 10 weeks. It was something we had dreamed of doing for years. It was a great voyage and we had a blast! Coming into Paris on our own boat, visiting small french villages and tasting wines at the “caves”... If you are thinking of seeing France by canal there are a number of options. Chartering a houseboat/peniche is one option. Going aboard a larger Peniche as a passenger or bicycle tour is another. But this blog is about taking your own boat. Can you do it and will it be any fun?
Suitable boats
Draft - We have seen a variety of craft in the canals but some were having less fun than others... If you have a boat that draws more than 1.8 meters than you should not even consider the trip. If your boat draws between 1.6 and 1.8 then you should be prepared to run a ground a fair bit. Boats drawing less than 1.6 will be safe. we draw less than 1 meter but swing the keel down to 1.6 for most of the trip as a safety valve. We very rarely touched bottom when staying in the proper channel, but when passing other craft we had to more to the side of the channel and were glad we drew less than 1.8.
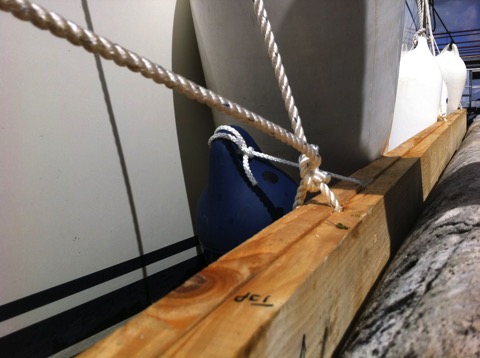
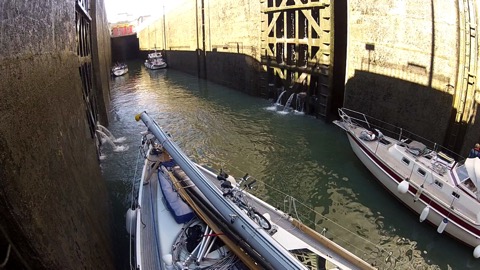
Beam - Our beam is 4.2 meters and the limit is 5 meters. But lock chambers are just 5 meters wide so your beam must include the width of your fenders. For us that meant we had less than 20cm clearance on each side as we came in to the locks. Thats less than a foot. So for boats more than 4.5 meters wide you will need a good fender strategy that isn’t very wide to fit in the locks. Our fender system worked very will. I highly recommend you think carefully on the fender system. With a good strategy we never worried about the narrow locks and bridges. If we jostled the lock wall our boards just bounced us safely away. And once settled in the lock chamber our width meant we almost didn’t need to tie up in the chamber - we were a tight fit and just sat there (same as the big peniches)
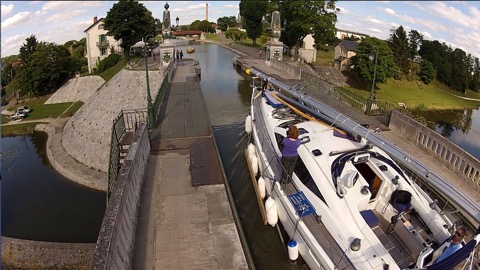
Fender Board
I believe our large fender board was the secret to a stress free passage (nearly stress free:-) and here are few hints.
Keep it low for the many locks that raise the boat up to there is just a few inches of wall remaining. Our boats was 12 inches tall and could be hung right down so it nearly drags in the water. Bevel the edges and front so it doesn’t get caught on the walls. Make sure the lines attached do not go on the outside or they will wear through. Tie a line to the front of the board that runs forward so the board won’t be swung back when you rub along the walls. We bought 8 more fender before the trip and it was cheap insurance. No scratches after the trip!
Bow thruster
Having a bow thruster was a great advantage.
We used it quite a lot and it again reduced stress. We even used it in the locks sometimes to centre the boat when currents swung us around. Take a spare fuse for the thruster too.
Height
The canals have different restrictions on height. For the Canal Briare/ Loire/ Centre that we took the restriction is 3.5 meters of “air Draft” If you don’t know your exact height you must figure it out precisely before starting. We measured our height with the mast on deck at 3.1 meters so had plenty of clearance. If you are 3.4 or greater you might need to take something down?
Carrying the Mast?
We carried our mast because it is too long to be transported by road in France. However if your mast is less than 18 meters long it can be trucked to meet you. Then the boat is easier to manage, shorter and tidier. Worth a thought!
Shortcut?
Some people look at the route from the North Sea down to the Med as a shortcut. If you have a powerboat that might not be up to crossing the Bay of Biscay, then this is a reasonable idea. But for a well-found sailboat that could do the passage around then it is not really much of a shortcut since you have to deal with the mast and the locks take quite a while.
But , if like us, you are interested in seeing France from the deck of your own boat, the French Canals are an unforgettable adventure and wonderful way to see this romantic and beautiful nation.
Suitable boats
Draft - We have seen a variety of craft in the canals but some were having less fun than others... If you have a boat that draws more than 1.8 meters than you should not even consider the trip. If your boat draws between 1.6 and 1.8 then you should be prepared to run a ground a fair bit. Boats drawing less than 1.6 will be safe. we draw less than 1 meter but swing the keel down to 1.6 for most of the trip as a safety valve. We very rarely touched bottom when staying in the proper channel, but when passing other craft we had to more to the side of the channel and were glad we drew less than 1.8.
Beam - Our beam is 4.2 meters and the limit is 5 meters. But lock chambers are just 5 meters wide so your beam must include the width of your fenders. For us that meant we had less than 20cm clearance on each side as we came in to the locks. Thats less than a foot. So for boats more than 4.5 meters wide you will need a good fender strategy that isn’t very wide to fit in the locks. Our fender system worked very will. I highly recommend you think carefully on the fender system. With a good strategy we never worried about the narrow locks and bridges. If we jostled the lock wall our boards just bounced us safely away. And once settled in the lock chamber our width meant we almost didn’t need to tie up in the chamber - we were a tight fit and just sat there (same as the big peniches)
Fender Board
I believe our large fender board was the secret to a stress free passage (nearly stress free:-) and here are few hints.
Keep it low for the many locks that raise the boat up to there is just a few inches of wall remaining. Our boats was 12 inches tall and could be hung right down so it nearly drags in the water. Bevel the edges and front so it doesn’t get caught on the walls. Make sure the lines attached do not go on the outside or they will wear through. Tie a line to the front of the board that runs forward so the board won’t be swung back when you rub along the walls. We bought 8 more fender before the trip and it was cheap insurance. No scratches after the trip!
Bow thruster
Having a bow thruster was a great advantage.
We used it quite a lot and it again reduced stress. We even used it in the locks sometimes to centre the boat when currents swung us around. Take a spare fuse for the thruster too.
Height
The canals have different restrictions on height. For the Canal Briare/ Loire/ Centre that we took the restriction is 3.5 meters of “air Draft” If you don’t know your exact height you must figure it out precisely before starting. We measured our height with the mast on deck at 3.1 meters so had plenty of clearance. If you are 3.4 or greater you might need to take something down?
Carrying the Mast?
We carried our mast because it is too long to be transported by road in France. However if your mast is less than 18 meters long it can be trucked to meet you. Then the boat is easier to manage, shorter and tidier. Worth a thought!
Shortcut?
Some people look at the route from the North Sea down to the Med as a shortcut. If you have a powerboat that might not be up to crossing the Bay of Biscay, then this is a reasonable idea. But for a well-found sailboat that could do the passage around then it is not really much of a shortcut since you have to deal with the mast and the locks take quite a while.
But , if like us, you are interested in seeing France from the deck of your own boat, the French Canals are an unforgettable adventure and wonderful way to see this romantic and beautiful nation.
Canals - Fender strategies
The French Canals are a destination we have wanted to cruise for many years. Five thousand miles of canals criss-cross the country and also connect to Belgium, Holland, Germany and beyond. Altogether you have thousands of miles to explore and many years worth of cruising in the European waterways. For us we have planned a 3 month excursion crossing France - a leisurely journey with plenty of time to stop and sample the wines, cheeses and pretty french villages.
Canal System
Some of the canals we will travel on were built 400 years ago, and most were designed for barges up to 5.2 meters wide by 1.8 meters deep and 38 meters long. The barges are big and square and just fit into the locks - no room for niceties like fenders. For the modern yacht that doesn’t want to scratch her topsides we will need a system to work safely through the locks. Distant Shores II is 4.2 meters wide so we will have just 0.4 meter on either side including fenders. If your boat is square and made of steel then you may not need any of this!!
Design Criteria
- entering the lock - approaching a lock we will be moving slowly and trying not to hit either side so we will need fenders that allow us to nudge the side of the lock and not slide up out of the way. Some people have used a huge rope hung like a belt around the wides point (generally the gunwales). We have opted for fender boards hung down outside the fenders to absorb friction of the walls and protect the fenders. We tie the board with a forward line as well so it won’t swing back if we scrape the wall moving in the lock.
- rising up or going down in the locks - going up in locks is usually rougher since the turbulence of the incoming water can push the boat around. Most sailboats have narrow bows and sterns so need to have some large fenders near the corners to protect against the bow or stern hitting the lock. The huge “tear-drop” fenders work well for this and also for powerboats wishing to protect their flared bows.
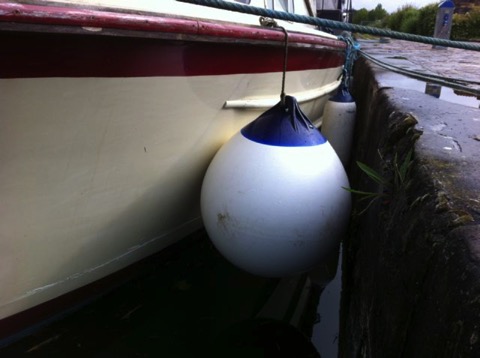
- low lock walls - some locks tend to fill up quite high so there isn’t much wall left at the top of the lift. In this case there might be just a few inches left of lock wall and fenders may all pop out. So it is important to be ready with some protection down near the water line.
Here is our current version of the system (Version 3.3?)
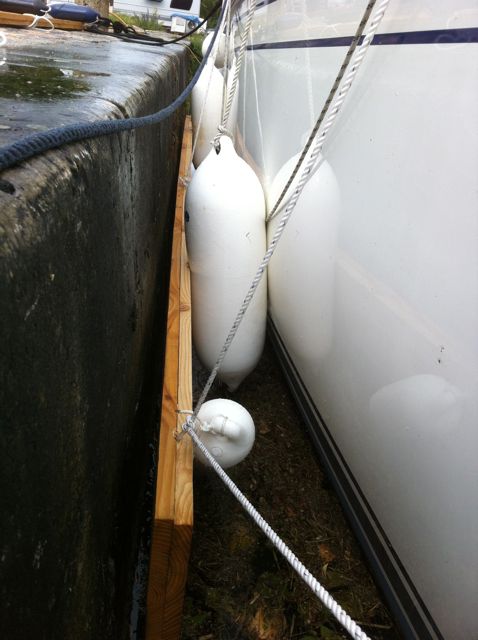
Fender Board Notes
In the upper picture you can see the support line holding the board up and the line going forward to stop is swinging back when we rub the lock wall on the way on and out of the lock. Some people use this same system for holding a bunch of fenders. One line from the bow down to the bottom of the first fender and then running aft tethering each fender to they don’t swing back.
Fender boards will scrape along the rough lock walls. It is important that lines tying the boards must not be on the outside of the board or they will quickly chafe through. There are various solutions to this. I made our 2 inch thick board from 2 times 1inch boards. I drilled holes through the inner board for the lines and attached the outer board to that with screws and glue. There will be a considerable wearing down of the outer board by the time we are through the locks.
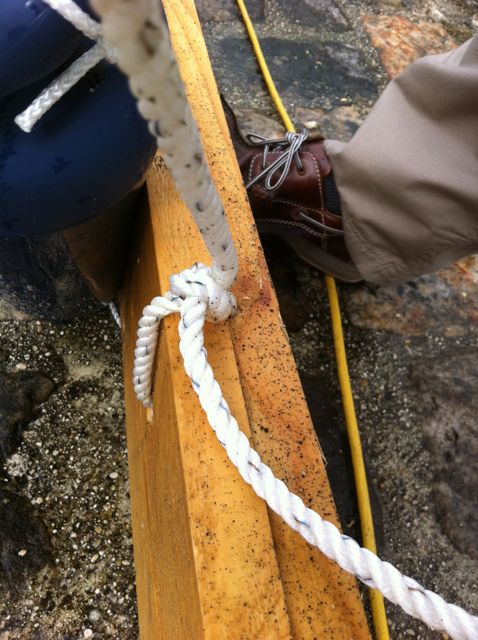
Canal System
Some of the canals we will travel on were built 400 years ago, and most were designed for barges up to 5.2 meters wide by 1.8 meters deep and 38 meters long. The barges are big and square and just fit into the locks - no room for niceties like fenders. For the modern yacht that doesn’t want to scratch her topsides we will need a system to work safely through the locks. Distant Shores II is 4.2 meters wide so we will have just 0.4 meter on either side including fenders. If your boat is square and made of steel then you may not need any of this!!
Design Criteria
- entering the lock - approaching a lock we will be moving slowly and trying not to hit either side so we will need fenders that allow us to nudge the side of the lock and not slide up out of the way. Some people have used a huge rope hung like a belt around the wides point (generally the gunwales). We have opted for fender boards hung down outside the fenders to absorb friction of the walls and protect the fenders. We tie the board with a forward line as well so it won’t swing back if we scrape the wall moving in the lock.
- rising up or going down in the locks - going up in locks is usually rougher since the turbulence of the incoming water can push the boat around. Most sailboats have narrow bows and sterns so need to have some large fenders near the corners to protect against the bow or stern hitting the lock. The huge “tear-drop” fenders work well for this and also for powerboats wishing to protect their flared bows.
- low lock walls - some locks tend to fill up quite high so there isn’t much wall left at the top of the lift. In this case there might be just a few inches left of lock wall and fenders may all pop out. So it is important to be ready with some protection down near the water line.
Here is our current version of the system (Version 3.3?)
- a 4 meter fender board (each side) that is a foot high (13 feet long X 12 inches high and 2 inches thick). Small fenders attached to the board as a backup in case the main fenders slide out. A forward line to keep it in place as we move along the lock wall.
- low “swimming” fender boards as a last defence against very low lock walls if the lock is overfilled and our fenders pop out
- large fenders at bow and stern to protect in the event of the bow or stern swinging in to the wall
Fender Board Notes
In the upper picture you can see the support line holding the board up and the line going forward to stop is swinging back when we rub the lock wall on the way on and out of the lock. Some people use this same system for holding a bunch of fenders. One line from the bow down to the bottom of the first fender and then running aft tethering each fender to they don’t swing back.
Fender boards will scrape along the rough lock walls. It is important that lines tying the boards must not be on the outside of the board or they will quickly chafe through. There are various solutions to this. I made our 2 inch thick board from 2 times 1inch boards. I drilled holes through the inner board for the lines and attached the outer board to that with screws and glue. There will be a considerable wearing down of the outer board by the time we are through the locks.
Mast down - hints & tips
This was the first time to take down the mast on Distant Shores II. Taking the mast down is biggish job but we have done it 3 times before on Distant Shores 1 - similar size and fittings, and also on Two-Step (6 times). We spent two days removing sails, building the horses and pulling out halyards etc.
Here are a few hints to happier “de-masting”
Plan and prep - carrying the mast on deck. I did a scale drawing to plan out the mast horses in advance since we would have to pass under a clearance of 3 meters. I used the drawing to plan how much lumber to buy. The drawing shows I will have to fold the dodger (sprayhood) down to clear the mast. The yellow box from the waterline is for a clearance of 3.1 meters. Different canals have different clearances. We need to clear 2.9 for the Nivernais so I don’t think we will take that route!
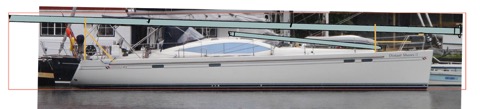

Unrigging the mast - make notes and take pix so you can rerig it all. It makes sense now but will I remember which line went in which block when we come to put it back up?
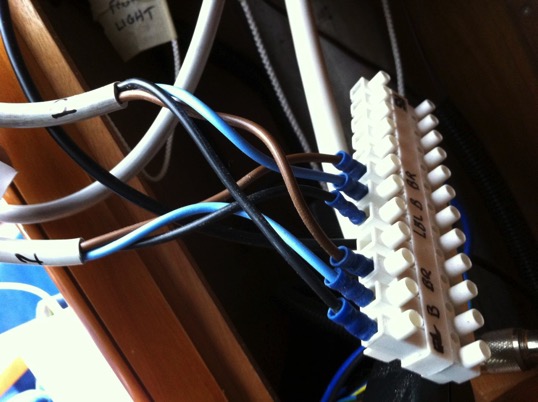
Wiring - remember to disconnect wires that come out of the mast - in our case VHF antenna, radar, lights and wind instrument. Label and photograph connectors to help with reassembly. I put the “1” and “2” labels on the identical grey wires with Sharpie” permanent marker.
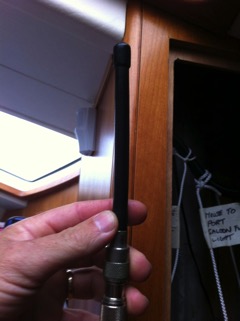
VHF - with the mast down we loose our VHF radio - we carry a small “rubber ducky” VHF antenna which can be connected where the mast feed is disconnected. Now our VHF and even our AIS works so we can use our radio to talk to locks etc. Note our AIS is the Raymarine unit that multiplexes the signal from the masthead. So the one little rubber duck will do both and we see ships coming on our AIS.
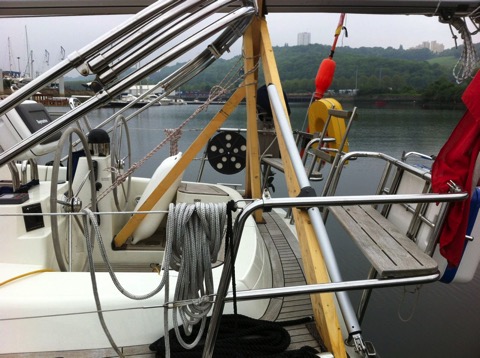
Main support aft - I have made this one as a tripod so it also supports the mast for-and-aft. This is very important as we don’t want the mast to start sliding when we cross a wake.
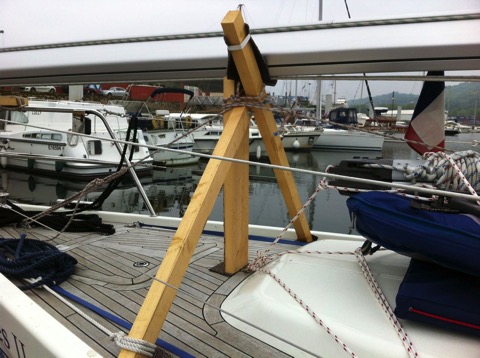
Forward support - ours holds about 45% of the weight with a cross to stop it tipping and most weight supported on the centre post.
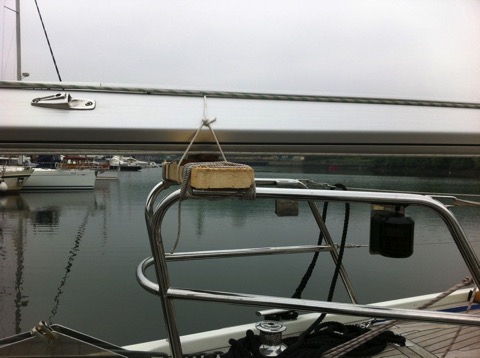
Block to support front of mast at bow. This will be lashed better to also help support against the mast moving for and aft.
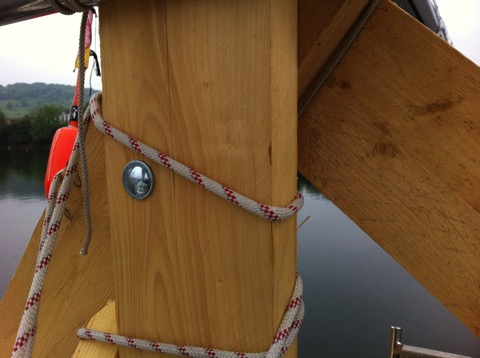
Over-engineer - we don’t want this falling down - I have used a heavy 2by6 lumber (50mm X 150mm) for main supports and 50X100 or smaller ones (2 by 4 inches)
Its is bolted together with heavy 10mm carriage bolts and oversize washers to attach the timbers. There is another bolt hidden that connects the 2 cross members.
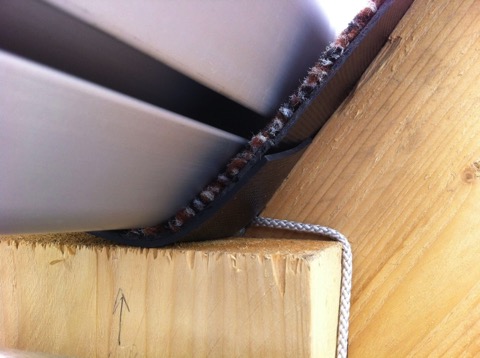
Carpet or rubber to protect the mast and deck. It also spreads the load to timbers and also where the stands rest on deck.
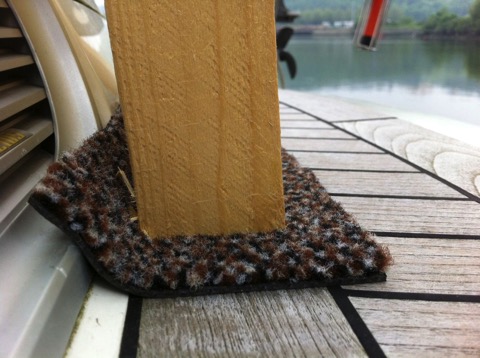
This is from a doormat that was rubber and carpet together. Most people use carpet scraps but we didn’t have any.
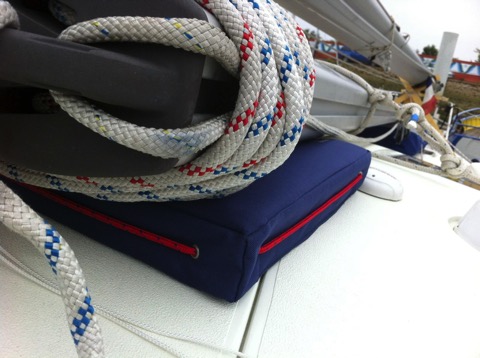
Boom lying on deck - we used a cushion to spread the load and protect the fibreglass.
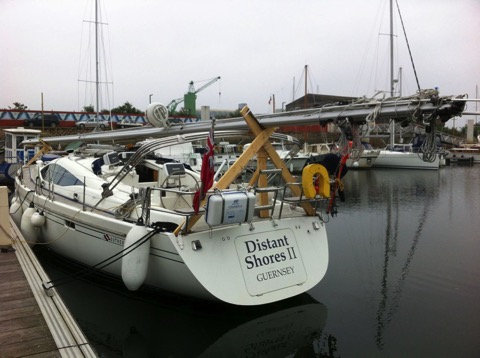
We planned to have the mast hang over the stern by 2.5 meters. This way I see it easily while manoeuvring from the helm. The bow hangs over by less than a meter so it is easy to judge. It was tougher with Two-Step which had a keel-stepped mast - so the overhang was more than our deck-stepped mast.
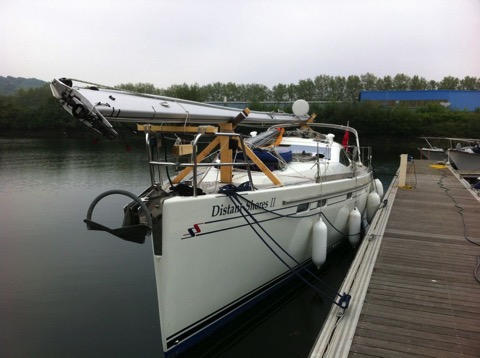
Another advantage of a small bow overhang is we can come in bows-to and not block the dock.

Here are a few hints to happier “de-masting”
Plan and prep - carrying the mast on deck. I did a scale drawing to plan out the mast horses in advance since we would have to pass under a clearance of 3 meters. I used the drawing to plan how much lumber to buy. The drawing shows I will have to fold the dodger (sprayhood) down to clear the mast. The yellow box from the waterline is for a clearance of 3.1 meters. Different canals have different clearances. We need to clear 2.9 for the Nivernais so I don’t think we will take that route!
Unrigging the mast - make notes and take pix so you can rerig it all. It makes sense now but will I remember which line went in which block when we come to put it back up?
Wiring - remember to disconnect wires that come out of the mast - in our case VHF antenna, radar, lights and wind instrument. Label and photograph connectors to help with reassembly. I put the “1” and “2” labels on the identical grey wires with Sharpie” permanent marker.
VHF - with the mast down we loose our VHF radio - we carry a small “rubber ducky” VHF antenna which can be connected where the mast feed is disconnected. Now our VHF and even our AIS works so we can use our radio to talk to locks etc. Note our AIS is the Raymarine unit that multiplexes the signal from the masthead. So the one little rubber duck will do both and we see ships coming on our AIS.
Main support aft - I have made this one as a tripod so it also supports the mast for-and-aft. This is very important as we don’t want the mast to start sliding when we cross a wake.
Forward support - ours holds about 45% of the weight with a cross to stop it tipping and most weight supported on the centre post.
Block to support front of mast at bow. This will be lashed better to also help support against the mast moving for and aft.
Over-engineer - we don’t want this falling down - I have used a heavy 2by6 lumber (50mm X 150mm) for main supports and 50X100 or smaller ones (2 by 4 inches)
Its is bolted together with heavy 10mm carriage bolts and oversize washers to attach the timbers. There is another bolt hidden that connects the 2 cross members.
Carpet or rubber to protect the mast and deck. It also spreads the load to timbers and also where the stands rest on deck.
This is from a doormat that was rubber and carpet together. Most people use carpet scraps but we didn’t have any.
Boom lying on deck - we used a cushion to spread the load and protect the fibreglass.
We planned to have the mast hang over the stern by 2.5 meters. This way I see it easily while manoeuvring from the helm. The bow hangs over by less than a meter so it is easy to judge. It was tougher with Two-Step which had a keel-stepped mast - so the overhang was more than our deck-stepped mast.
Another advantage of a small bow overhang is we can come in bows-to and not block the dock.
Preparing for Canals
Bonjour toutes mes amis
Sheryl and I are back on board Distant Shores II in England getting ready for the French Canals.
We have planned 3 months for this trip but have been dreaming about it for more than 15 years! It always sounded very romantic to cross France by boat, and when I learned you could go right into the centre of Paris, I knew we would do it someday. But back then we owned Two-Step and she is too deep to manage the canals at 6 feet. The Canal de Midi route has a maximum draft of around 1.5 meters and the various Paris/Med routes have a limit of 1.8 meters. Two-Step drew over 1.8 so would not be allowed in. Bummer! This was where we first started seriously considering a shallow draft boat! Now we are coming to finally tackle the canals - our draft is less than 1 meter!
Taking a Sailboat in the canals
First we must deal with the mast. There are not many canals that allow for sailboats to transit with the mast up. We did a few of these routes the past two years.
Gota Canal in Sweden (Season 7 - episode 10,11)
Kiel Canal to the Baltic in Germany (Season 7 - episode 6)
Dutch Staandemastroute - Standing Mast route through Holland (Season 7- episode 12)
Crinan Canal - Season 8 episode 3
Caledonian Canal - Season 8 episode 4
These canals all allow a sailboat with mast height less than 21 meters. But crossing France we must take the mast down.
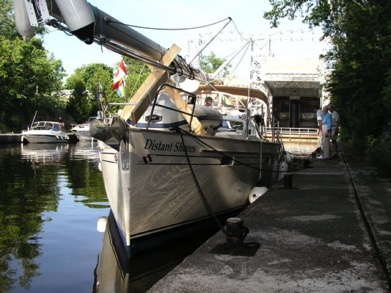 Mast on Deck?
In the past we have done the Erie Canal in the USA and Canada’s Trent Severn Waterway carrying the mast on deck. French canals have a maximum “air draft” of less than 3.5 meters so we would have to carry the mast lower than we have in the past. The alternative in France is to use a mast service to transport the mast. It will be waiting when you arrive at the end. The advantage is not banging your head in it for the 2-3 months of canalling, plus not dealing with the “overhang” since the masts of most sailboats are longer than the hull.
Fendering - Protection
I am currently working on the fendering system. We normally use a fender board hung outside a pair of fenders to protect against rough lock walls. With this extended canal cruise I am adding even more fenders and plan 3 more fender boards so we have 2 each side. I will post again when we have this system set up finally.
Miscellaneous
Other considerations include preparing for a trip as a motorboat. So carry engine spares, lots of fuel and possibly jerry cans if you can’t get the boat to a fuel dock. Practice clearing the intake water filter since there will be more debris/grass/weed than normal. Carry extra impeller for the same reason.
Charts and guide books etc ... more in the next blog...
Sheryl and I are back on board Distant Shores II in England getting ready for the French Canals.
We have planned 3 months for this trip but have been dreaming about it for more than 15 years! It always sounded very romantic to cross France by boat, and when I learned you could go right into the centre of Paris, I knew we would do it someday. But back then we owned Two-Step and she is too deep to manage the canals at 6 feet. The Canal de Midi route has a maximum draft of around 1.5 meters and the various Paris/Med routes have a limit of 1.8 meters. Two-Step drew over 1.8 so would not be allowed in. Bummer! This was where we first started seriously considering a shallow draft boat! Now we are coming to finally tackle the canals - our draft is less than 1 meter!
Taking a Sailboat in the canals
First we must deal with the mast. There are not many canals that allow for sailboats to transit with the mast up. We did a few of these routes the past two years.
Gota Canal in Sweden (Season 7 - episode 10,11)
Kiel Canal to the Baltic in Germany (Season 7 - episode 6)
Dutch Staandemastroute - Standing Mast route through Holland (Season 7- episode 12)
Crinan Canal - Season 8 episode 3
Caledonian Canal - Season 8 episode 4
These canals all allow a sailboat with mast height less than 21 meters. But crossing France we must take the mast down.
In the past we have done the Erie Canal in the USA and Canada’s Trent Severn Waterway carrying the mast on deck. French canals have a maximum “air draft” of less than 3.5 meters so we would have to carry the mast lower than we have in the past. The alternative in France is to use a mast service to transport the mast. It will be waiting when you arrive at the end. The advantage is not banging your head in it for the 2-3 months of canalling, plus not dealing with the “overhang” since the masts of most sailboats are longer than the hull.
Fendering - Protection
I am currently working on the fendering system. We normally use a fender board hung outside a pair of fenders to protect against rough lock walls. With this extended canal cruise I am adding even more fenders and plan 3 more fender boards so we have 2 each side. I will post again when we have this system set up finally.
Miscellaneous
Other considerations include preparing for a trip as a motorboat. So carry engine spares, lots of fuel and possibly jerry cans if you can’t get the boat to a fuel dock. Practice clearing the intake water filter since there will be more debris/grass/weed than normal. Carry extra impeller for the same reason.
Charts and guide books etc ... more in the next blog...
Solar Power Onboard?
03/02/12 06:48 Filed in: Electrical | Outfitting
Looking forward to the next cruising season I am investigating whether we could add solar power to Distant Shores.
 We had two 55-watt panels on Two-Step and it was excellent to see power coming in from the sun as we hung at anchor. The two panels were mounted on the spray dodger and in full sun could put out 6-7 amps. Of course I had to swing the boom out to one side since any shade cut out put dramatically. I think on a nice sunny day we might have got 30-35 amps total. This is much less than you might hope but we couldn’t aim the panels and shade did come on them often as the boat swung on the hook.
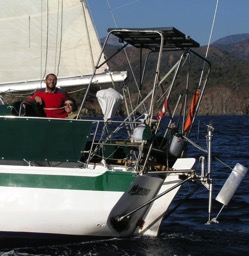 To obtain higher efficiency a number of boats have solar panels mounted on some construction at the stern such as our friends on Narena sailing here off the south coast of Turkey. I have started playing with some sketches to see if we could build some sort of stern arch for Distant Shores II but so far haven’t got anything to work yet.
Solar Power - How Much do you need?
The modern boat has got more electrical appliances on than the cruising sailboat of 20 years ago. We all have our i-devices, computers, watermaker, navigation system etc. Some have air-con, washer/dryer vacuum cleaner etc. So although we have big electrical savings in things like LED lighting, the boat overall uses much more than before. So how much can solar power do? Could you ever really run the whole boat from solar power?
With Two-Step’s 2 X 55 Watt panels we just extended the time between running the engine to charge up the battery. We would have needed perhaps 3 times as many panels to keep up with all demands - and that assumed a sunny tropical day.
So the first thing to do is re-examine that electrical budget and make sure it is accurate. Is there anything to be gained (such as changing over any lighting that isn’t LED or fluorescent)?
On Distant Shores our electrical consumption worked out at over 200 amp-hours per day. Distant Shores II is similar but with 2 main differences. We have the same fridge/freezer unit with keel-cooler but also have an additional freezer unit. We also have the excellent Imtra LED lighting throughout. So while we have saved quite a bit in power through the lighting, we have used a fair bit extra with the additional freezer. And our experience with DSII has been sailing in cool northern summers. So when we get to warm tropical waters the freezer will use more than it does now. Just how much we don’t know... but we might be looking at over 250 amp hours per day. That’s a lot to get from solar panels!
I will do more on this in the next little while and post more.
How about you? Are you looking at Solar power? Do you have a working solar installation that is providing what your boat needs? Please give me your comments either by email or over on our Facebook page.
Is Sheryl pondering a new solar panel arch?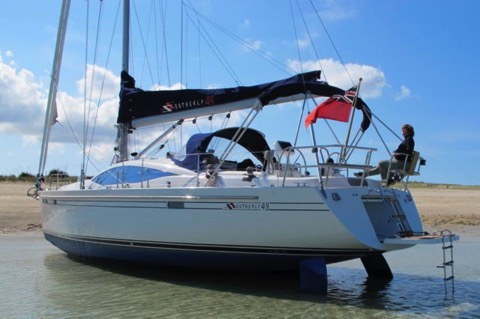