When the cats away... plumbing!
26/08/13 09:56
When the Cats Away... the mice will do plumbing projects!
I am missing Sheryl as she has flown home for a couple of weeks...
However this also means I can get to a couple of the more disruptive boat jobs. And one of the most disruptive jobs is servicing the heads (that’s toilets and plumbing in land-speak). Not only does plumbing mean I have to open up floorboards and various lockers, find the spare parts and generally make a mess, it also means a certain amount of cursing and blue language as I run into unforeseen problems.
What plumbing job doesn’t involve unforeseen problems? Well we do try our best to foresee difficulties and plan the needed parts.
Todays job involved overhauling the macerator pump...
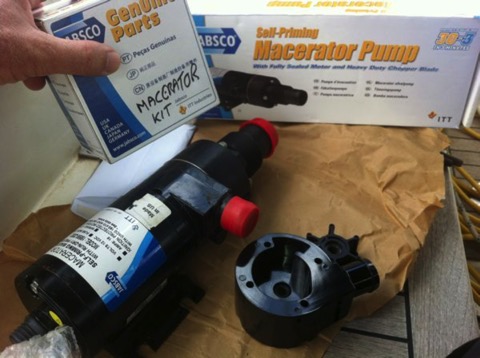
- spare parts kit for the macerator
- spare macerator
- wiring connectors to wire the new pump in (shown below installed with red shrink tube)
Why have a spare macerator if I also have a spares kit? Well my plan was to be able to quickly disconnect the pipes to the macerator, then just swap in the brand new pump. I have rebuilt these pumps before and I know it will take an hour or so. The plan was to be able to do that rebuild later at my leisure, and put the rebuilt pump back in my spares locker.
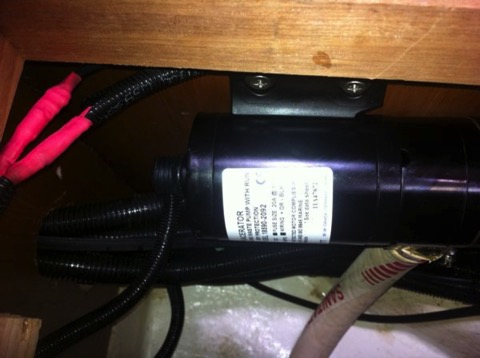
It was just as well. The swap went quickly, I added the wiring quick-connectors on the new pump, took out the old pump, fitted the hoses in place and the swap was done in just a few minutes with minimum cursing.
Then I surfaced for air and took the old pump out on deck to rebuild it....
Oops, opening up the old pump I see it has 2 broken bolts in it (out of 4). There are two shorter bolts and 2 longer bolts that hold the motor to the pump assembly. One of those 2 longer bolts is broken, and the spare kit just gives you the 2 shorter bolts. I should have know this since I have used this same pump on Two-Step for years, and those bolts are the main weakness of this pump. Anyway, no excuses, today I pop around to Island Water World to see if they have the bolt studs. Then I can finish the pump rebuild and put it back in my spares kit.
Thank goodness I had the whole spare pump otherwise it would have left an unpleasant mess until the parts could be sorted out.
When the cats away the mice will play (with plumbing parts!)
Comments
Spare Parts - If you Bring Your Umbrella...
16/05/13 08:10
It always seemed to me if I actually did remember to bring my umbrella it wouldn’t rain... but if I forgot it then it would rain for sure!
It sometimes seems to be the same with spare parts on a cruising sailboat. Try to bring along the spares you think you might need and it’s actually something else you find broken.
Electric Heads
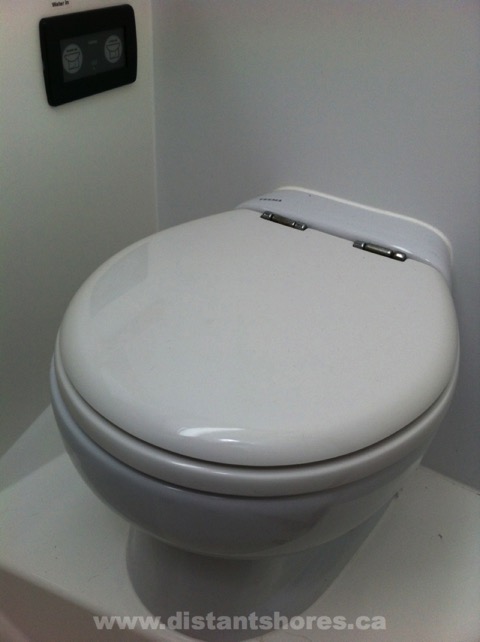
I know... many people "poo-poo" electric heads (warning.... there may be more head-related humour within) but we have been having a very positive experience with our Tecma electric heads on Distant Shores II. I cannot speak for other electric heads, but I have admired the simple design, solid workmanship and easy operation. And so far they have been reliable... right up until a few days ago when I began to suspect something was up with the aft heads.
Everything looked fine, and sounded fine when the button was pushed... however, something smelled funny...
I quick check of the bilge revealed the worst. A leak from the heads, and it wasn’t pretty.
Rather than start disassembling immediately I dove into the parts locker to find all the parts I had bought for these heads. Since I had not owned a Tecma until we bought this boat, a Southerly 49, (3 years ago) I hadn’t known what might need fixing. So I basically bought one of everything as a spare part.
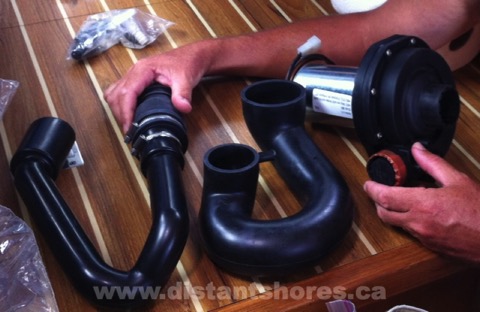
On the right is the large and heavy-duty macerator pump that sits in the bottom of the toilet. On the top of the picture (in a small bag) is the water injector fitting and a few other gaskets etc. Then there are the two very creatively shaped hoses that move the content/effluent/poo around. Note that all this actually fits inside the body of the toilet. Cunning engineering! In fact the design of this toilet is very beautifully shown here in what must be the sexiest toilet video ever made...
Anyway, here I am admiring the large pile of expensive spare parts, confident that one of these hoses was likely to be the odiferous cause of my woes, and proud that I had the parts.

Besides, playing with nice clean spare parts beats playing in the ....
So, time to roll up the sleeves and get to work. I will gloss over the first part of the project where I had to bail out the bilge, rinse it down and sterilize all... anyway that was done with no more than a smattering of "poo-jokes" some swearing and a nice long shower afterwards. There certainly was an incremental (or excremental?) increase in toilet references during this whole procedure :-)
Now to get to the actual repair. At this point I seem to have lost my enthusiasm for photography and did not record any more pictures.
1) Detach toilet - this entailed cutting the silicone sealing the whole unit in place, and removing the 4 screws holding it down.
2) Carefully lift toilet up - extra long hoses allow it to come up somewhat until you can undo the hose clamps
3) Disconnect hoses - I removed the saltwater intake hose, but the outflow hose had already come off!!
Problem Found. the hose clamp was not tightened down enough and the outflow fitting has slipped right out.
Result - direct discharge into the bilge whenever the toilet was operated! Yikes!!
Solution - re-assemble and tighten to insure the fitting doesn’t come off again!
During the disassembly procedure I carefully inspected all the hoses and the macerator. All appeared to be in top shape. No sign of age or any problems, so I did not actually need any of the spare parts.
Looking for the "silver-lining" in a generally "s__t" day, I can say it felt good to start the project knowing I had all the parts that could possibly be needed. I would not be faced with a long delay trying to get spare parts to get the head back in action.
Just like carrying an umbrella and not worrying that it might rain.
It sometimes seems to be the same with spare parts on a cruising sailboat. Try to bring along the spares you think you might need and it’s actually something else you find broken.
Electric Heads
I know... many people "poo-poo" electric heads (warning.... there may be more head-related humour within) but we have been having a very positive experience with our Tecma electric heads on Distant Shores II. I cannot speak for other electric heads, but I have admired the simple design, solid workmanship and easy operation. And so far they have been reliable... right up until a few days ago when I began to suspect something was up with the aft heads.
Everything looked fine, and sounded fine when the button was pushed... however, something smelled funny...
I quick check of the bilge revealed the worst. A leak from the heads, and it wasn’t pretty.
Rather than start disassembling immediately I dove into the parts locker to find all the parts I had bought for these heads. Since I had not owned a Tecma until we bought this boat, a Southerly 49, (3 years ago) I hadn’t known what might need fixing. So I basically bought one of everything as a spare part.
On the right is the large and heavy-duty macerator pump that sits in the bottom of the toilet. On the top of the picture (in a small bag) is the water injector fitting and a few other gaskets etc. Then there are the two very creatively shaped hoses that move the content/effluent/poo around. Note that all this actually fits inside the body of the toilet. Cunning engineering! In fact the design of this toilet is very beautifully shown here in what must be the sexiest toilet video ever made...
Anyway, here I am admiring the large pile of expensive spare parts, confident that one of these hoses was likely to be the odiferous cause of my woes, and proud that I had the parts.
Besides, playing with nice clean spare parts beats playing in the ....
So, time to roll up the sleeves and get to work. I will gloss over the first part of the project where I had to bail out the bilge, rinse it down and sterilize all... anyway that was done with no more than a smattering of "poo-jokes" some swearing and a nice long shower afterwards. There certainly was an incremental (or excremental?) increase in toilet references during this whole procedure :-)
Now to get to the actual repair. At this point I seem to have lost my enthusiasm for photography and did not record any more pictures.
1) Detach toilet - this entailed cutting the silicone sealing the whole unit in place, and removing the 4 screws holding it down.
2) Carefully lift toilet up - extra long hoses allow it to come up somewhat until you can undo the hose clamps
3) Disconnect hoses - I removed the saltwater intake hose, but the outflow hose had already come off!!
Problem Found. the hose clamp was not tightened down enough and the outflow fitting has slipped right out.
Result - direct discharge into the bilge whenever the toilet was operated! Yikes!!
Solution - re-assemble and tighten to insure the fitting doesn’t come off again!
During the disassembly procedure I carefully inspected all the hoses and the macerator. All appeared to be in top shape. No sign of age or any problems, so I did not actually need any of the spare parts.
Looking for the "silver-lining" in a generally "s__t" day, I can say it felt good to start the project knowing I had all the parts that could possibly be needed. I would not be faced with a long delay trying to get spare parts to get the head back in action.
Just like carrying an umbrella and not worrying that it might rain.
Bilge Alarm!!
27/04/13 06:46
Are you sinking??
Every once in a while you hear a story like this...
A sailor on watch pops down to get a cup of tea and finds the floorboards awash.
Or...
Waking up in his bunk the sailor puts his foot out to find he is ankle deep in water...
Or...
A couple out on deck at night enjoying a romping sail start to feel the boat is a bit sluggish... they find the boat has taken on so much water they can’t trace the leak since everything is awash... the boat sinks and they abandon ship...
All of these stories are true but in most cases I believe they could have been prevented.
One of the most common causes of sinking is simply some sort of leak that went undetected until it was too late. A hose clamp fails, a hose bursts, a pump back-syphons, an anti-syphon valve sticks, a thruhull fitting cracks... you get the idea. Modern boats are somewhat complicated and many things COULD go wrong.
The main point is that many of these potential leaks is small and easy to deal with IF you know you have a problem. Unfortunately most boats do not let you know you have that problem! A beautiful little Rule Automatic bilge pump will deal with a certain amount of water coming in to the bilge. It will continue to try to keep up with the leak but it is so quiet that you will likely not hear it and never know you have a problem.
A bilge alarm can solve this! And for a VERY affordable price it is the cheapest insurance you can buy!!
Bilge Alarm Options
Broadly speaking there are two types of bilge alarm. Water detectors and bilge-pump alarms. One will detect water that is getting to a dangerous level. The second detects when you bilge pump has activated itself.
Water detector
Bilge alarms can be a simple water detector. It sounds an alarm if water is detected in the bilge. Then you have to decide how to install it. You could set this detector above the level of the automatic pump. This means basically to set a water detector so that it will sound when it gets up above the bilge pump. So in effect you wait until the bilge pump is overwhelmed and then sound an alarm. For very wet boats this might be the right solution but it does sound a bit scary...
Alternatively it can be set up to detect ANY water in the bilge by putting it below the level the bilge pump will activate. Then you will hear the alarm whenever water enters the bilge. It depends on the type of boat you have whether you might prefer this. Our first boat "Two-Step" had a very deep bilge and all water would drain to this small space where the bilge pumps were located. Pour 1 litre of water into the bilge anywhere and it would drain down to this bucket-sized bilge where it would set off this alarm.
Bilge Pump Alarm
Another option is to connect a loud alarm to let you know the bilge pump has been activated. This is my preferred solution and I have installed these alarms on all our boats. It is really quite simple and inexpensive - the ones I installed on Distant Shores II cost less than $4 each. What a DEAL for such super insurance!!
Here is how its done...
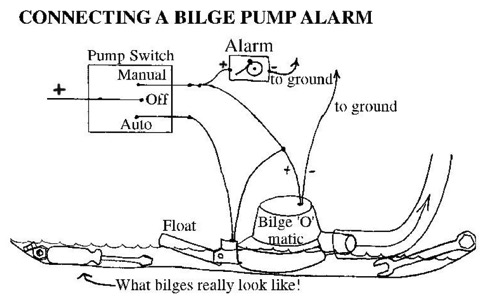
Basically all you have to do is connect a beeper or buzzer to the manual side of the typical bilge pump control. This means any time the pump has power then the alarm will sound.
Optional - I also added a switch to turn the alarm off again. In the event the bilge pump DOES come on and you are busy trying to find the leak, you might want to turn off the alarm. I installed the switch inline with the alarm. Easy and made the price more than $5 total!!
Every once in a while you hear a story like this...
A sailor on watch pops down to get a cup of tea and finds the floorboards awash.
Or...
Waking up in his bunk the sailor puts his foot out to find he is ankle deep in water...
Or...
A couple out on deck at night enjoying a romping sail start to feel the boat is a bit sluggish... they find the boat has taken on so much water they can’t trace the leak since everything is awash... the boat sinks and they abandon ship...
All of these stories are true but in most cases I believe they could have been prevented.
One of the most common causes of sinking is simply some sort of leak that went undetected until it was too late. A hose clamp fails, a hose bursts, a pump back-syphons, an anti-syphon valve sticks, a thruhull fitting cracks... you get the idea. Modern boats are somewhat complicated and many things COULD go wrong.
The main point is that many of these potential leaks is small and easy to deal with IF you know you have a problem. Unfortunately most boats do not let you know you have that problem! A beautiful little Rule Automatic bilge pump will deal with a certain amount of water coming in to the bilge. It will continue to try to keep up with the leak but it is so quiet that you will likely not hear it and never know you have a problem.
A bilge alarm can solve this! And for a VERY affordable price it is the cheapest insurance you can buy!!
Bilge Alarm Options
Broadly speaking there are two types of bilge alarm. Water detectors and bilge-pump alarms. One will detect water that is getting to a dangerous level. The second detects when you bilge pump has activated itself.
Water detector
Bilge alarms can be a simple water detector. It sounds an alarm if water is detected in the bilge. Then you have to decide how to install it. You could set this detector above the level of the automatic pump. This means basically to set a water detector so that it will sound when it gets up above the bilge pump. So in effect you wait until the bilge pump is overwhelmed and then sound an alarm. For very wet boats this might be the right solution but it does sound a bit scary...
Alternatively it can be set up to detect ANY water in the bilge by putting it below the level the bilge pump will activate. Then you will hear the alarm whenever water enters the bilge. It depends on the type of boat you have whether you might prefer this. Our first boat "Two-Step" had a very deep bilge and all water would drain to this small space where the bilge pumps were located. Pour 1 litre of water into the bilge anywhere and it would drain down to this bucket-sized bilge where it would set off this alarm.
Bilge Pump Alarm
Another option is to connect a loud alarm to let you know the bilge pump has been activated. This is my preferred solution and I have installed these alarms on all our boats. It is really quite simple and inexpensive - the ones I installed on Distant Shores II cost less than $4 each. What a DEAL for such super insurance!!
Here is how its done...
Basically all you have to do is connect a beeper or buzzer to the manual side of the typical bilge pump control. This means any time the pump has power then the alarm will sound.
Optional - I also added a switch to turn the alarm off again. In the event the bilge pump DOES come on and you are busy trying to find the leak, you might want to turn off the alarm. I installed the switch inline with the alarm. Easy and made the price more than $5 total!!
Equipment Roundup
30/11/10 08:03
Having the new boat has been a great opportunity to get that new gear I always thought would be a good idea. I thought I would do a round-up of the equipment now that we have had a year to try it out. So here goes... in no particular order
Electric heads - Tecma - they have been brilliant! No breakages and no servicing required yet. I had thoroughly disliked our Jabsco heads previously. They needed constant maintenance, required way too much pumping to operate and frequently seemed to malfunction. There had to be a better way and the Tecma electric head is perfect for us. I have ordered a spares kit for them (not cheap!) but it is well worth it. I know purists will suggest an electric toilet is somehow “not proper” but if all fails we always have a bucket...
Forced Air Heating System - Espar - Wonderful! Nothing beats coming down below to a toasty warm boat after a cold/wet sailing day. The Espar has just worked flawlessly. It does have a small and slightly bizarre control panel that does theoretically allow it to be turned on and off at preprogrammed intervals but we haven’t used that option. We just turn it on and set it for 1-3 hours as needed. Great!

Plotters - Raymarine’s new E90Wide X 2 units. These are the new touchscreen hybrids that have full control either with touch or buttons. The plotter is the heart of the boats navigation system and the E-wides are excellent. I really like the touch screen ability including a popup onscreen keyboard to name waypoints etc. These units also come with a huge number of built-in charts - another big savings over the old style. But adding the Navionics charts is great also since it gives you harbour info, tides and currents plus aerial shots of harbours if you don’t have a cruising guide. The picture above was shot leaving Amsterdam at night. The plotter up on deck working perfectly as usual. Bright enough to be easily read on the brightest day, it also goes right down for night use. With the radar and AIS overlaid we can see ships that might otherwise be hard to spot against the lights of the city.
 Electric winch - Lewmar conversion - This was a lifesaver! We sailed a couple of months then added the electric winch so we can compare before/after. The 49 means everything is 20-30% bigger and raising the mainsail was a tough slog. On the 42 I pulled the main up to just 1 meter from the masthead then put it on the winch. With the bigger 49-footer the same effort means I can pull it with 4-5 meters left to go. So I have to winch the sail 4-5 times as far. The electric winch handles it easily. It also meant we had no trouble going up the mast. Sheryl can easily pull me up and that meant we could get more shots from the masthead!! Depending on your boat, an electric winch could make sense. Even just adding one as I did could change your sailing a lot.
LED Lighting - Imtra - A revelation! Finally LED lighting that works and lasts! We can now afford to turn on any lights we light. On the darker winter days we can run all the lights we want. Using perhaps 1/4 the power of the old lights. The lights are designed from the ground up as LED lights rather than adding replacement bulbs to conventional fixtures. This means they can build in a nice heat sink for the power circuits. I am sure they will last for many years giving us a cozy well lit boat!
...
This is just the start... now I am rolling I want to go through more tomorrow - anchor, engine etc...
Electric heads - Tecma - they have been brilliant! No breakages and no servicing required yet. I had thoroughly disliked our Jabsco heads previously. They needed constant maintenance, required way too much pumping to operate and frequently seemed to malfunction. There had to be a better way and the Tecma electric head is perfect for us. I have ordered a spares kit for them (not cheap!) but it is well worth it. I know purists will suggest an electric toilet is somehow “not proper” but if all fails we always have a bucket...
Forced Air Heating System - Espar - Wonderful! Nothing beats coming down below to a toasty warm boat after a cold/wet sailing day. The Espar has just worked flawlessly. It does have a small and slightly bizarre control panel that does theoretically allow it to be turned on and off at preprogrammed intervals but we haven’t used that option. We just turn it on and set it for 1-3 hours as needed. Great!
Plotters - Raymarine’s new E90Wide X 2 units. These are the new touchscreen hybrids that have full control either with touch or buttons. The plotter is the heart of the boats navigation system and the E-wides are excellent. I really like the touch screen ability including a popup onscreen keyboard to name waypoints etc. These units also come with a huge number of built-in charts - another big savings over the old style. But adding the Navionics charts is great also since it gives you harbour info, tides and currents plus aerial shots of harbours if you don’t have a cruising guide. The picture above was shot leaving Amsterdam at night. The plotter up on deck working perfectly as usual. Bright enough to be easily read on the brightest day, it also goes right down for night use. With the radar and AIS overlaid we can see ships that might otherwise be hard to spot against the lights of the city.
LED Lighting - Imtra - A revelation! Finally LED lighting that works and lasts! We can now afford to turn on any lights we light. On the darker winter days we can run all the lights we want. Using perhaps 1/4 the power of the old lights. The lights are designed from the ground up as LED lights rather than adding replacement bulbs to conventional fixtures. This means they can build in a nice heat sink for the power circuits. I am sure they will last for many years giving us a cozy well lit boat!
...
This is just the start... now I am rolling I want to go through more tomorrow - anchor, engine etc...